¶ Requirements
- The deployment machine must run a recent version of Docker and Docker Compose. Note that a version of Docker Desktop already includes Docker-compose. However, we recommend installing the Docker Server Engine for Linux-based systems together with Docker Compose.
- The deployment machine must not use the ports
3030and8443. - Account credentials for the Station Registry. You can request your account by contacting us. For the BETTER Project, use this contact point.
- The downloaded und unpacked station deployment files stationdeploymentfiles.zip
- (Optional) SSL certificates if you want to secure your application with TLS.
¶ Station Onboarding
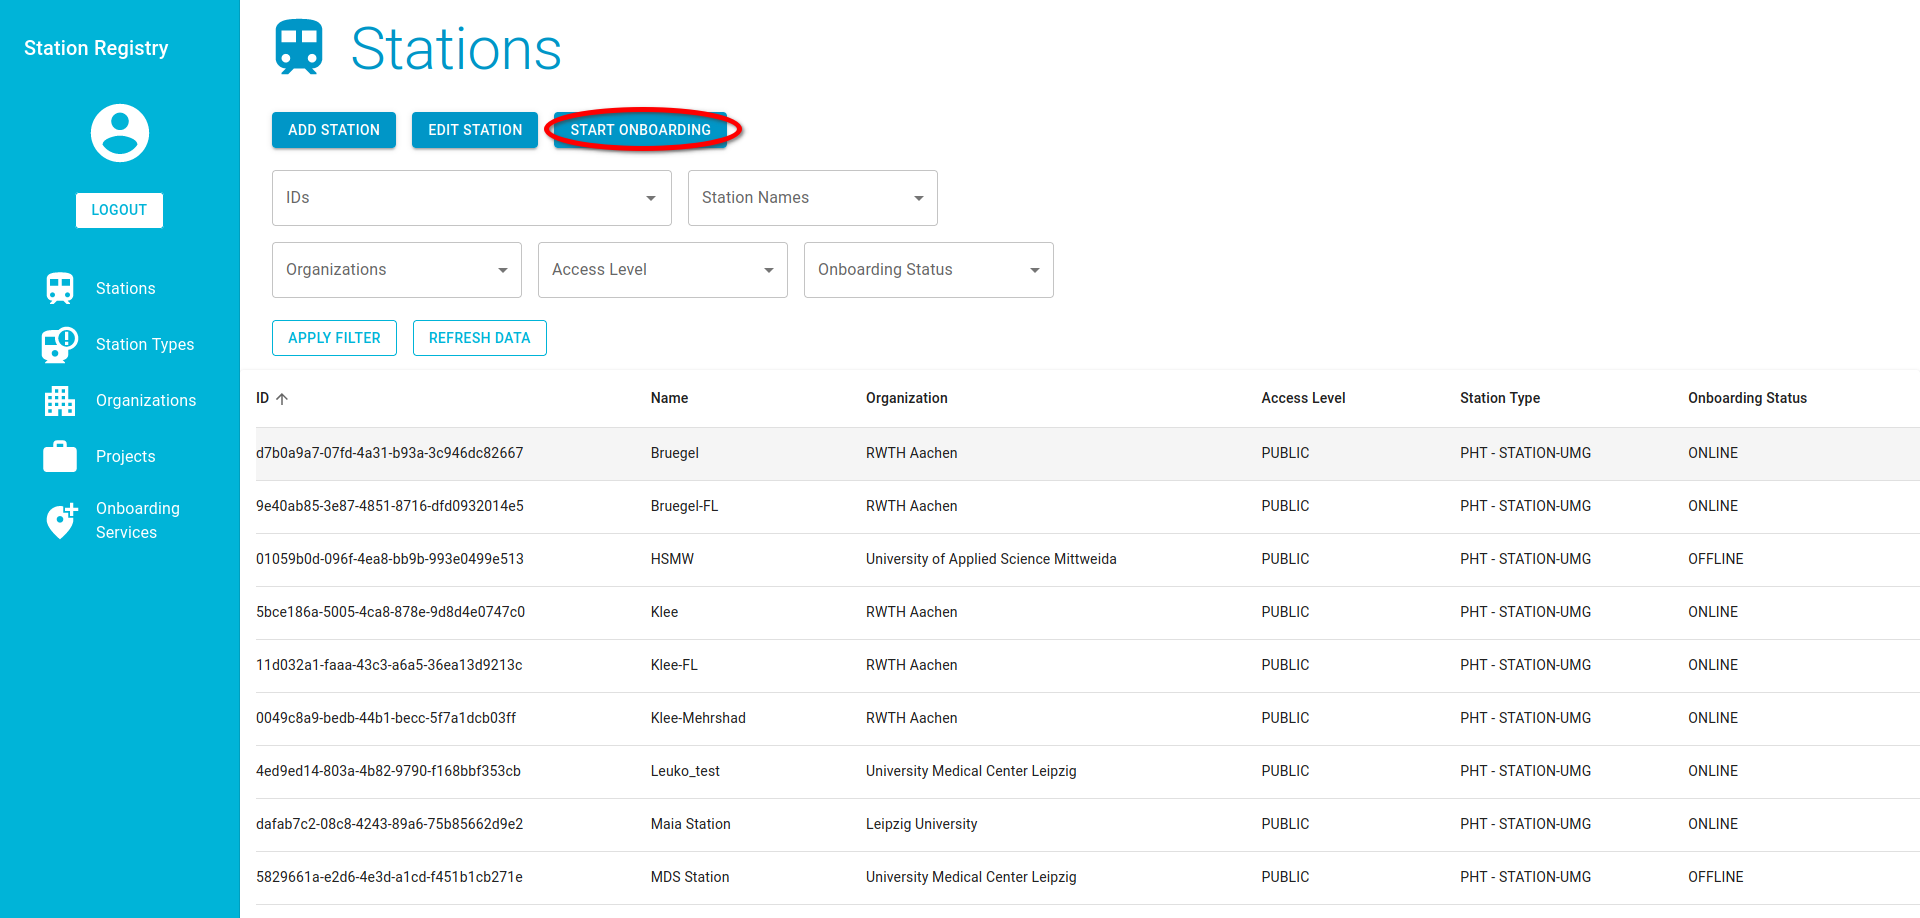
- Use your credentials to log in to the Station Registry and add a new Station as it is described here.
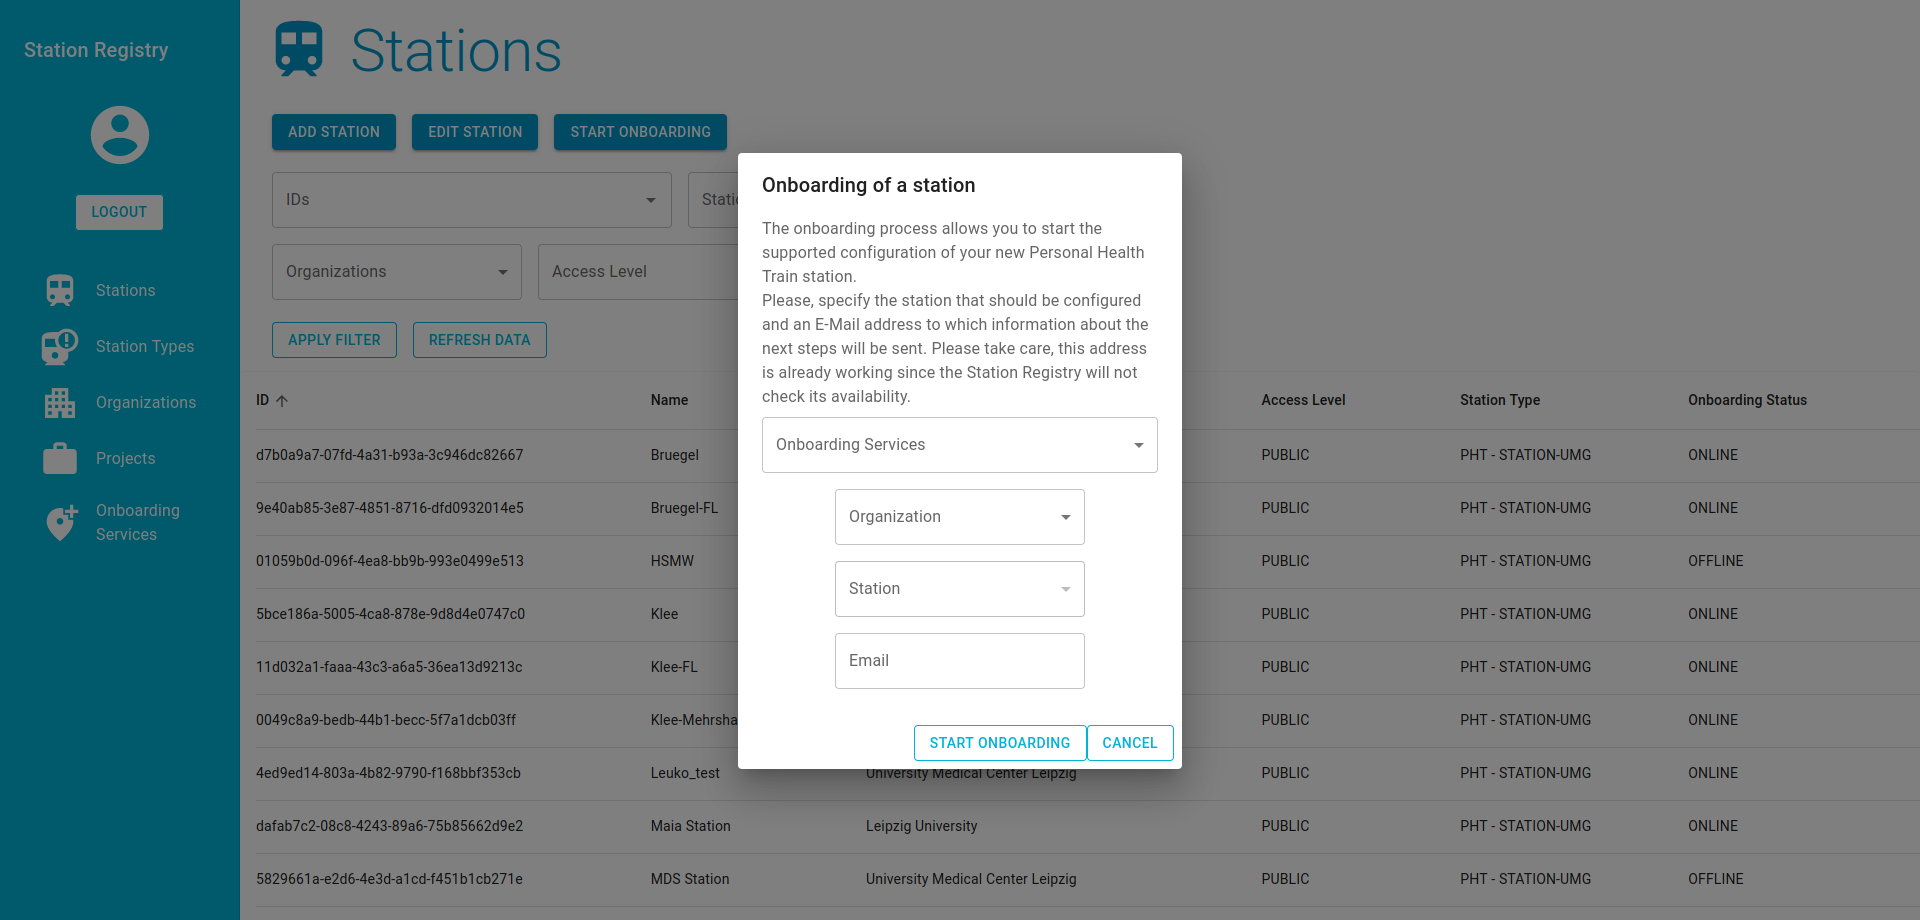
- After the Station is added successfully, start the Onboarding service for that station, by clicking the corresponding button and selecting the required information. Select the newly added station for the onboarding and your organization. For the onboarding service use the
requester.padme-analytics.deif not otherwise instructed.
It is necessary to use a valid Email address, because you will receive an Email with its content necessary for the following steps.
After you start the onboarding, you will be presented an One Time Password (OTP). It is necessary to store this, as you need it in the following steps.
¶ Software Setup (New)
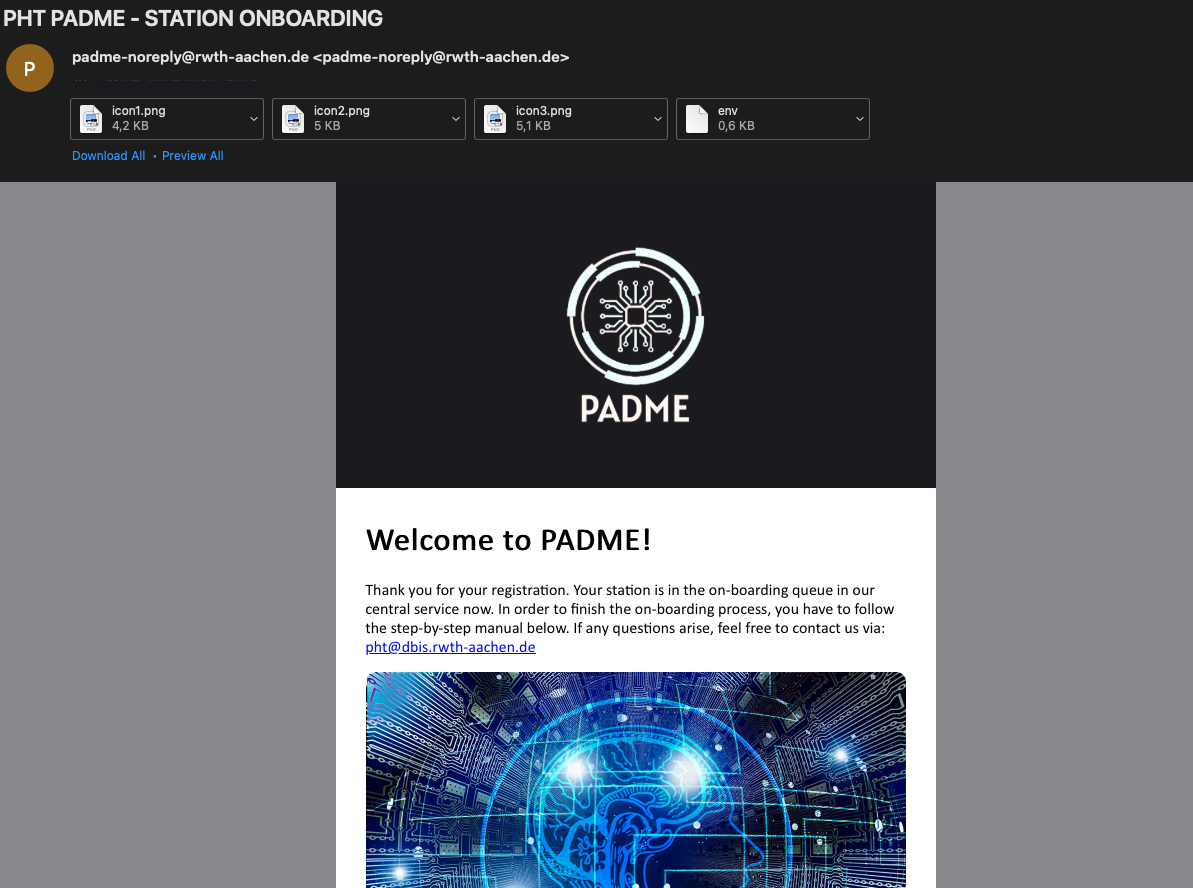
Check your inbox. Following the previous steps, you should have received an Email from our PADME Central Service. This Email contains the encrypted environment variables file (env file). The station deployment file which was provided to you should be unpacked in a folder of your choice.
¶ Run the Station Software
Open a console, navigate to the unzipped stationdeploymentfiles folder.
¶ Configuring the .env File (CENTRALSERVICE_BASE and PROJECT_NAME)
¶ Set the CENTRALSERVICE_BASE
Ensure there is a .env file in the root directory of your stationdeploymentfiles folder. If it does not exist, create it.
./stationdeploymentfiles
|____.env
|____docker-compose.yml
|____keycloak
| |____PHT-Station-Keycloak-Realm.json
| |____Dockerfile
|____telegraf
| |____telegraf.conf
| |____Dockerfile
|____mongo
| |____init-mongo.js
| |____Dockerfile
The CENTRALSERVICE_BASE variable in the .env file determines the central service domain your station will connect to. Based on your partnership and the central service to which your station is connected, choose the appropriate value from the list below:
- Main CS:
padme-analytics.de - Fraunhofer CS:
pht.fit.fraunhofer.de - FAIRDS CS:
centralservice.pht.computational.bio - BETTER Project Staging CS:
padme-staging.better-health-project.eu
Note: If you are not sure which CENTRALSERVICE_BASE value to choose, contact your service provider for guidance.
¶ Set the PROJECT_NAME (optional)
The PROJECT_NAME variable is used to namespace the containers and networks created by Docker Compose. This helps to prevent conflicts with other deployments.
¶ Example .env
Here is an example of what your .env file might look like until now:
.env
PROJECT_NAME=PADME_STATION_
CENTRALSERVICE_BASE=padme-analytics.de
Note: the .env file and the env file are not the same, .env includes variables for the docker compose, while the env (which was sent by email in the onbourding) includes encrypted environment variables
¶ Configuring compose file with your Server IP
You will probably deploy the Station Software on a stand-alone server. To be able to run the software properly, you need to configure the compose file to your Server IP/domain. To do this, navigate to the stationdeploymentfiles folder and open/create a .env inside the folder. Paste the following environment variables and configure them according to your server IP or domain.
.env
KEYCLOAK_AUTH_SERVER_URL=https://your_server_ip_or_domain:8443
KEYCLOAK_HOSTNAME_URL=https://your_server_ip_or_domain:8443
KEYCLOAK_ADMIN_URL=https://your_server_ip_or_domain:8443
KEYCLOAK_REDIRECT_URI=http://your_server_ip_or_domain:3030/*
Lastly, you also need to change the Subject Alternative Name (SAN) in the folder keycloak -> Dockerfile. If you open the Dockerfile you will see something like this.
"SAN:c=DNS:localhost,IP:127.0.0.1"
You can change this in two ways.
- If your server has a configured domain, replace with
"SAN:c=DNS:your_server_domain,IP:your_server_ip" - Otherwise, replace with
"SAN=IP:your_server_ip"
To deploy station software on your local machine/pc, you do not need to change anything as the compose file is already configured for localhost (your personal computer). Please follow along the documentation.
To verify if the above env changes are reflected in the docker-compose.yml file, please run the following command. You should see the resolved compose file in canonical format on the console.
docker compose config
¶ Mounting a Folder
If you need to mount a folder to the station, it needs to be done before bringing up the station software. For this you can set the following environment variables:
HOST_MOUNT_DIR = HOST location, i.e. the folder on your system you want to mount
DIND_MOUNT_DIR = Docker-in-Docker (DIND) location, i.e. the place inside the DIND container where your host folder will be mounted

Example:
export HOST_MOUNT_DIR=/home/training/data
export DIND_MOUNT_DIR=/home/data
Some more information can be found here.
¶ Configuring TLS for Station and Keycloak
By default, station software will be running an HTTP server and Keycloak will be using a self signed certificate to secure the endpoints and enable TLS. However, it is recommended to provide proper certificates when running in production. So if you have them, please follow the steps below.
NOTE: If you provide proper certs, you will have to run both station and keycloak on HTTPS.
You must have valid certificates (certificate file and key file) in PEM formats.
You have to edit the docker-compose.yml (from the unzipped stationdeploymentfiles folder) to mount the certificates and provide them as environment variables to the pht-web and pht-keycloak containers. For this, edit the pht-web and pht-keycloak services and add the following lines in their respective places:
services:
    ...

  pht-web:
  	...
    volumes:
    	...
    	- "path/to/key/file.pem:/usr/src/app/certs/server.key.pem"
      - "path/to/cert/file.pem:/usr/src/app/certs/server.cert.pem"
    environment:
    	- HTTPS_SERVER_KEY=/usr/src/app/certs/server.key.pem
      - HTTPS_SERVER_CERT=/usr/src/app/certs/server.cert.pem

  ...

  pht-keycloak:
  	...
    volumes:
    	- "path/to/key/file.pem:/opt/keycloak/conf/keys/server.key.pem"
      - "path/to/cert/file.pem:/opt/keycloak/conf/keys/server.cert.pem"
    environment:
    	- KC_HTTPS_CERTIFICATE_KEY_FILE=/opt/keycloak/conf/keys/server.key.pem
      - KC_HTTPS_CERTIFICATE_FILE=/opt/keycloak/conf/keys/server.cert.pem
Now, when the containers are started, both keycloak and station will be secured with TLS. Bonus: no more certificate errors in browser.
We provide multiple versions of the station software, currently a general one and one for interoperability. To change the version of your station you can edit the docker compose file by replacing the tag of the docker image behind the colon as follows:
services:
    ...
  pht-web:
  	#image: smithpht/station-software:interopt
  	image: smithpht/station-software:latest
  ...
Please visit the dockerhub repository for an overview of all available tags:
https://hub.docker.com/r/smithpht/station-software/tags
¶ GPU Support
You must have a system with a supported GPU and GPU drivers must be installed. Make sure that you have the NVIDIA container runtime installed. Refer to the Docker documentation for installation instructions for your platform.
Find the dind image matching your system specifications from here. For example, if your Cuda version is 11.7.1, OS is Ubuntu 22.04 and Docker version is 23.0, choose cuda11.7.1-runtime-ubuntu22.04-docker23.0.
If there is no prebuilt image, you can build your own by following these steps.
Download all files from the nvidia-dind directory in the official PADME station software repo. This includes the Dockerfile, deamon.json and dockerd-entrypoint.sh.
Change ARG CUDA_IMAGE to the correct base image according to your CUDA version and host OS. Check the official NVIDIA CUDA Docker Hub repo for available tags. If your host has support for CUDA 11.4.3 and runs on Ubuntu 20.04, edit it like so.
ARG CUDA_IMAGE=nvidia/cuda:11.4.3-runtime-ubuntu20.04
Search for wget -O 'docker.tgz' and change the Docker version that is being downloaded to match the one on your host. For example, if your host runs Docker 24.0.7, edit it like so.
RUN ...; \
    wget -O 'docker.tgz' 'https://download.docker.com/linux/static/stable/x86_64/docker-24.0.7.tgz'; \
  ...
Finally, search for ENV DIND_COMMIT and replace the checksum with the ref from the official Docker GitHub repository that matches the Docker version on your host. Using the same example as above, edit it like so.
ENV DIND_COMMIT v24.0.7
Create a new subdirectory in your StationDeploymentFiles folder called dind-gpu and copy all three files into that directory.
Edit the docker-compose.yml (from the unzipped stationdeploymentfiles folder) and update the dind service as following:
services:
    ...

  dind:
    image: 'smithpht/dind:cuda11.7.1-runtime-ubuntu22.04-docker23.0'
    container_name: 'pht-dind'
    environment:
      - DOCKER_TLS_CERTDIR=/certs
      - DOCKER_TLS_SAN=DNS:pht-dind
    volumes:
      - "pht-dind-certs-ca:/certs/ca"
      - "pht-dind-certs-client:/certs/client"
      - "pht-dind-data:/var/lib/docker"
      - "${HOST_MOUNT_DIR-/dev/null}:${DIND_MOUNT_DIR-/dev/null}"
    networks:
      pht-net:
        aliases:
          - pht-dind
    privileged: true
    restart: unless-stopped
    deploy:
      resources:
        reservations:
          devices:
            - capabilities: [gpu]

    ...
Note the changes to image and the additional deploy section at bottom.
If you intend to build your own DinD image, change image: 'smithpht/...' to build: ./dind-gpu.
Next, execute the following command to start the Station Software:
docker compose up -d
If this is the first time you have run Station Software on your device, it may take some time to pull all the images. Finally, you should see something like the image below.

If you have the old version of Station Software, please click here to proceed.
¶ Configuration Wizard
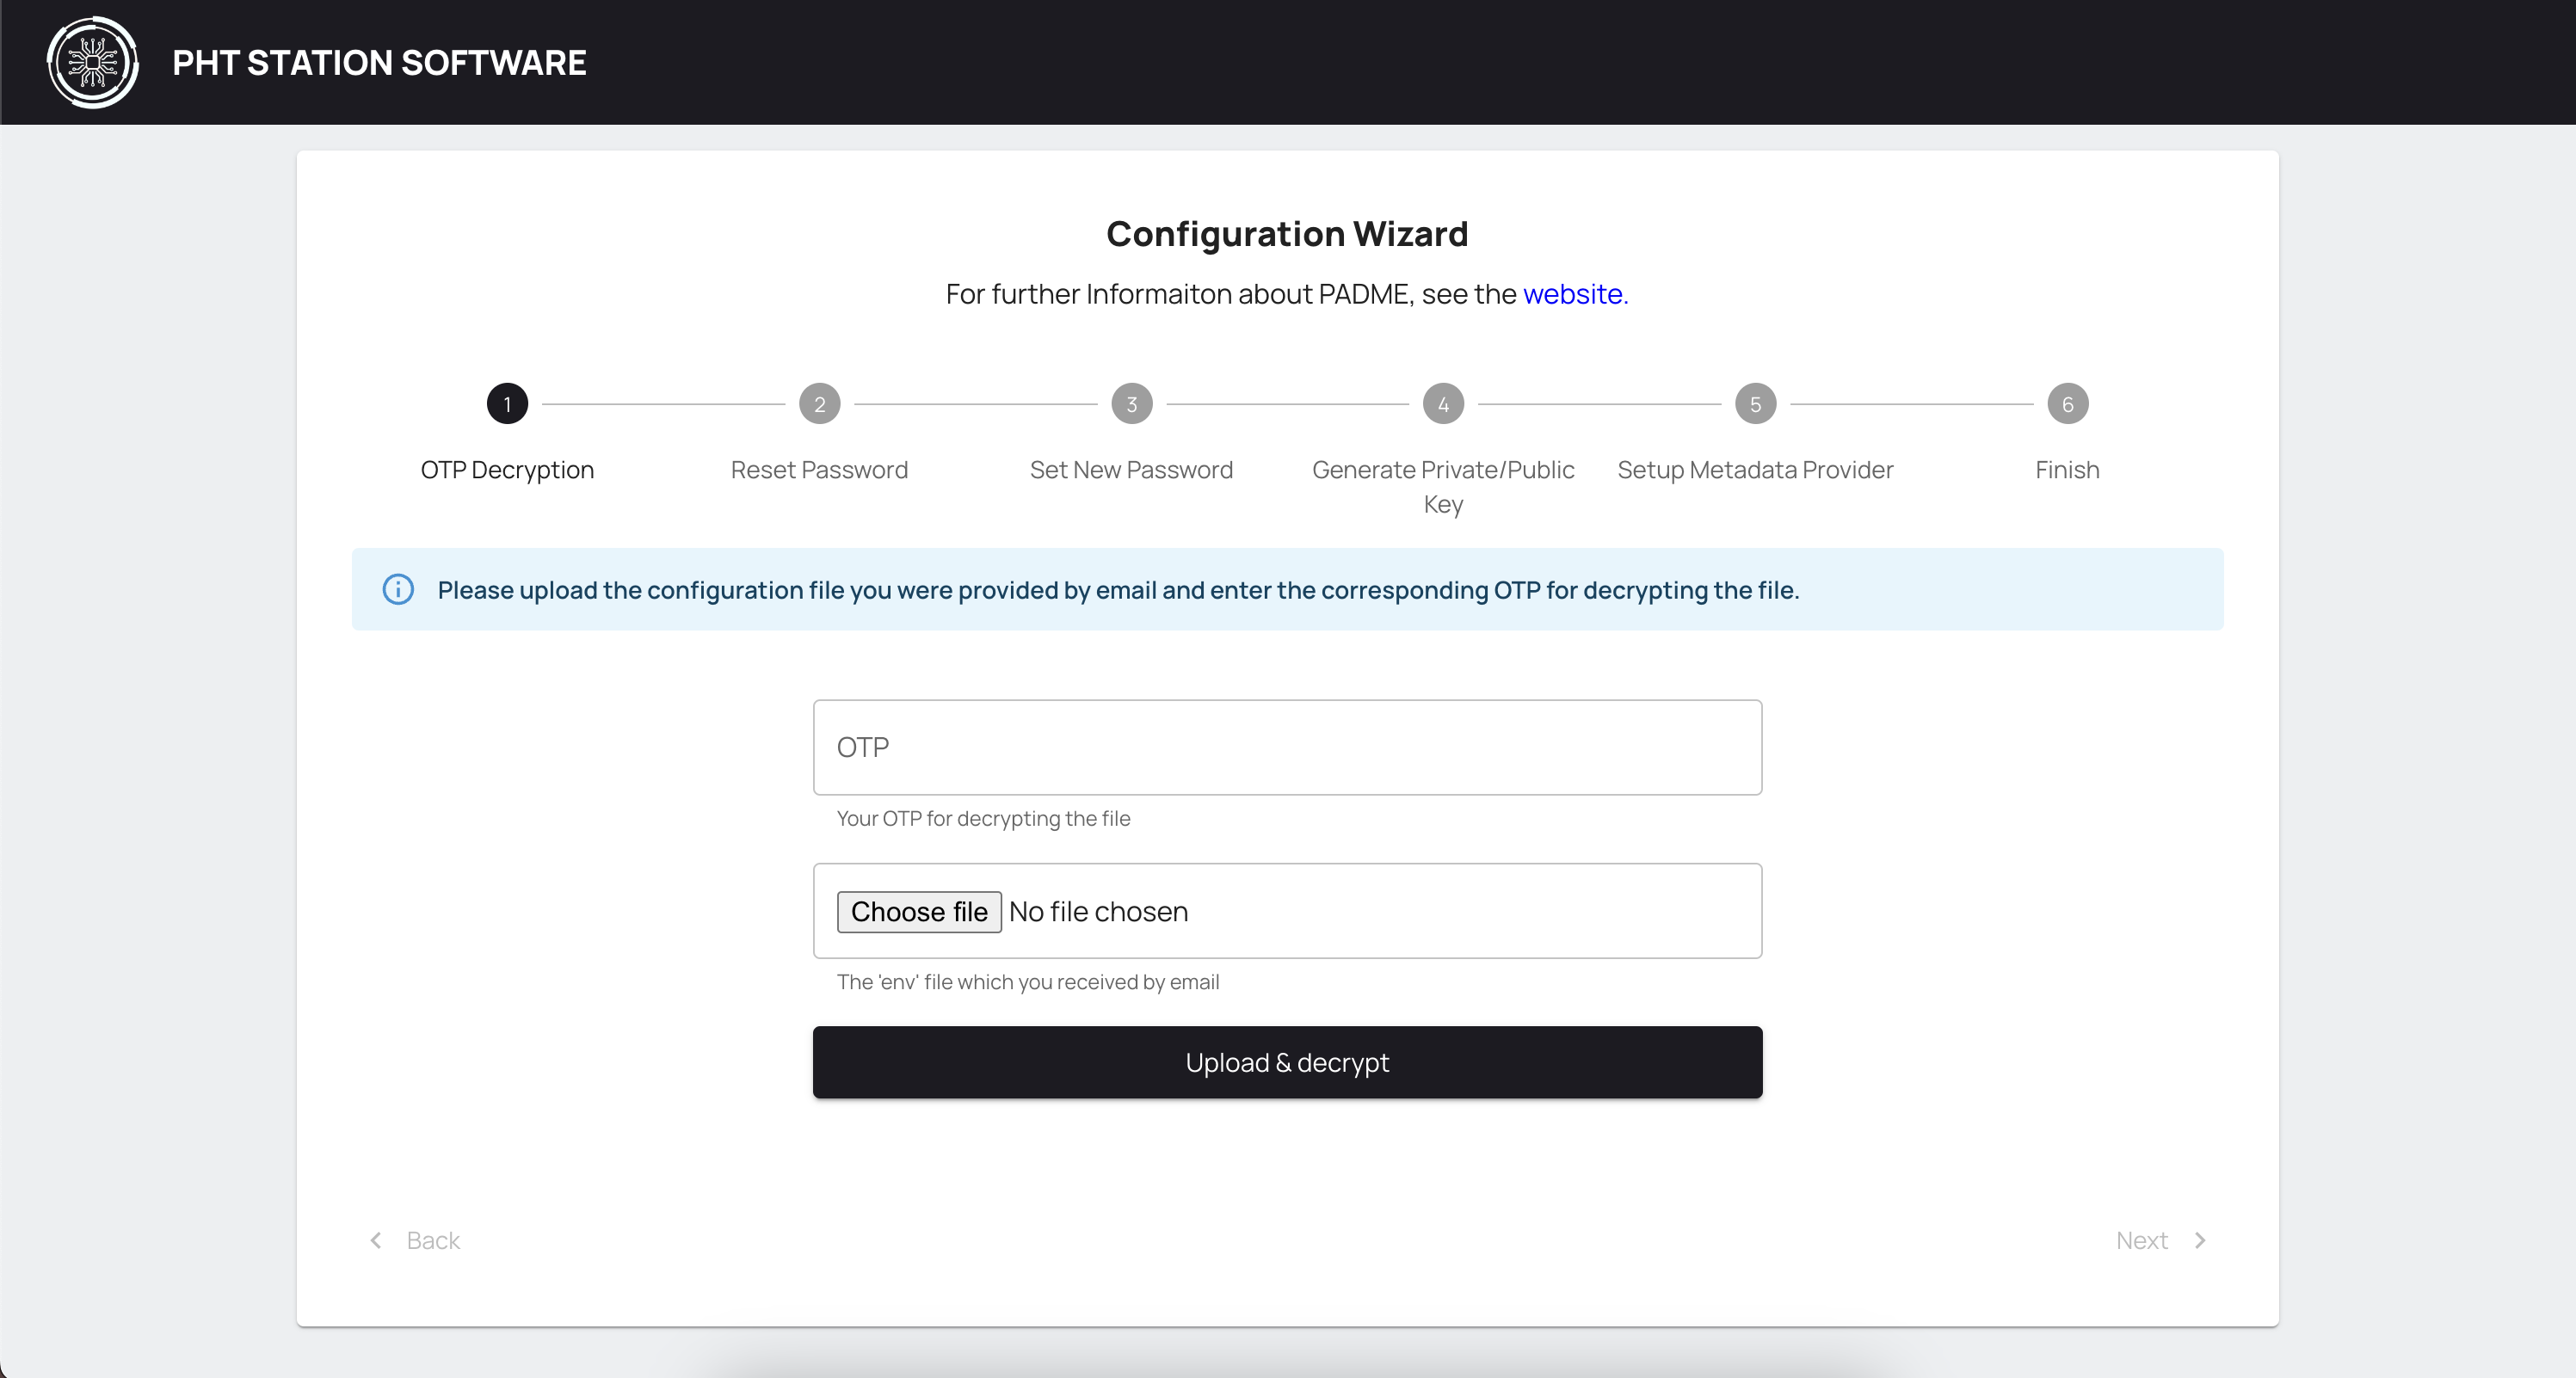
Open your browser and navigate to the configuration wizard. If you access the website from the deployment machine you can use http://localhost:3030, otherwise use http://your-server-ip-or-domain:3030.
You should see a page like the one you see in the image below. Now you can start the Station Software configuration.
¶ Upload and Decrypt (env) file
Here we will decrypt the env configuration file which you received through email from PADME.
Insert the One-Time-Password from the previous step into the OTP field.
Afterwards, click on Choose file and select the env file you received via email.
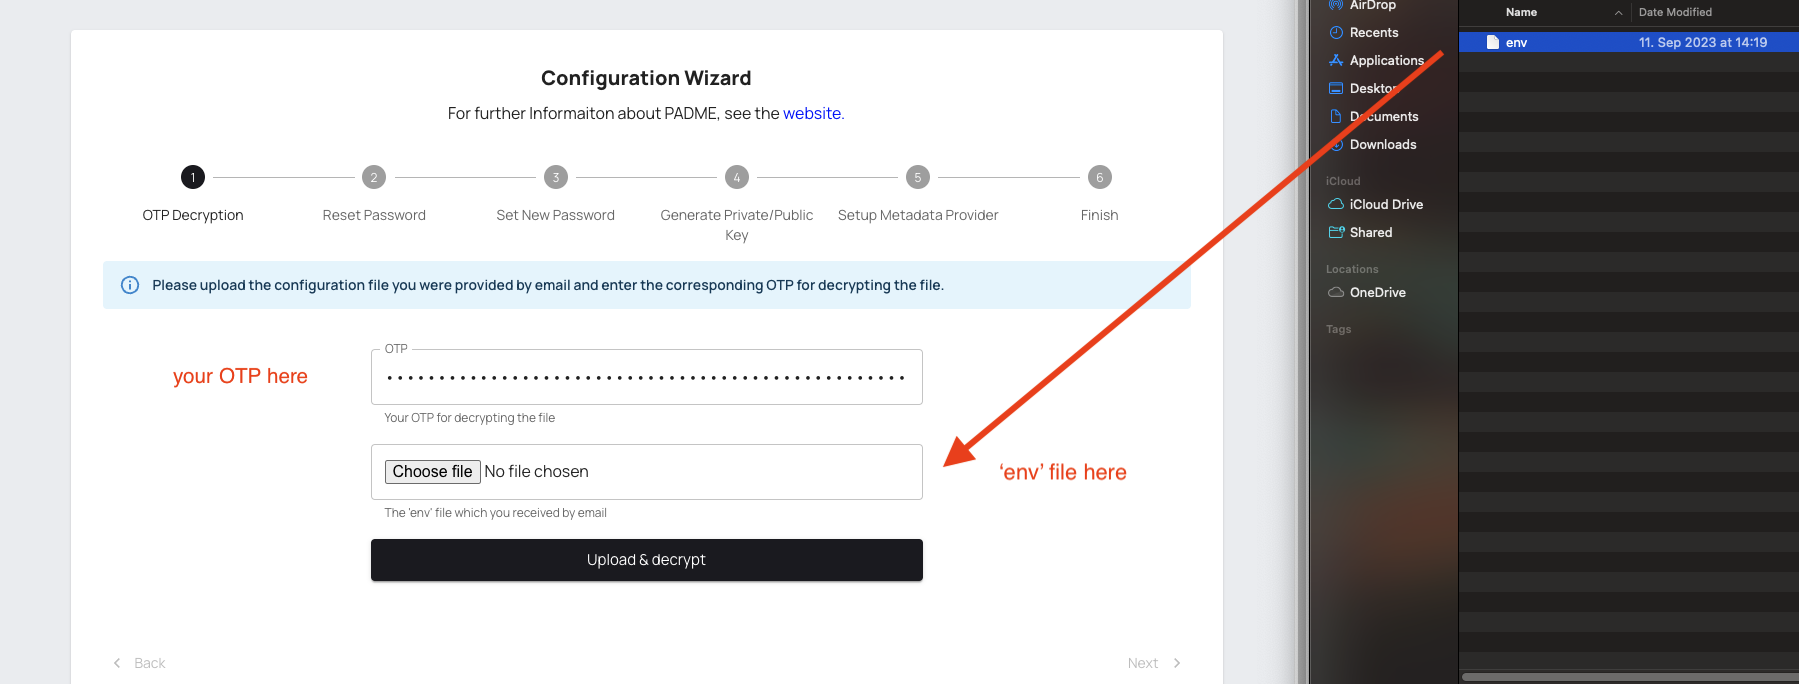
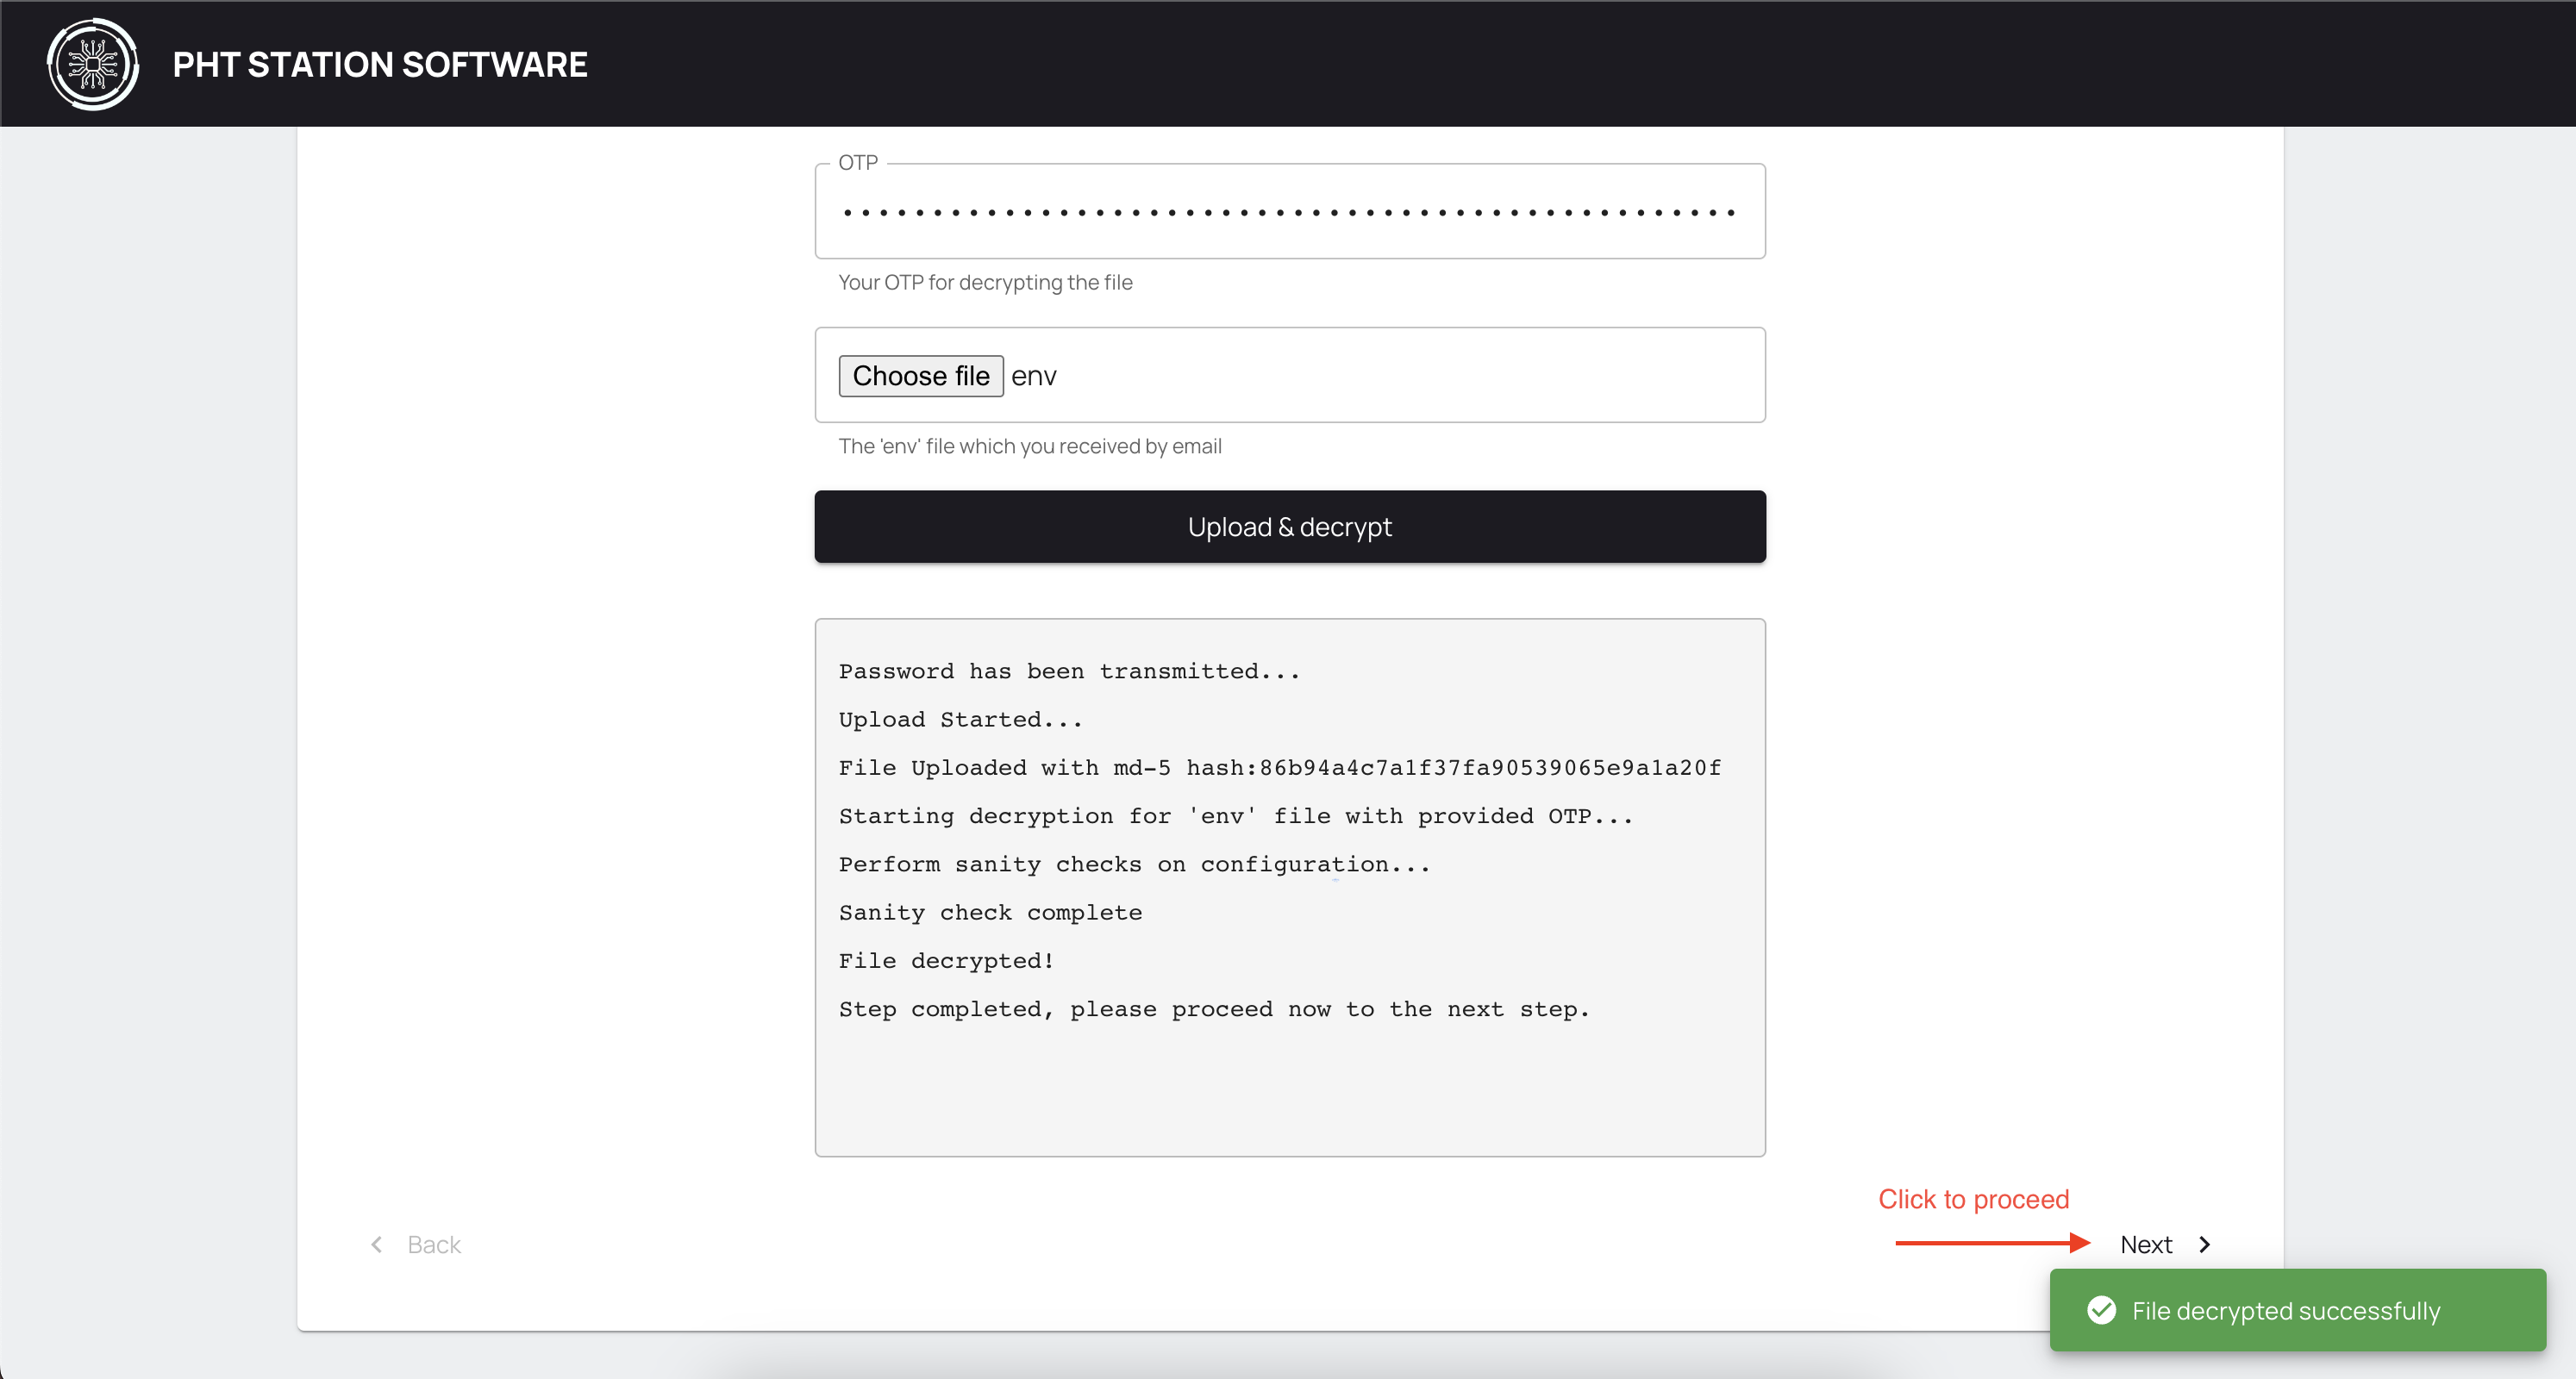
Click on Upload & Decrypt button. If the decryption is done successfully, you should see the following success message and Next button at the bottom right will be activated. Click to proceed.
¶ Reset Password
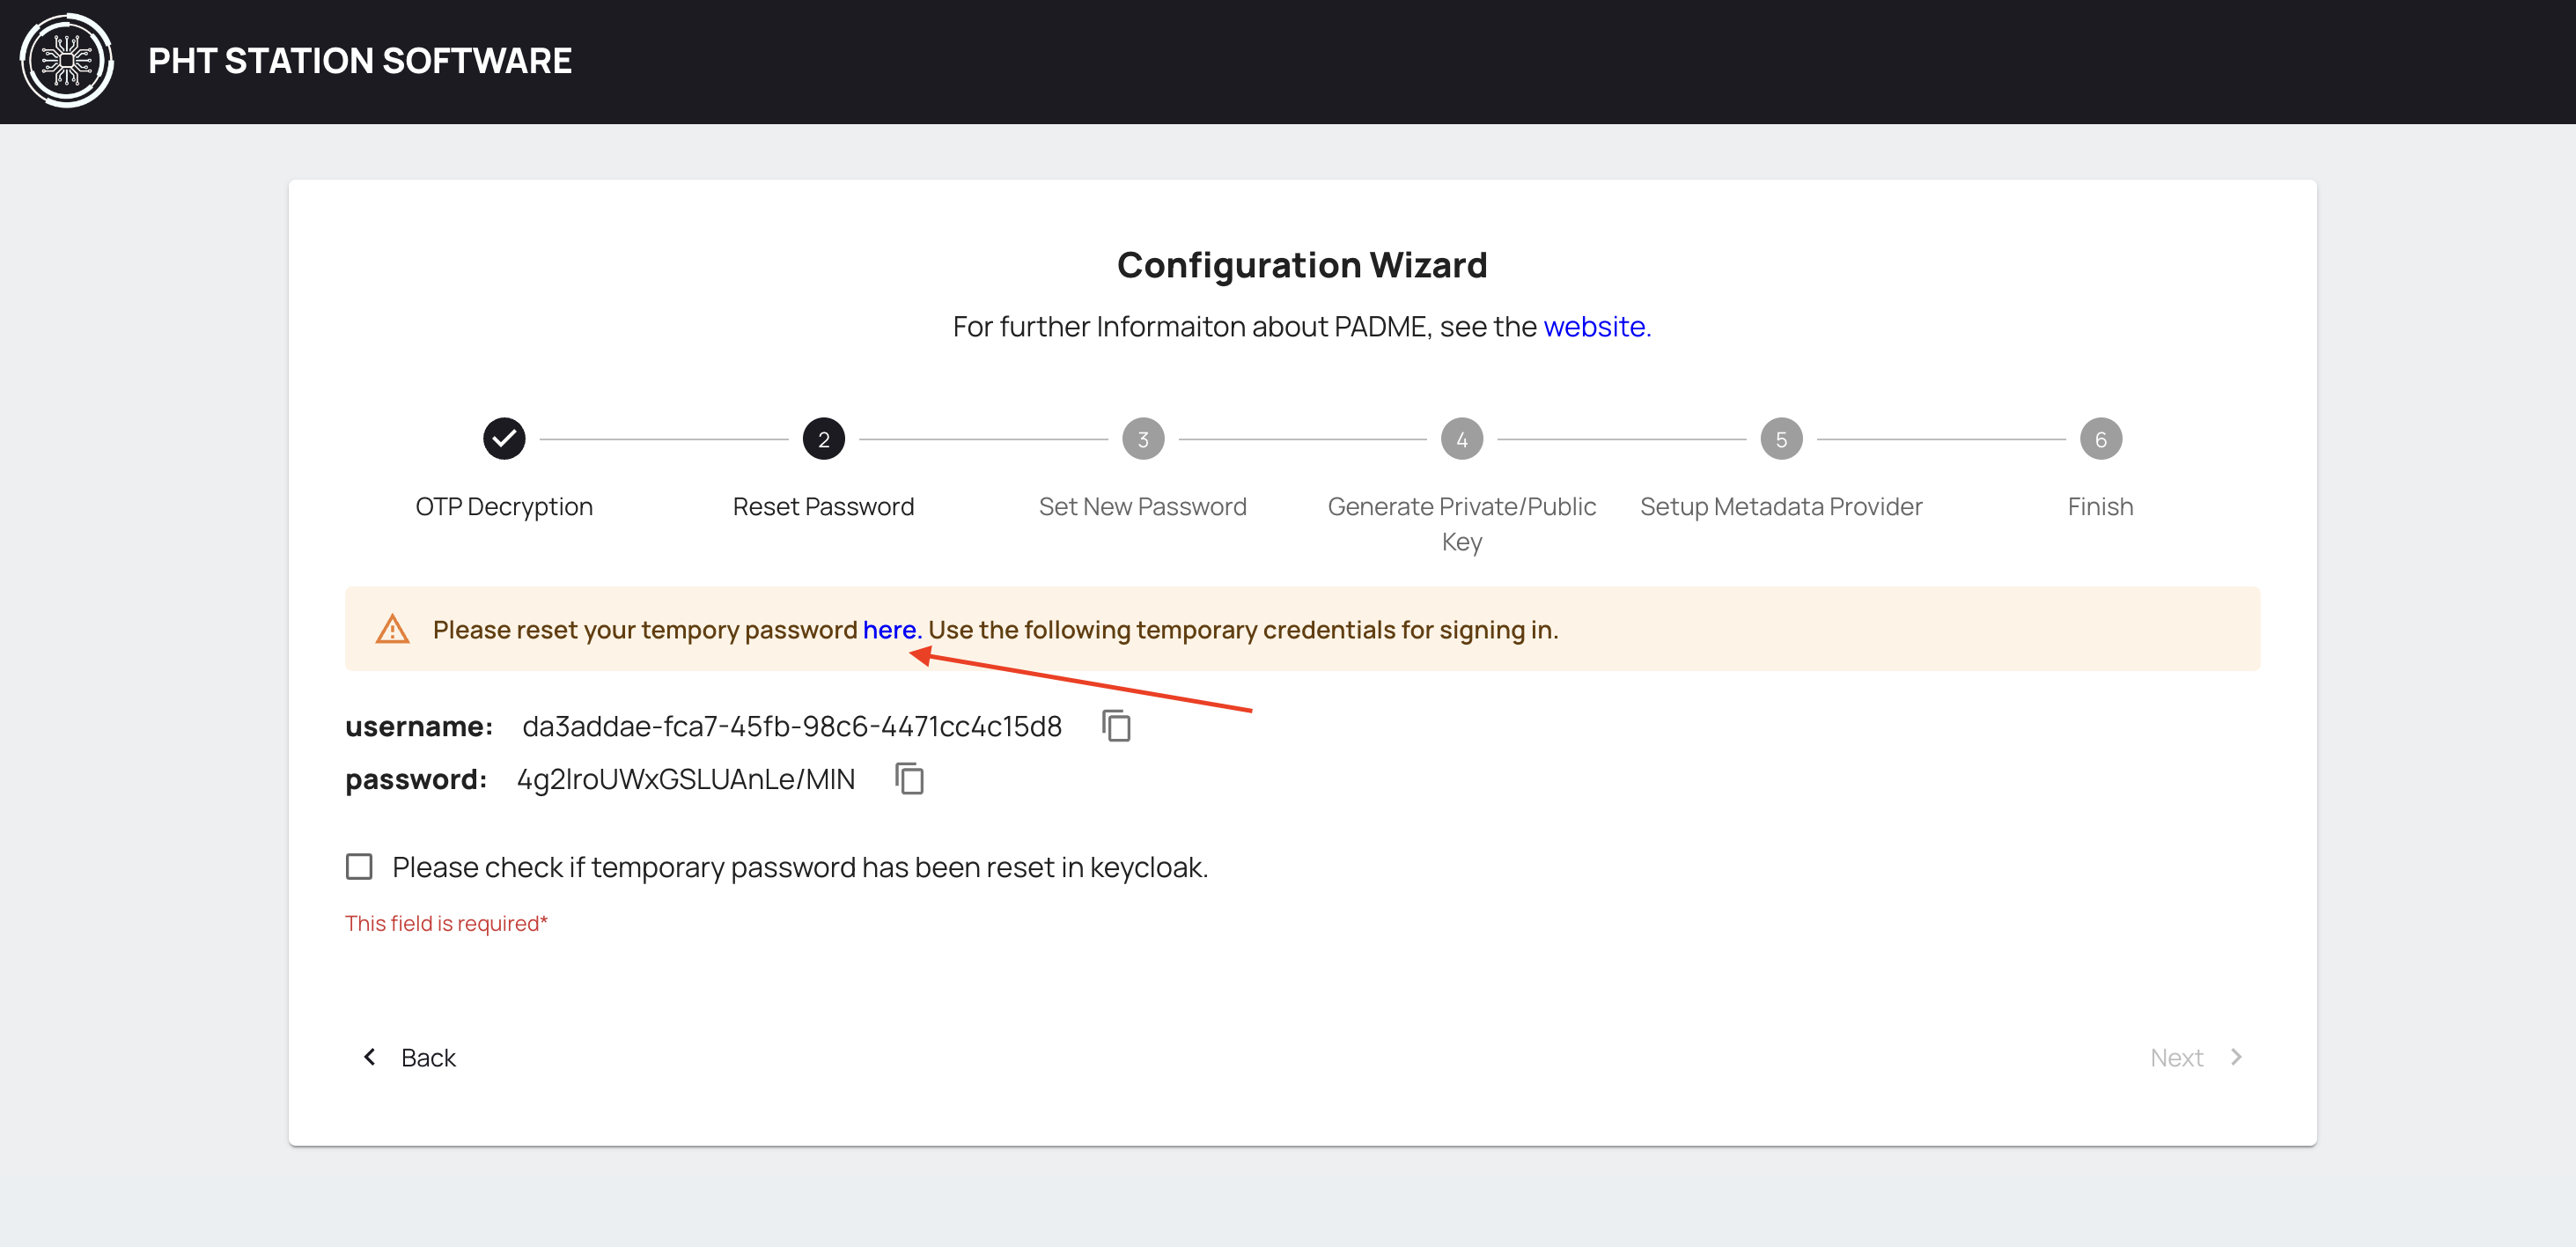
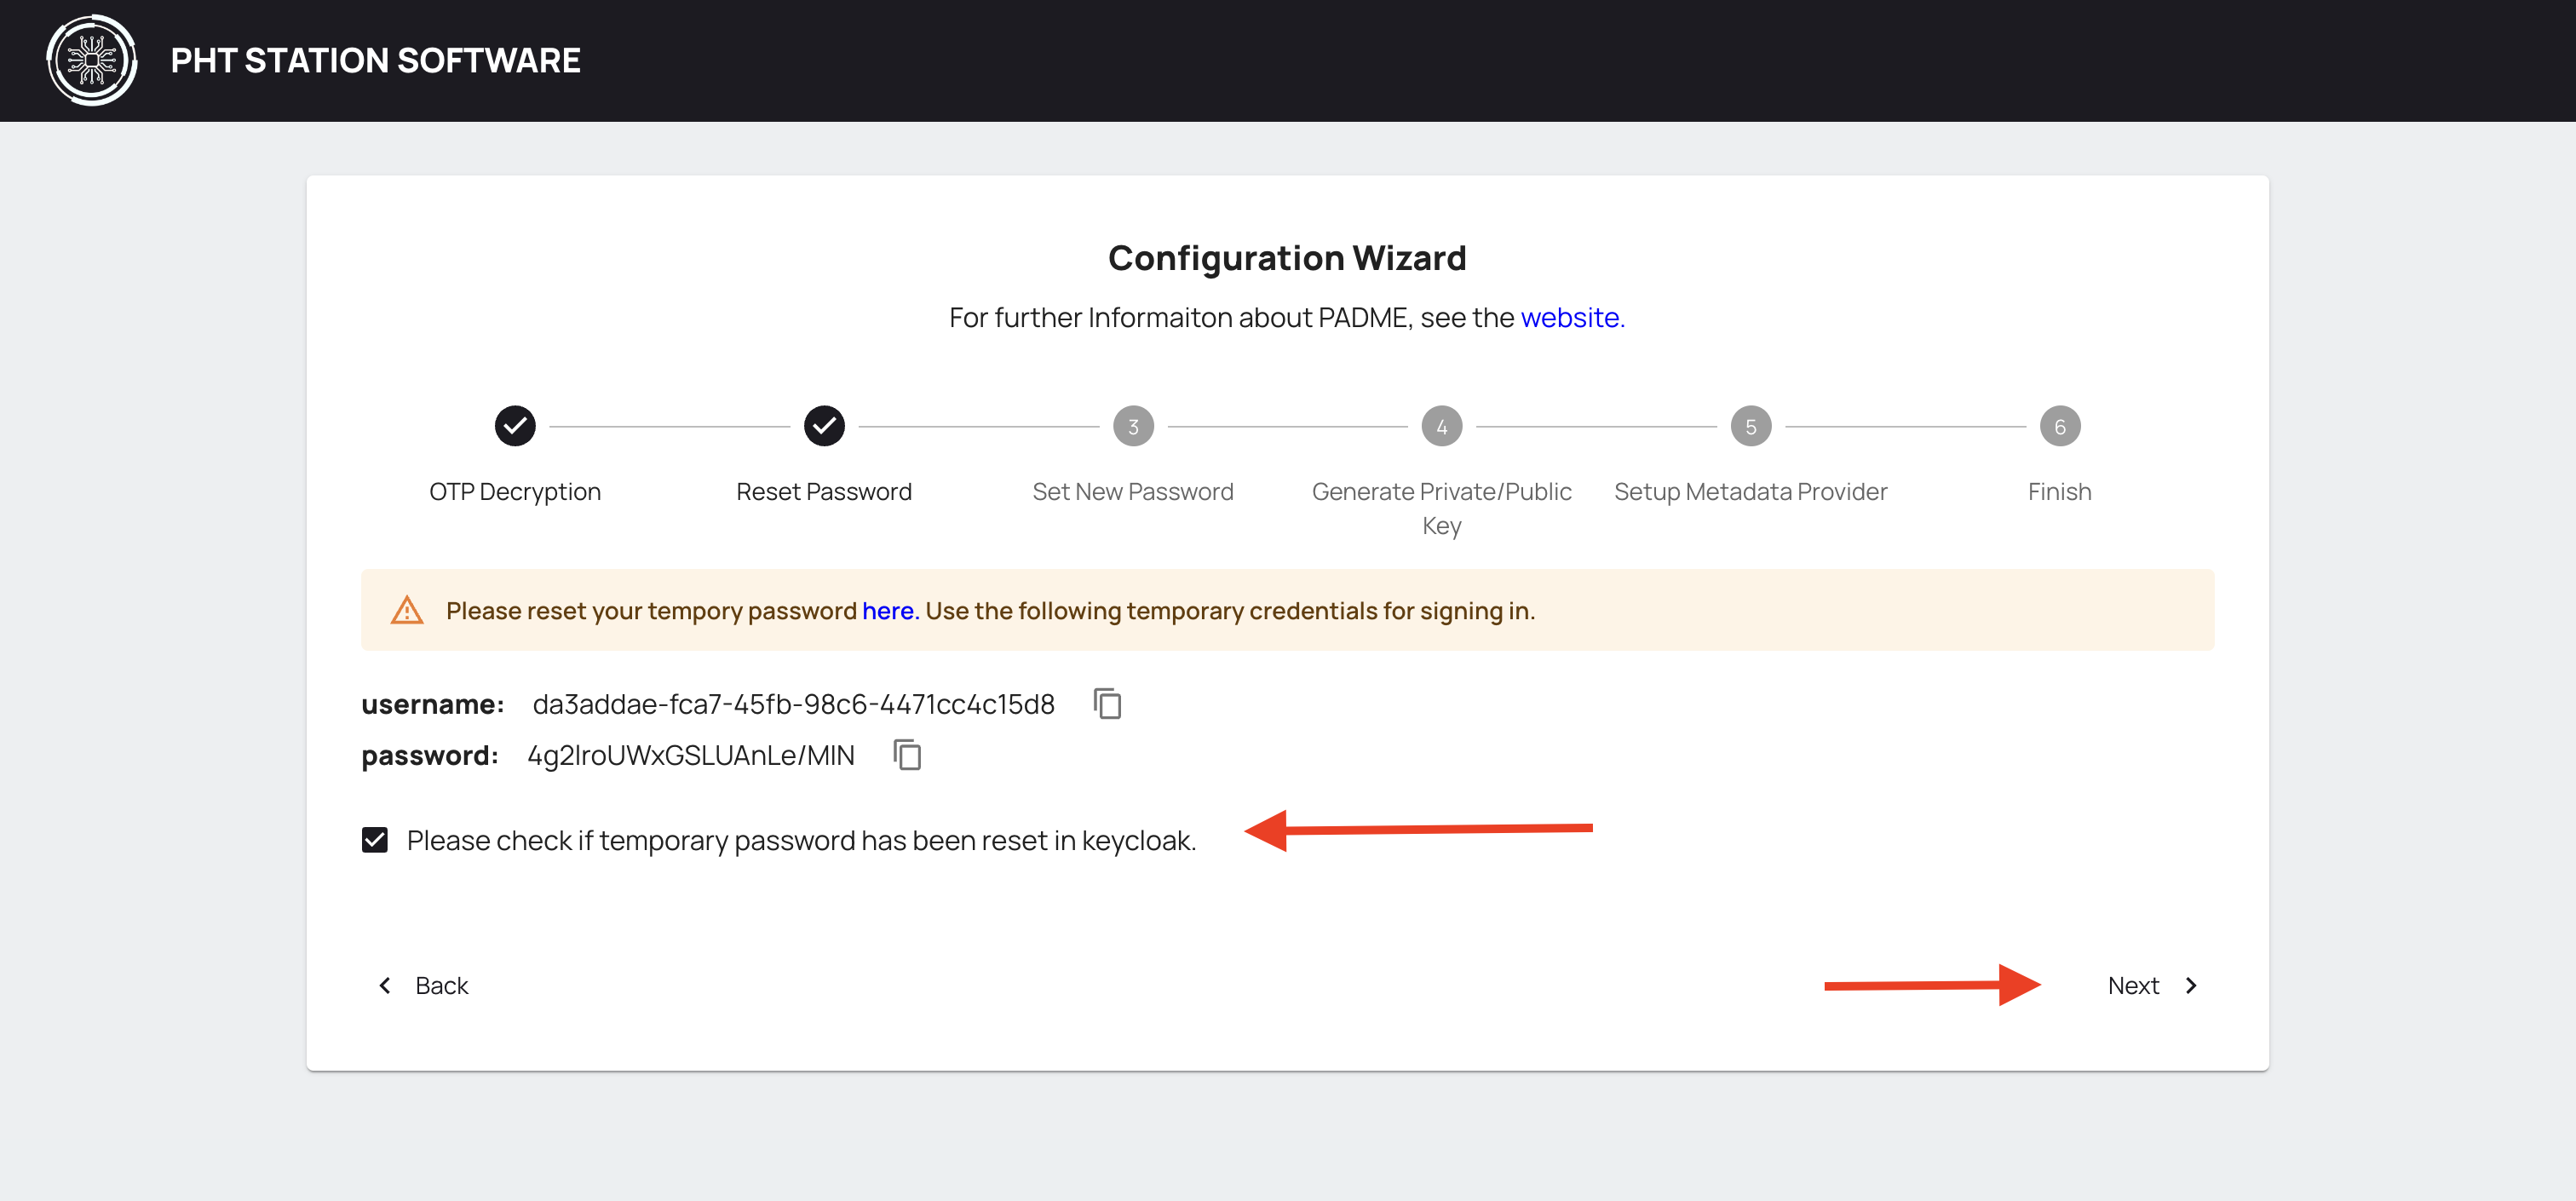
Please reset your temporary password in the following steps.
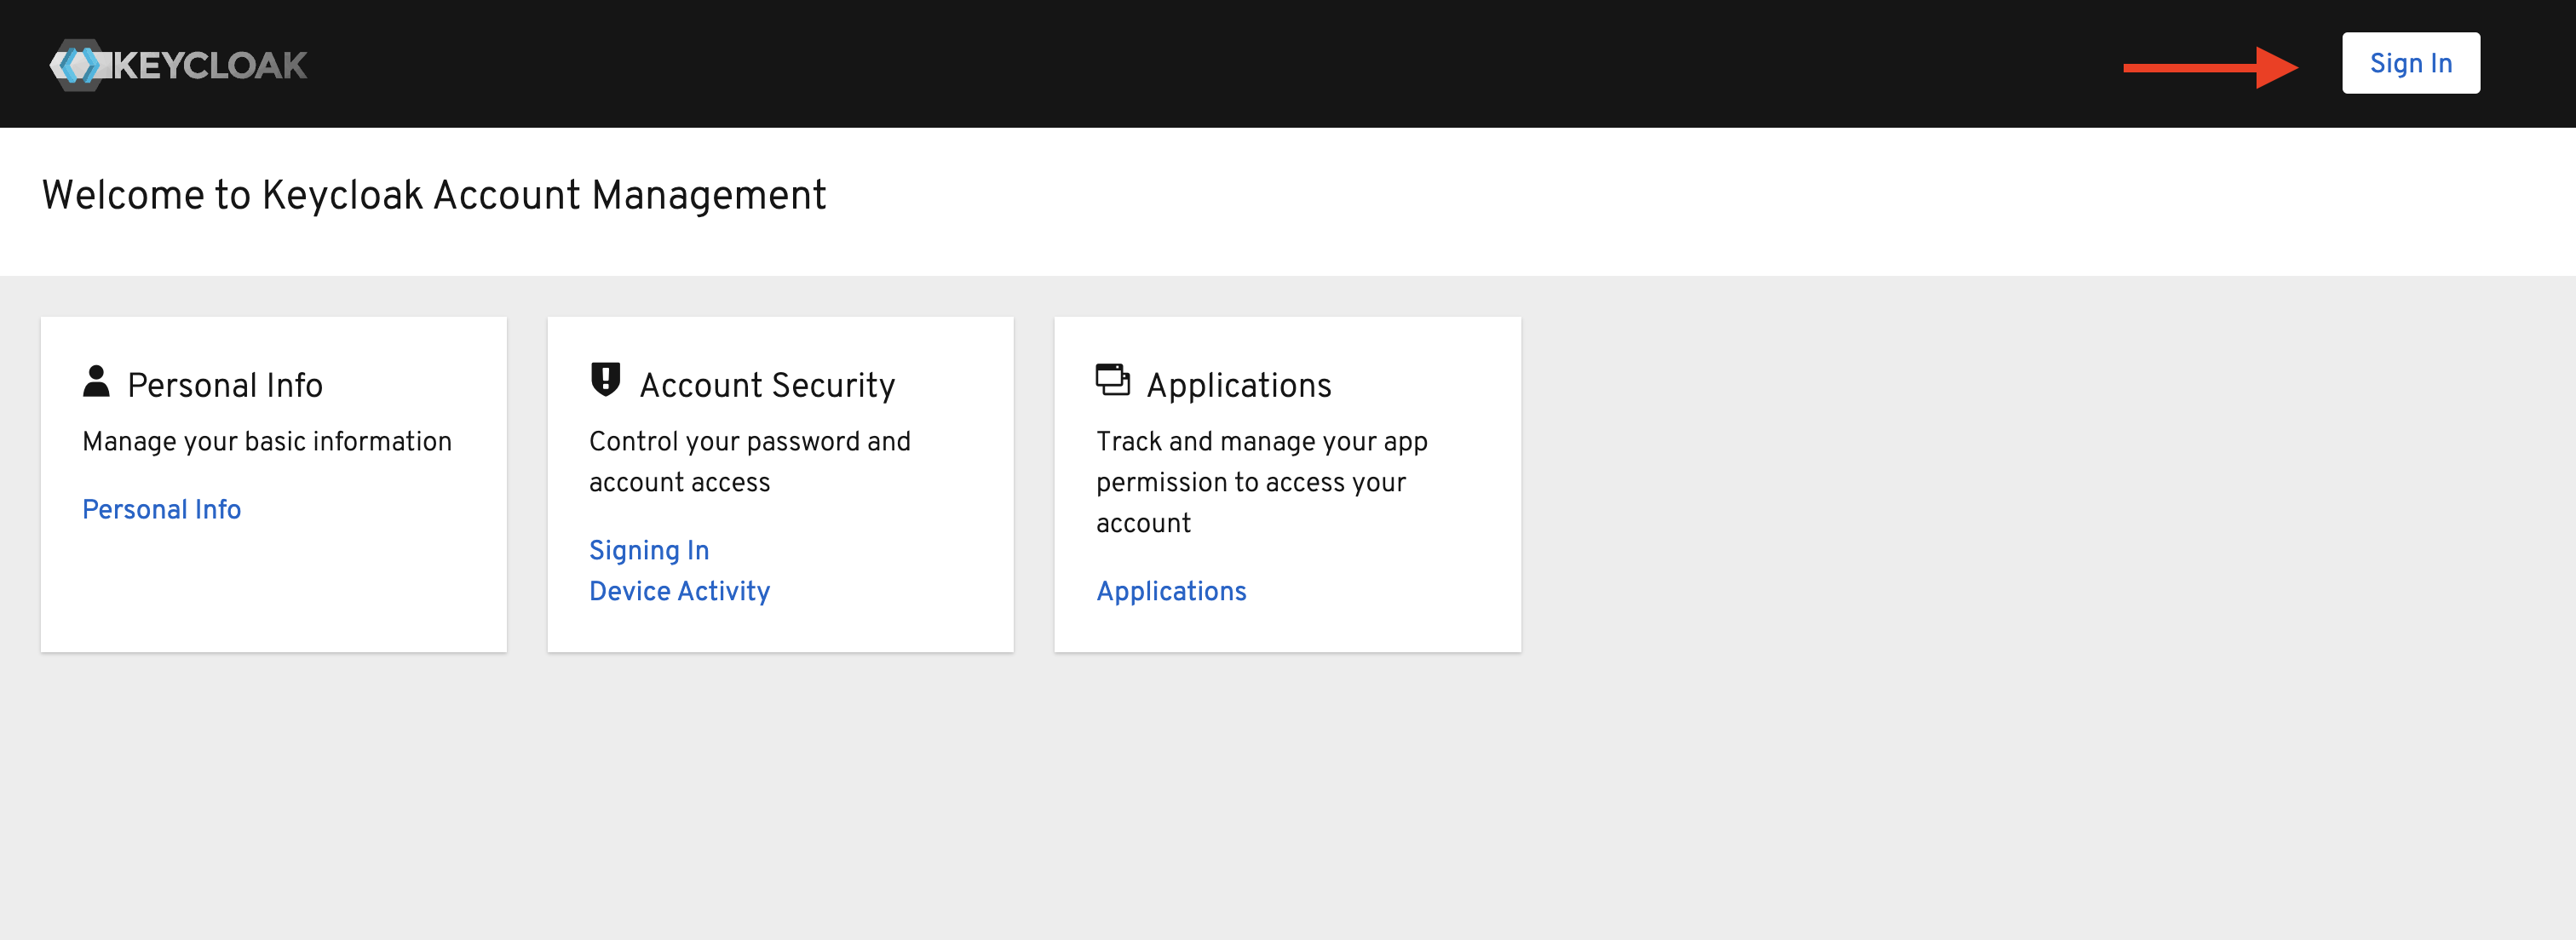
Please click the button link here. You will be redirected to Keycloak Account Management page.
Please click the Sign In button.
Enter the username and password from Step 1 and click Sign In.
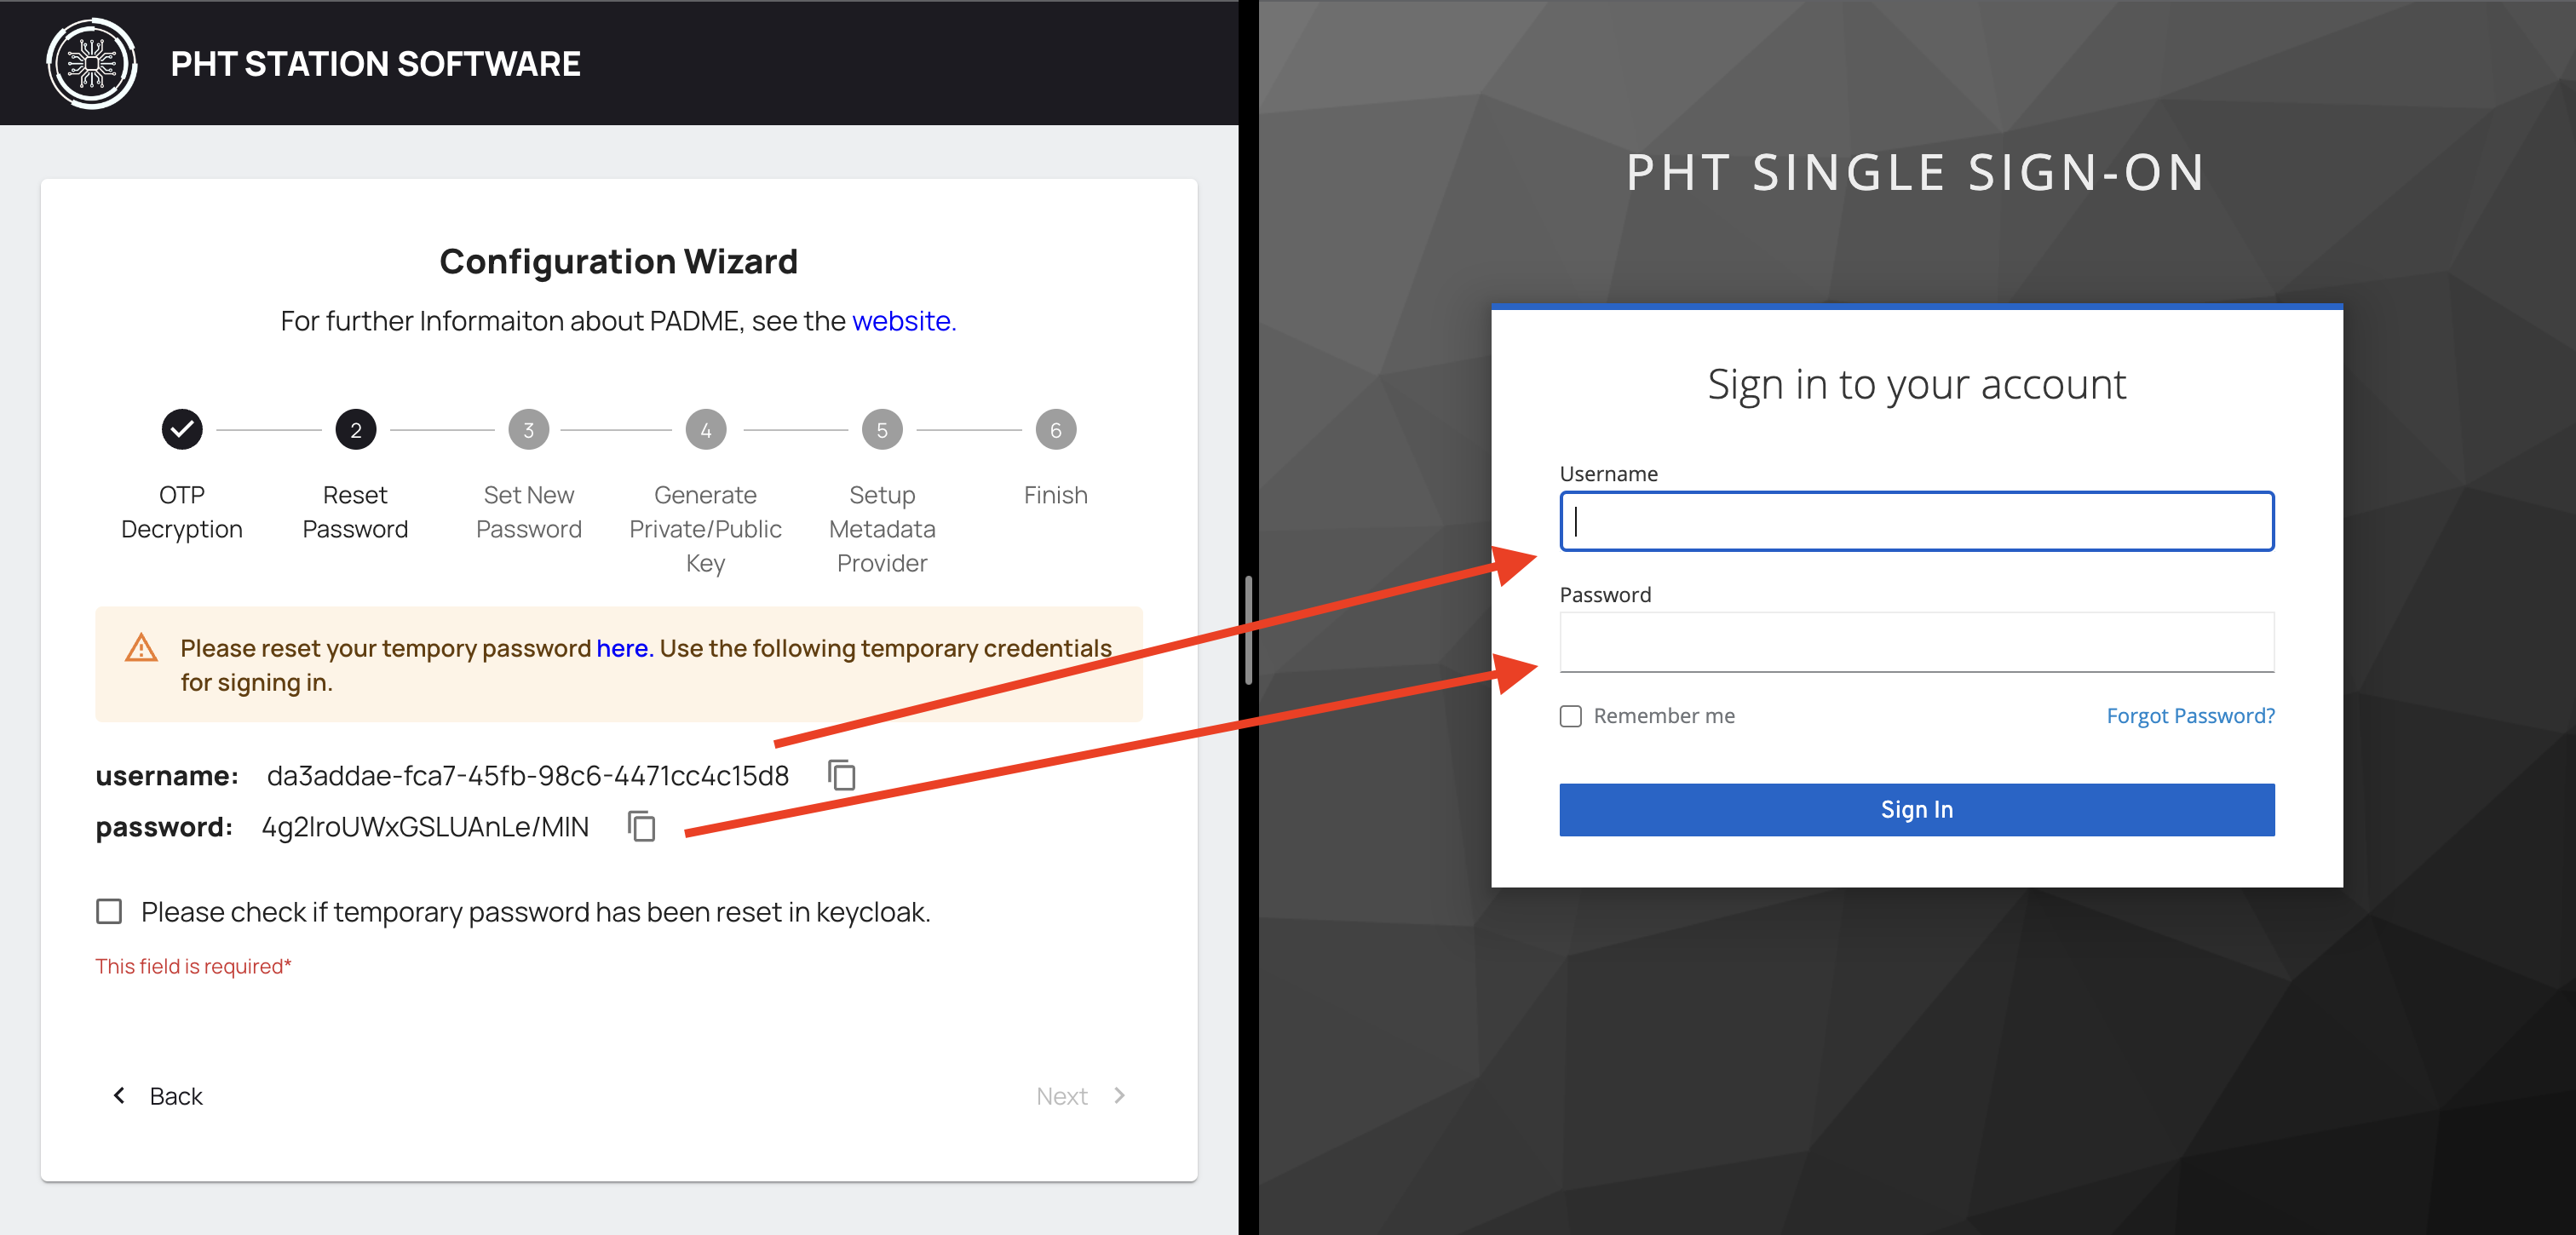
You will be asked to set a new password. Remember to note it somewhere safe. Type the password and click Submit.
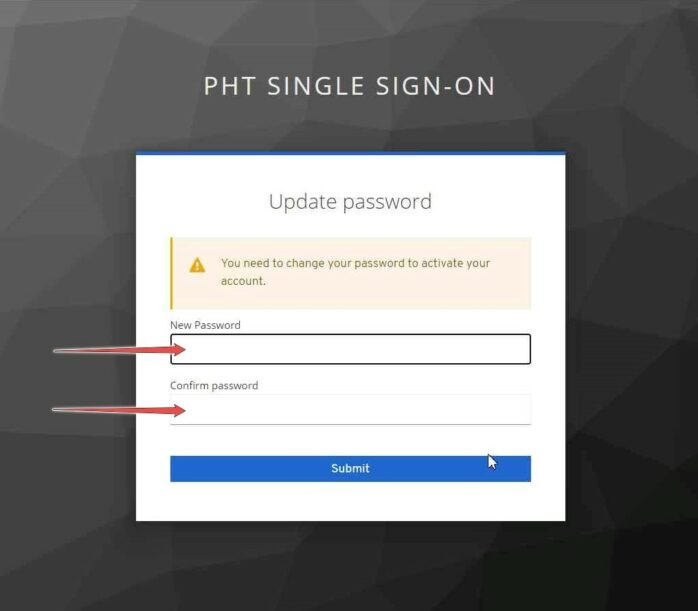
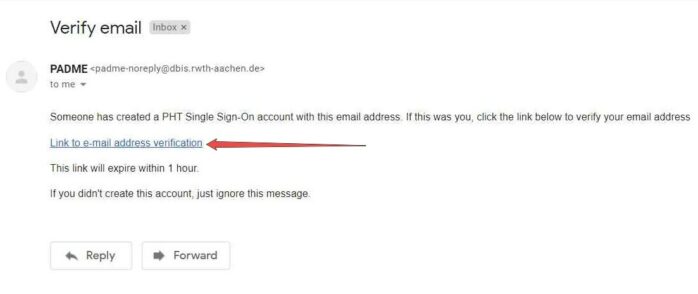
A verification email will be sent to you; check your inbox and open the Verify email. Click on Link to email address verification.
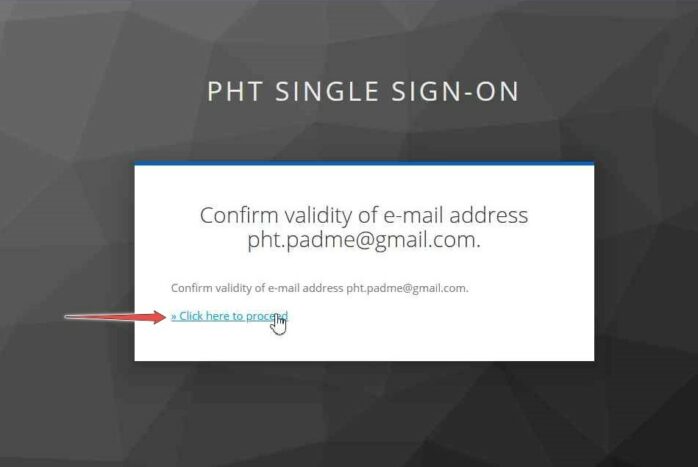
And click on Click here to proceed.
Navigate to the Configuration Wizard and click the checkbox to continue to the next step.
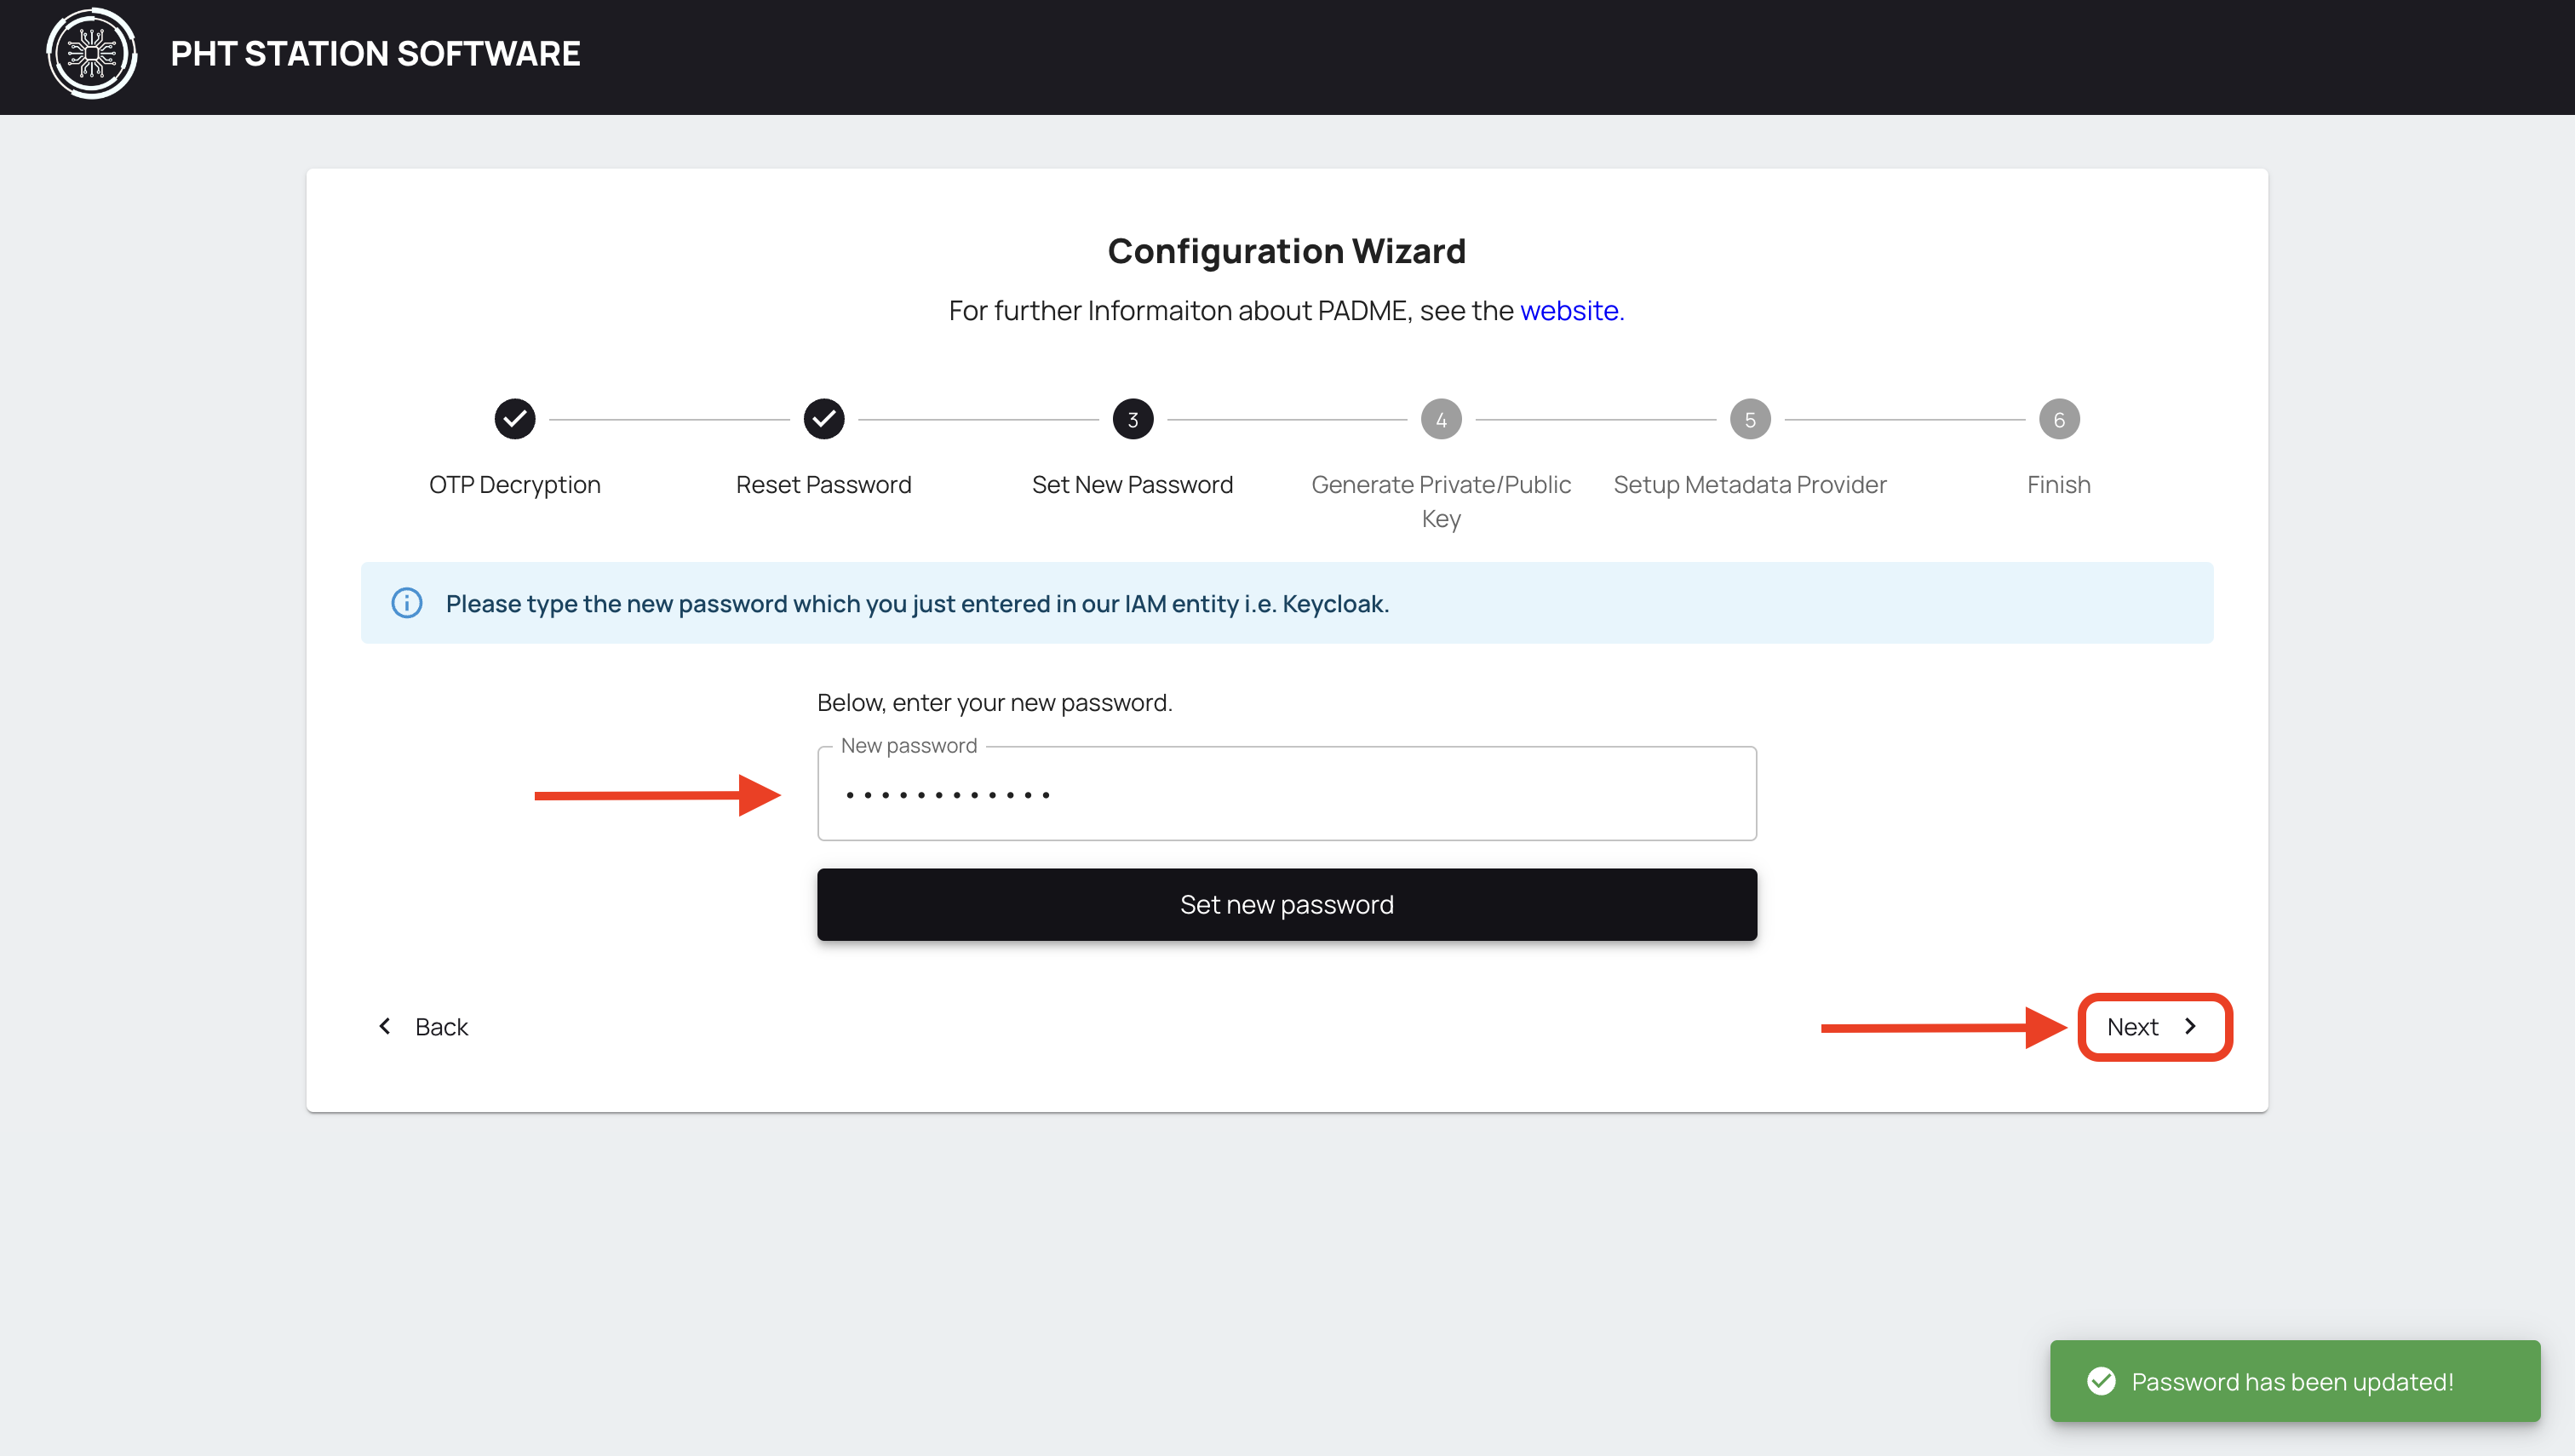
Type the New Password which you just entered in Keycloak, and click on Set new password. You should see a success message below. Click next.
¶ Generate Private/Public Key Pair
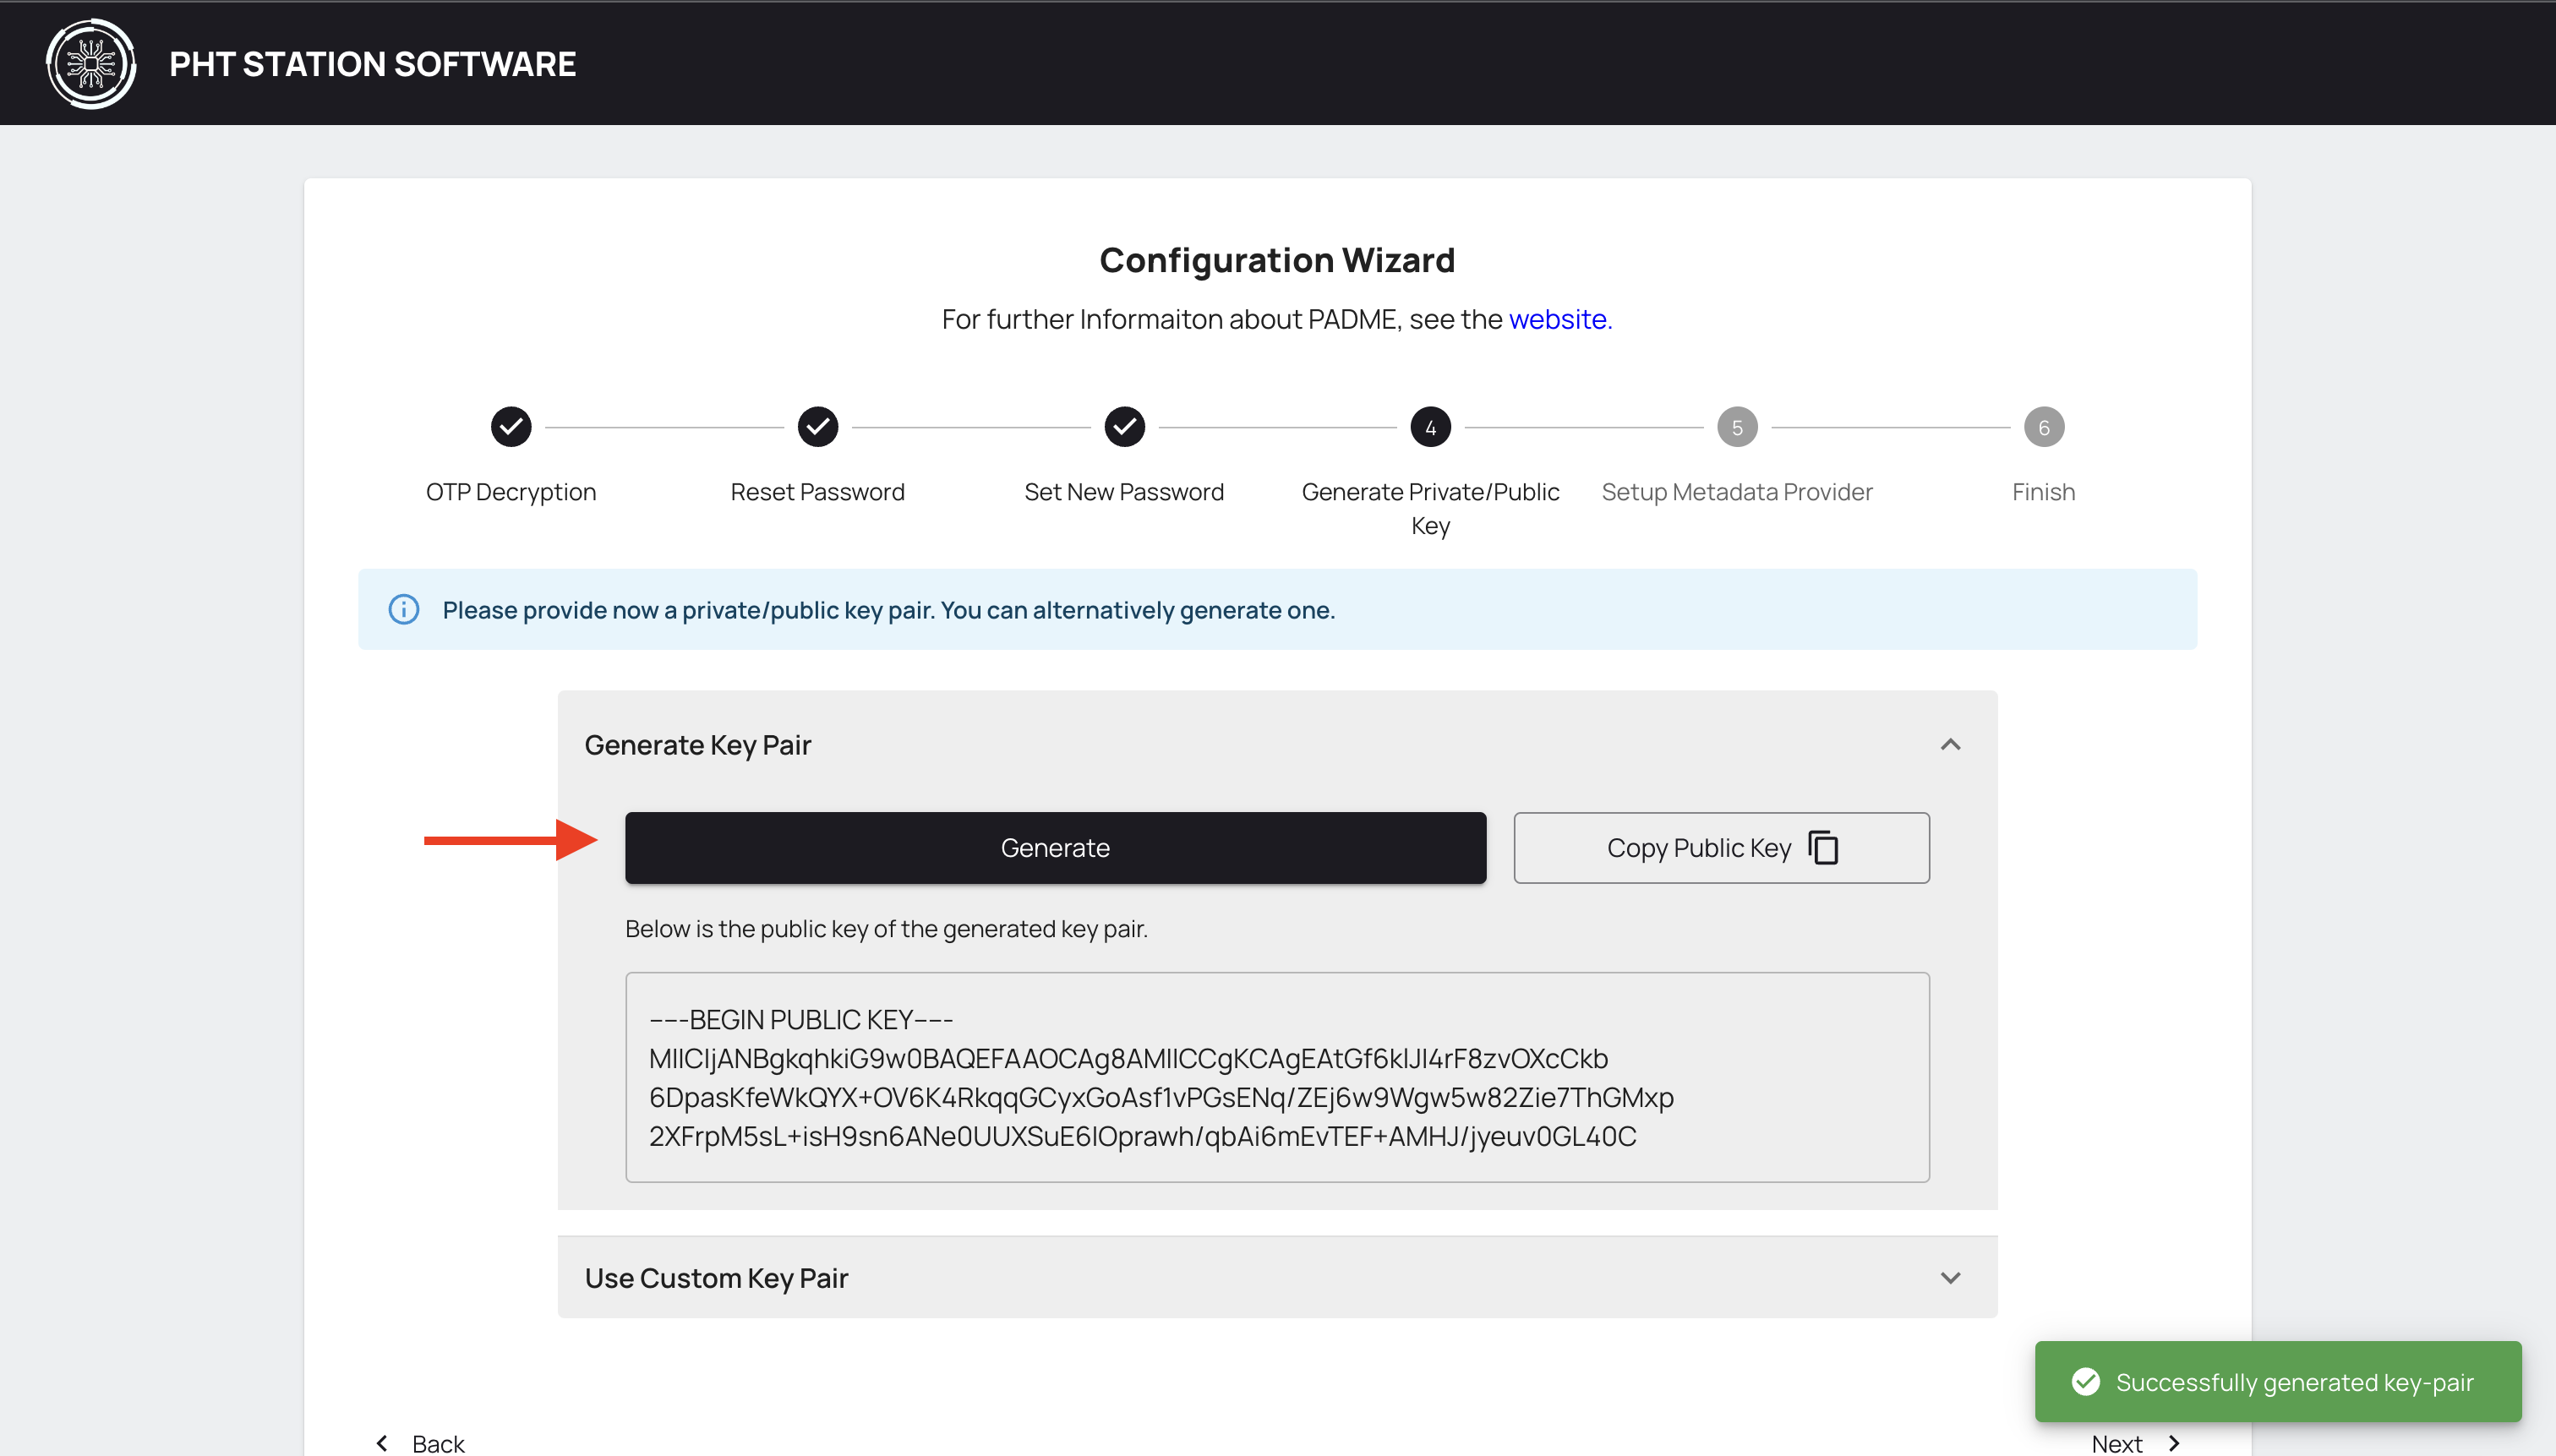
In this step, you need to generate an RSA key-pair. We recommend using our Generate Key Pair engine by clicking on Generate.
However, you can also use your own key generator. If you want to use a custom key-pair, choose Use Custom Key Pair option and provide your valid public and private keys (your private key will be stored locally and never leaves the Station Software).
Click on Generate to generate a Private/Public key pair. The generated public key will be displayed below and you should see a success message. Click next.
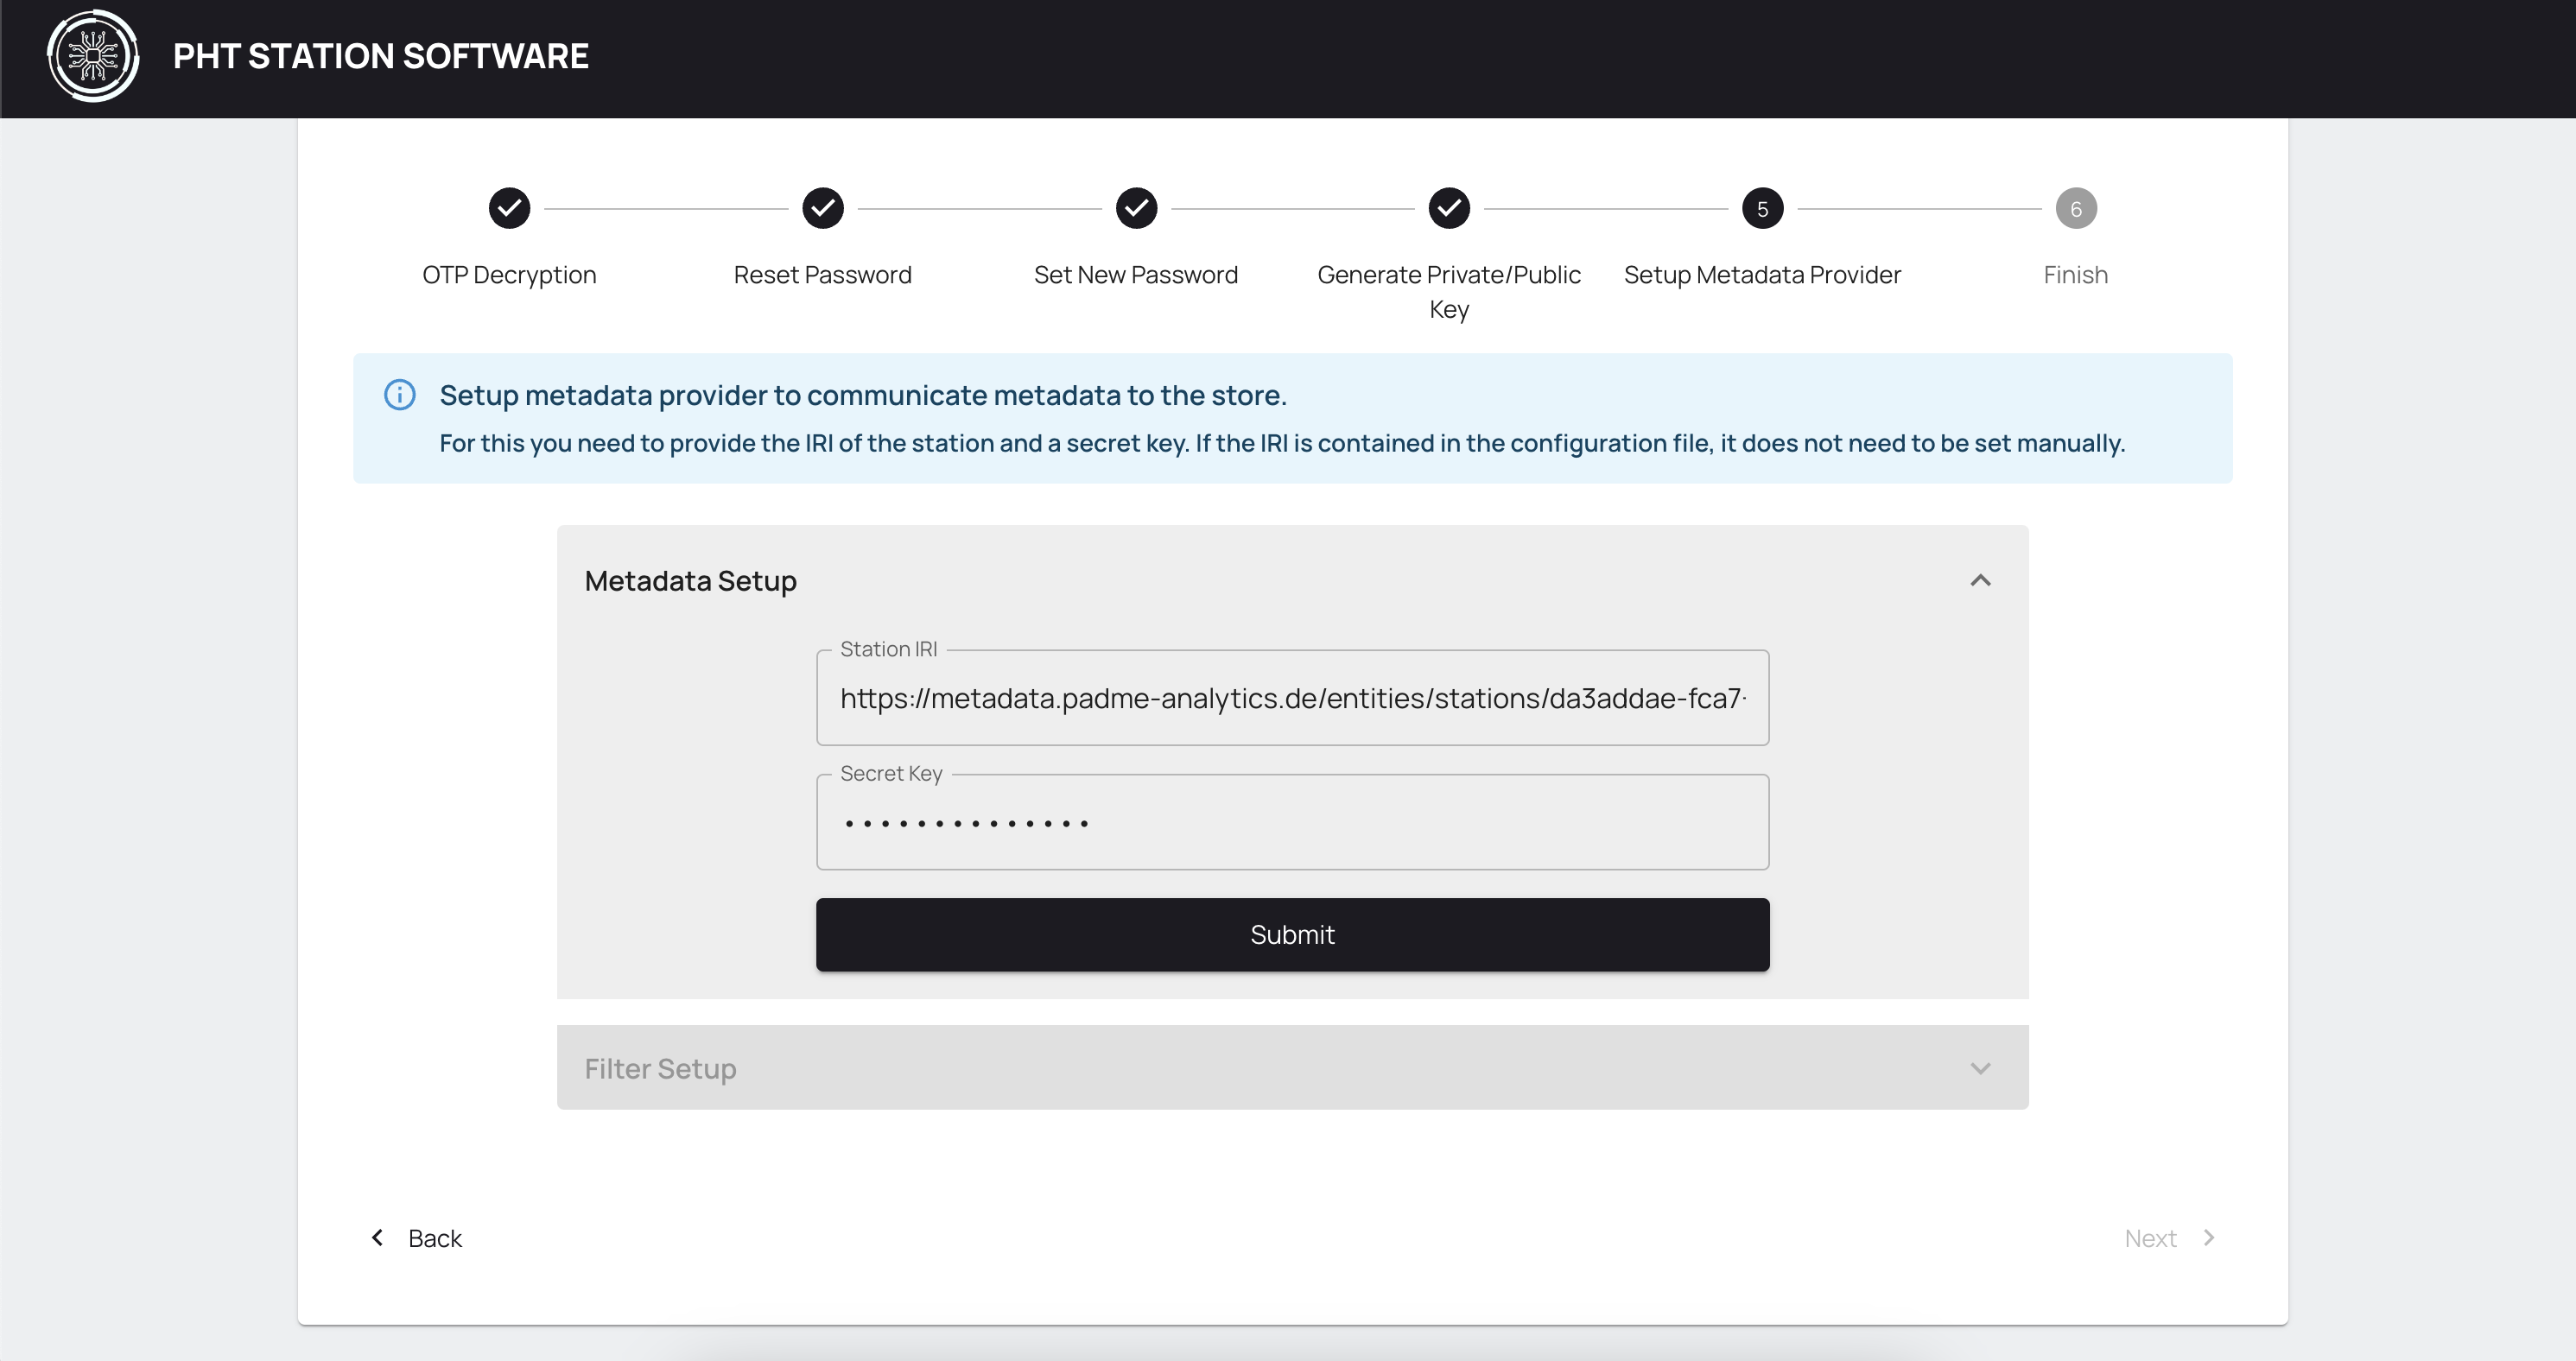
In this step, you can configure the Metadata provider to communicate metadata to the store. In the Station IRI field, you can enter an IRI, identifying your station globally. If the prior uploaded configuration file contains such an IRI for the station, this field will be filled out for you.
In the Secret Key field, you have to enter a random password. This will be used as a one time password to connect the metadata provider at the station with the central metadata store.
After you Submit this info, the Next button is enabled. Additionally, a text field is displayed, where you can enter in each row an IRI of an event which should be added to the filter list. Via the checkbox, you can define whether the list should be treated as an allow list, meaning that only entries in the filter list are communicated. Otherwise, the list will be used as a blocklist, allowing all events but those in the list.
Click Next to proceed.
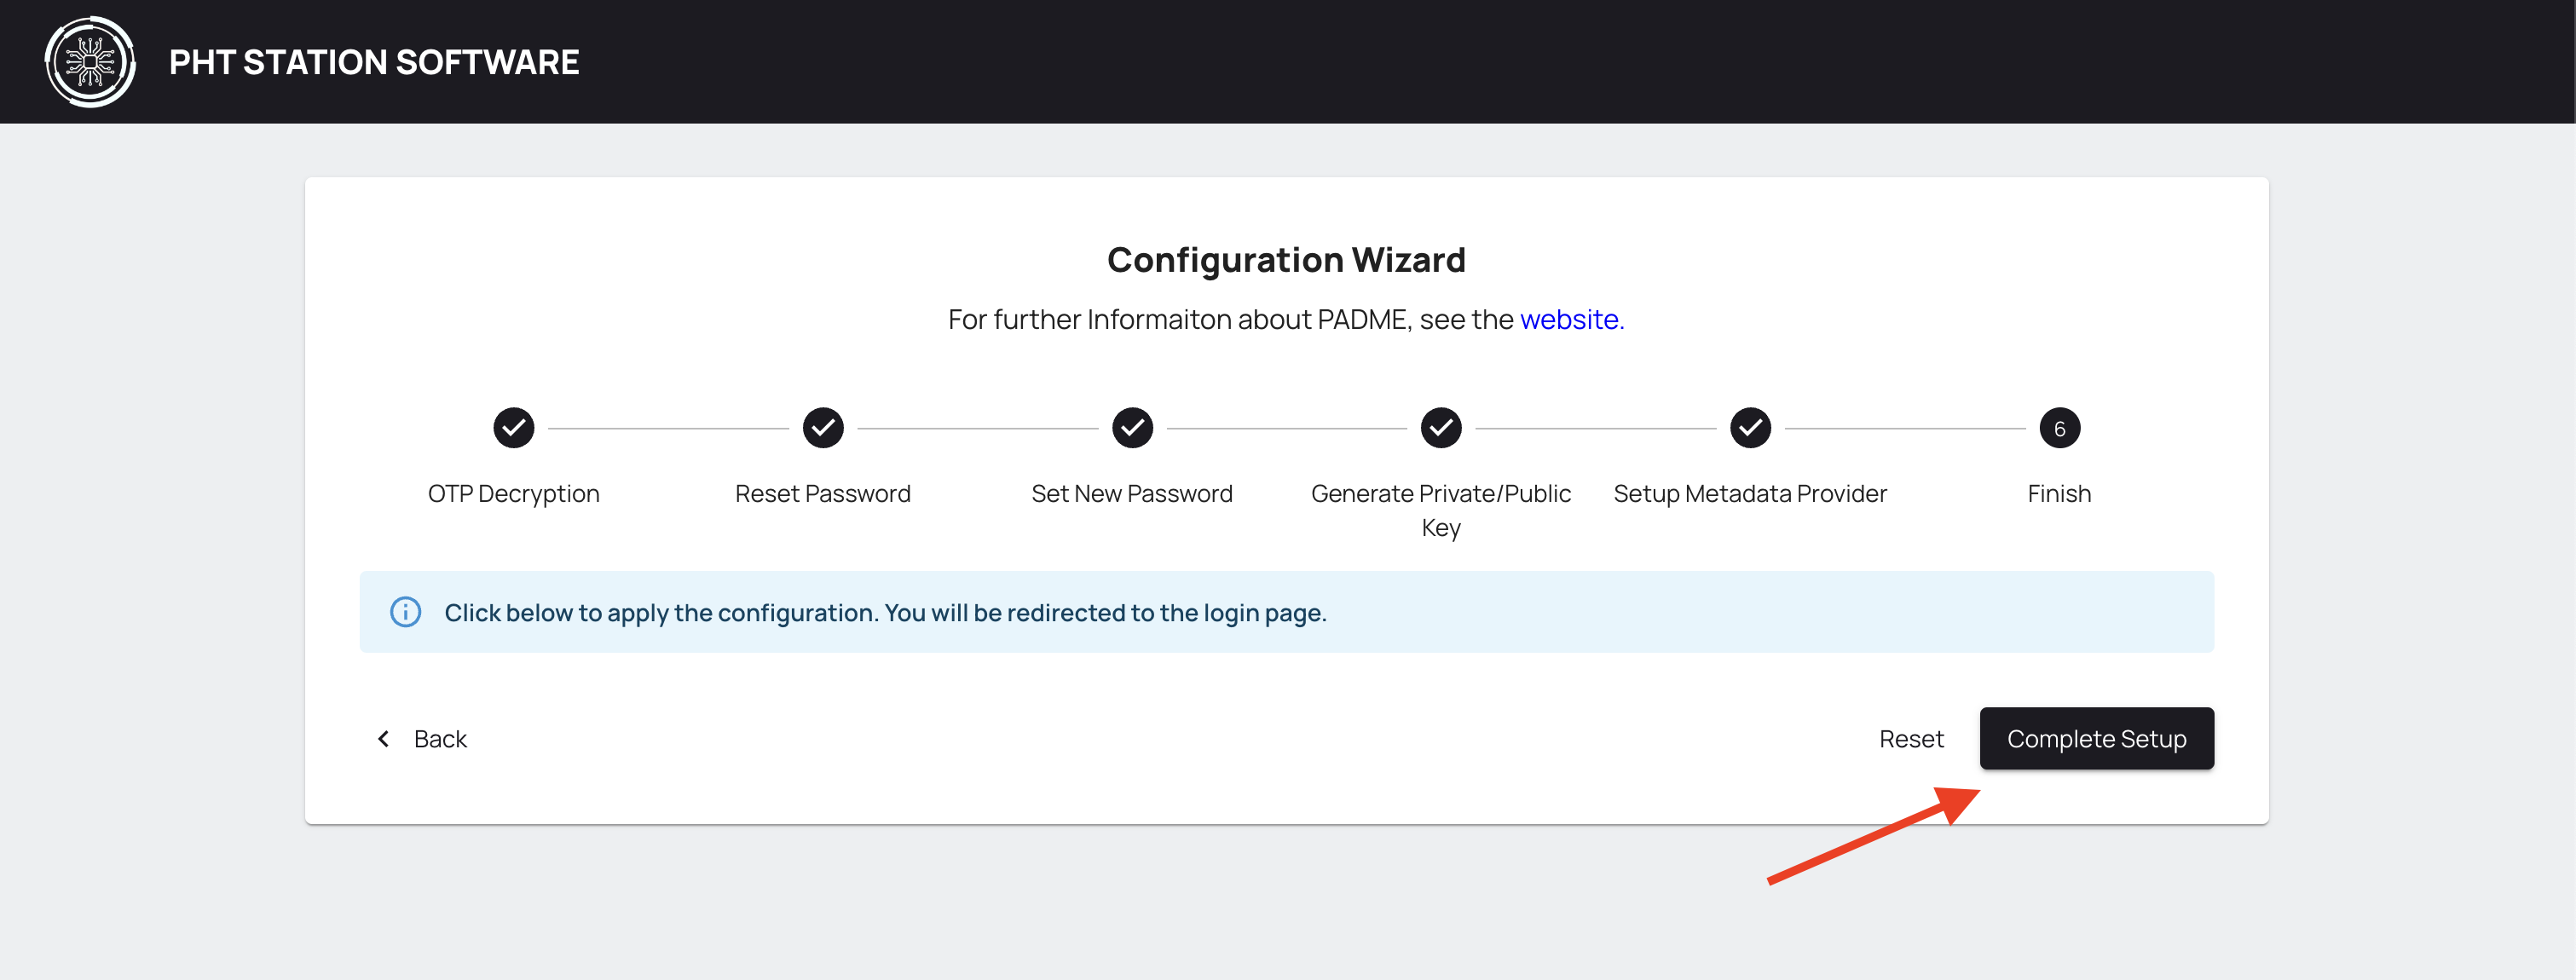
The wizard steps are done. Click on the Complete Setup button and you will be redirected to the login page of the Station Software.
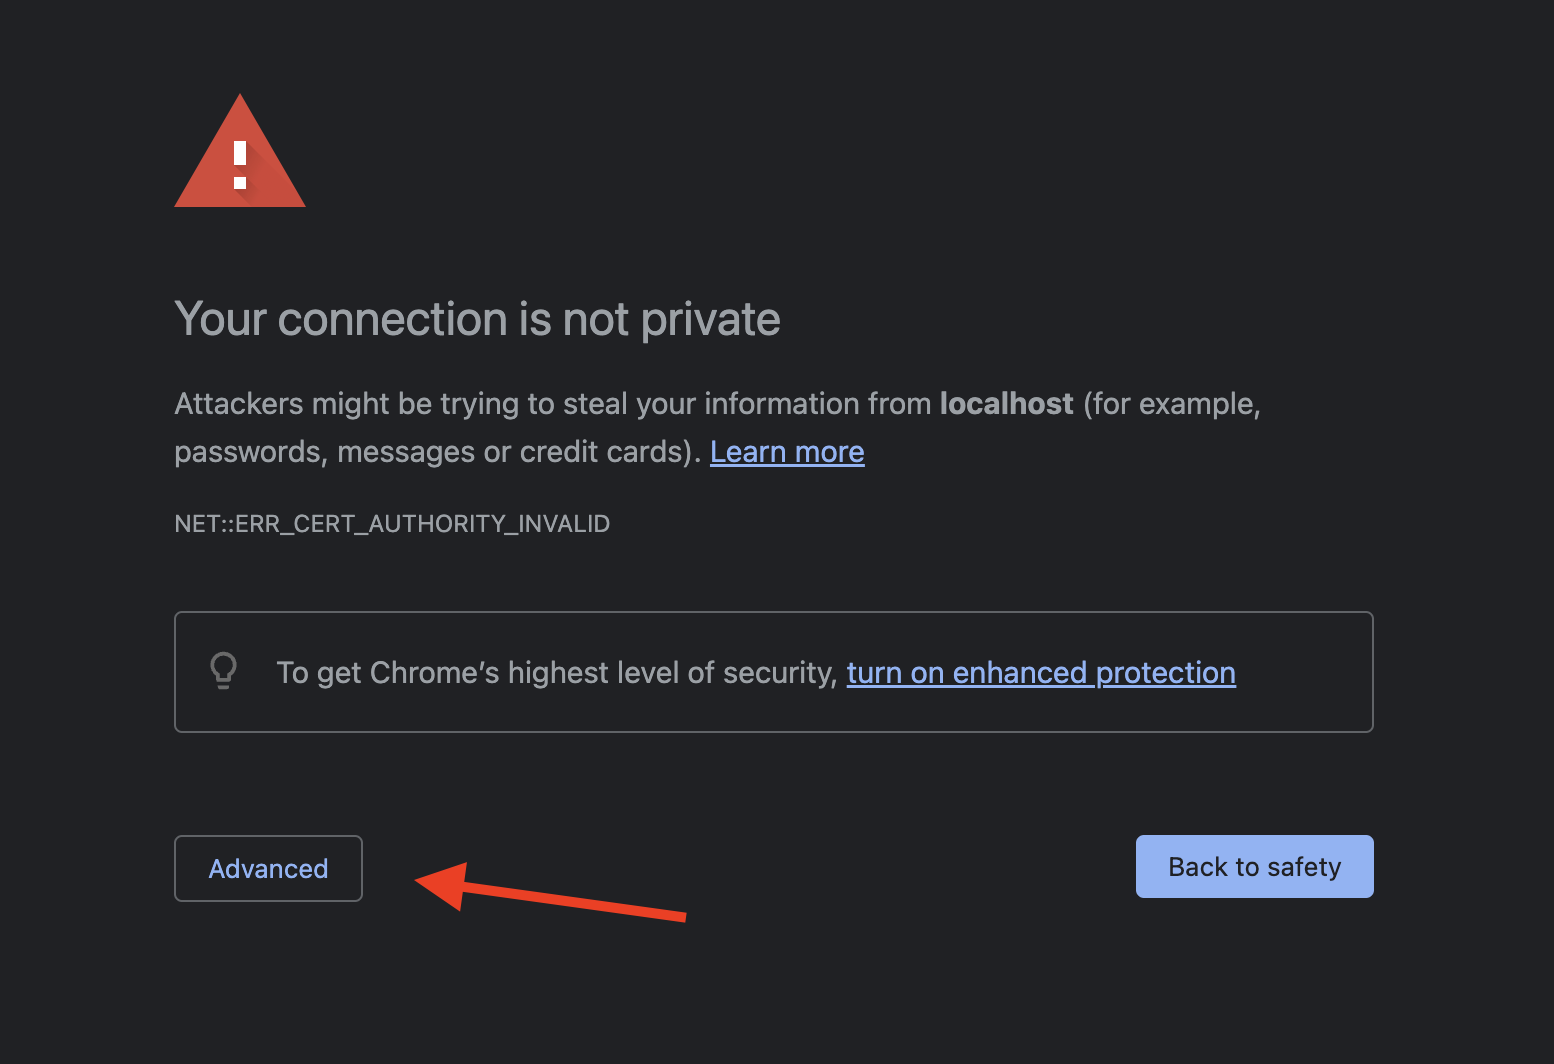
You might see a blank page at first. This is to be expected since the Keycloak instance is using a self-signed certificate which the browser blocks due to security checks.
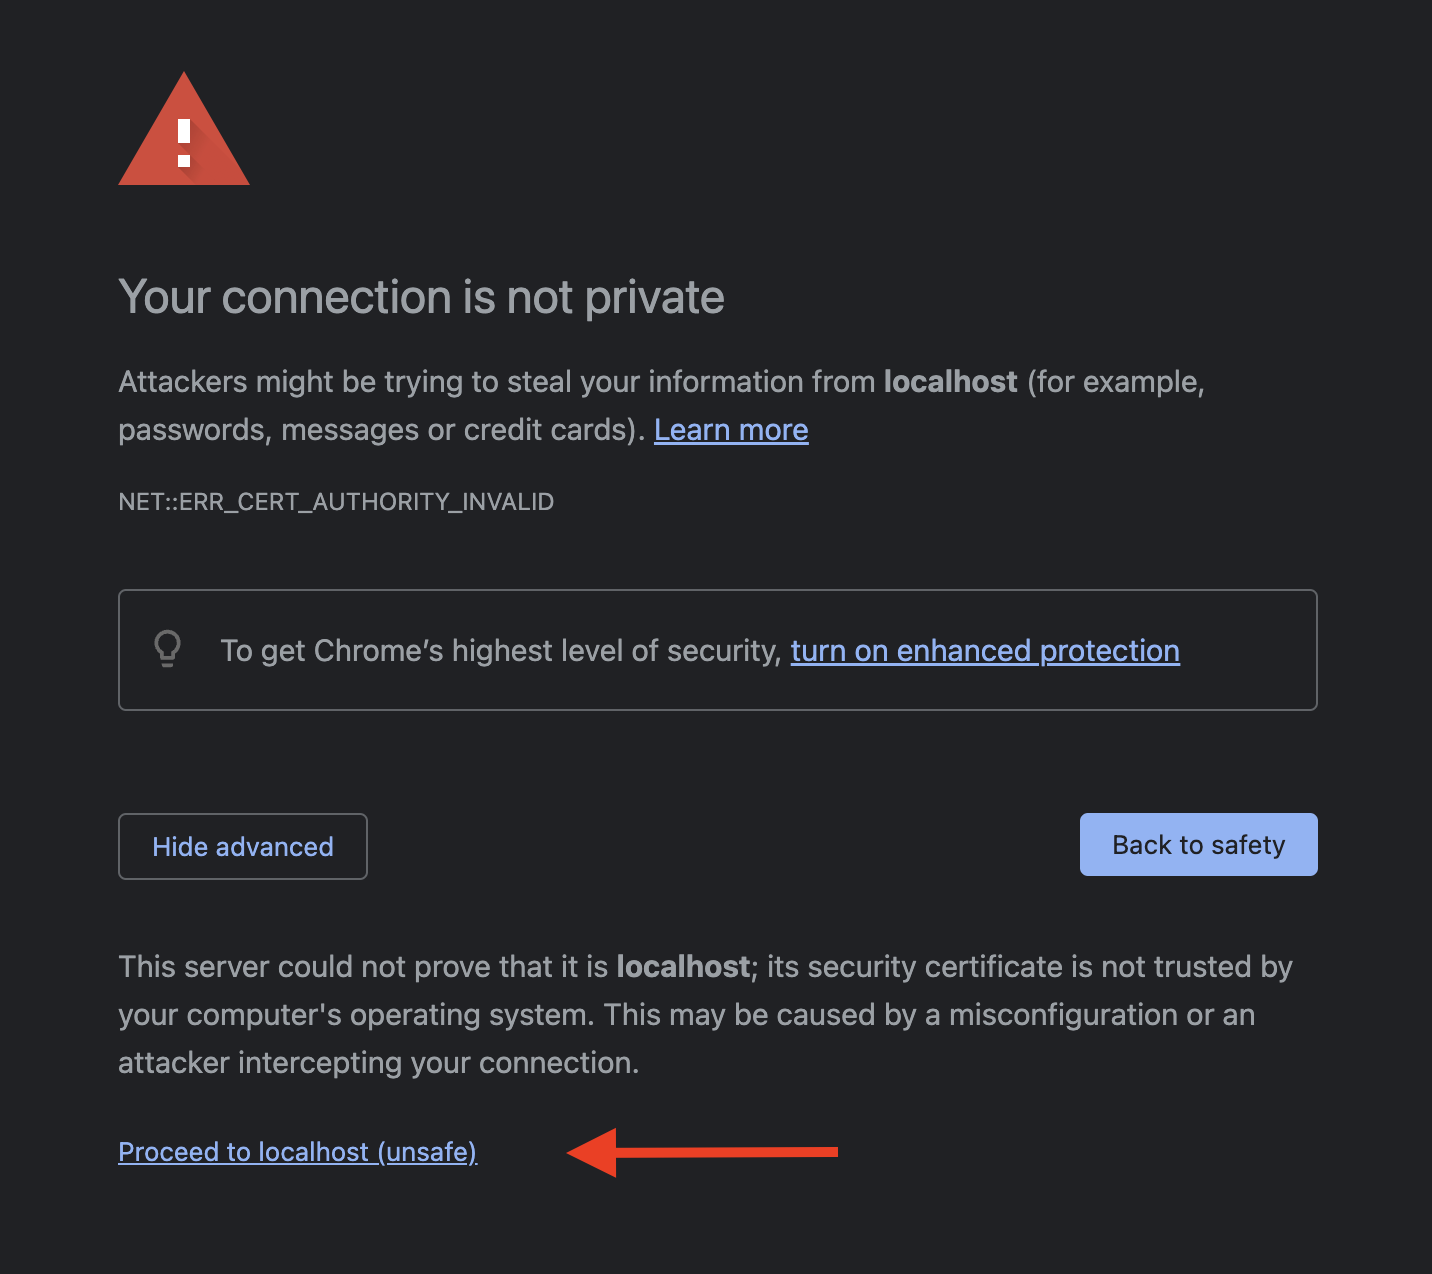
We can safely bypass this security check by either opening https://localhost:8443 or https://your-server-ip-or-domain:8443, clicking on Advanced and Proceed to localhost (unsafe).
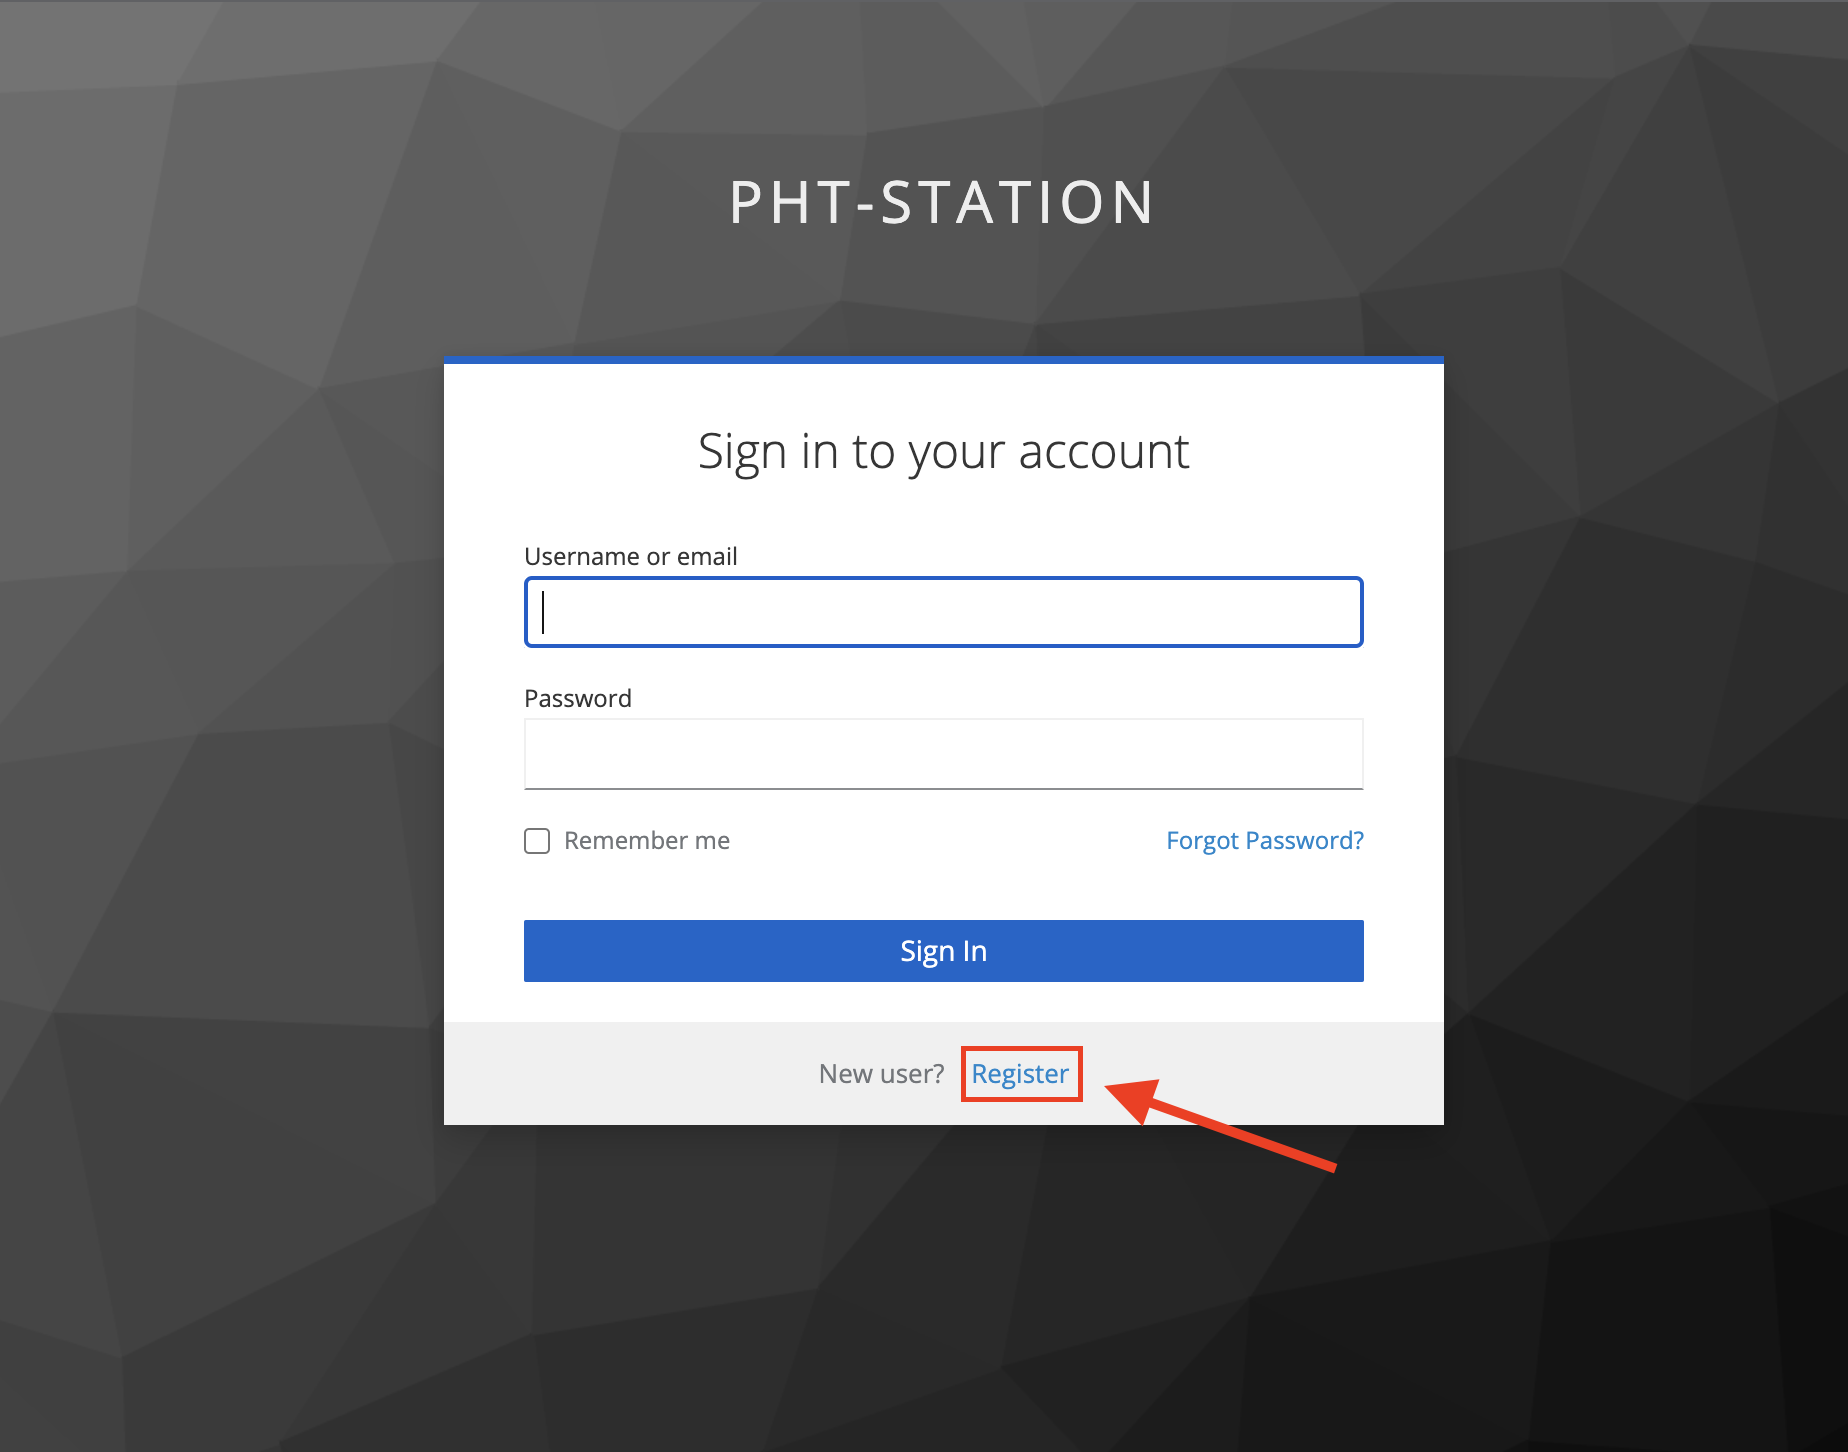
Navigate back to either http://localhost:3030 or http://your-server-ip-or-domain:3030 and you should now see the PHT-STATION login page.
Please click the Register button to create an account. Then you can log in to the Station Software with your login credentials.
¶ Update Admin Password on Keycloak
This step is recommended as part of finishing the Station Software setup. You should update the Keycloak admin default password provided with the deployment files.
Default Keycloak Credentials
username: admin
password: password
To update, go to the Keycloak admin page and log in using the above credentials.
- Select
masterrealm from dropdown and click onUserstab. - Click on user
admin -> Credentials -> Reset password. - Type the new password and click
Save(final step).
¶ Vault Setup (New)
After successfully logging in to the Station Software, you need to set up Vault. In this documentation, we will show you how to set up Vault.
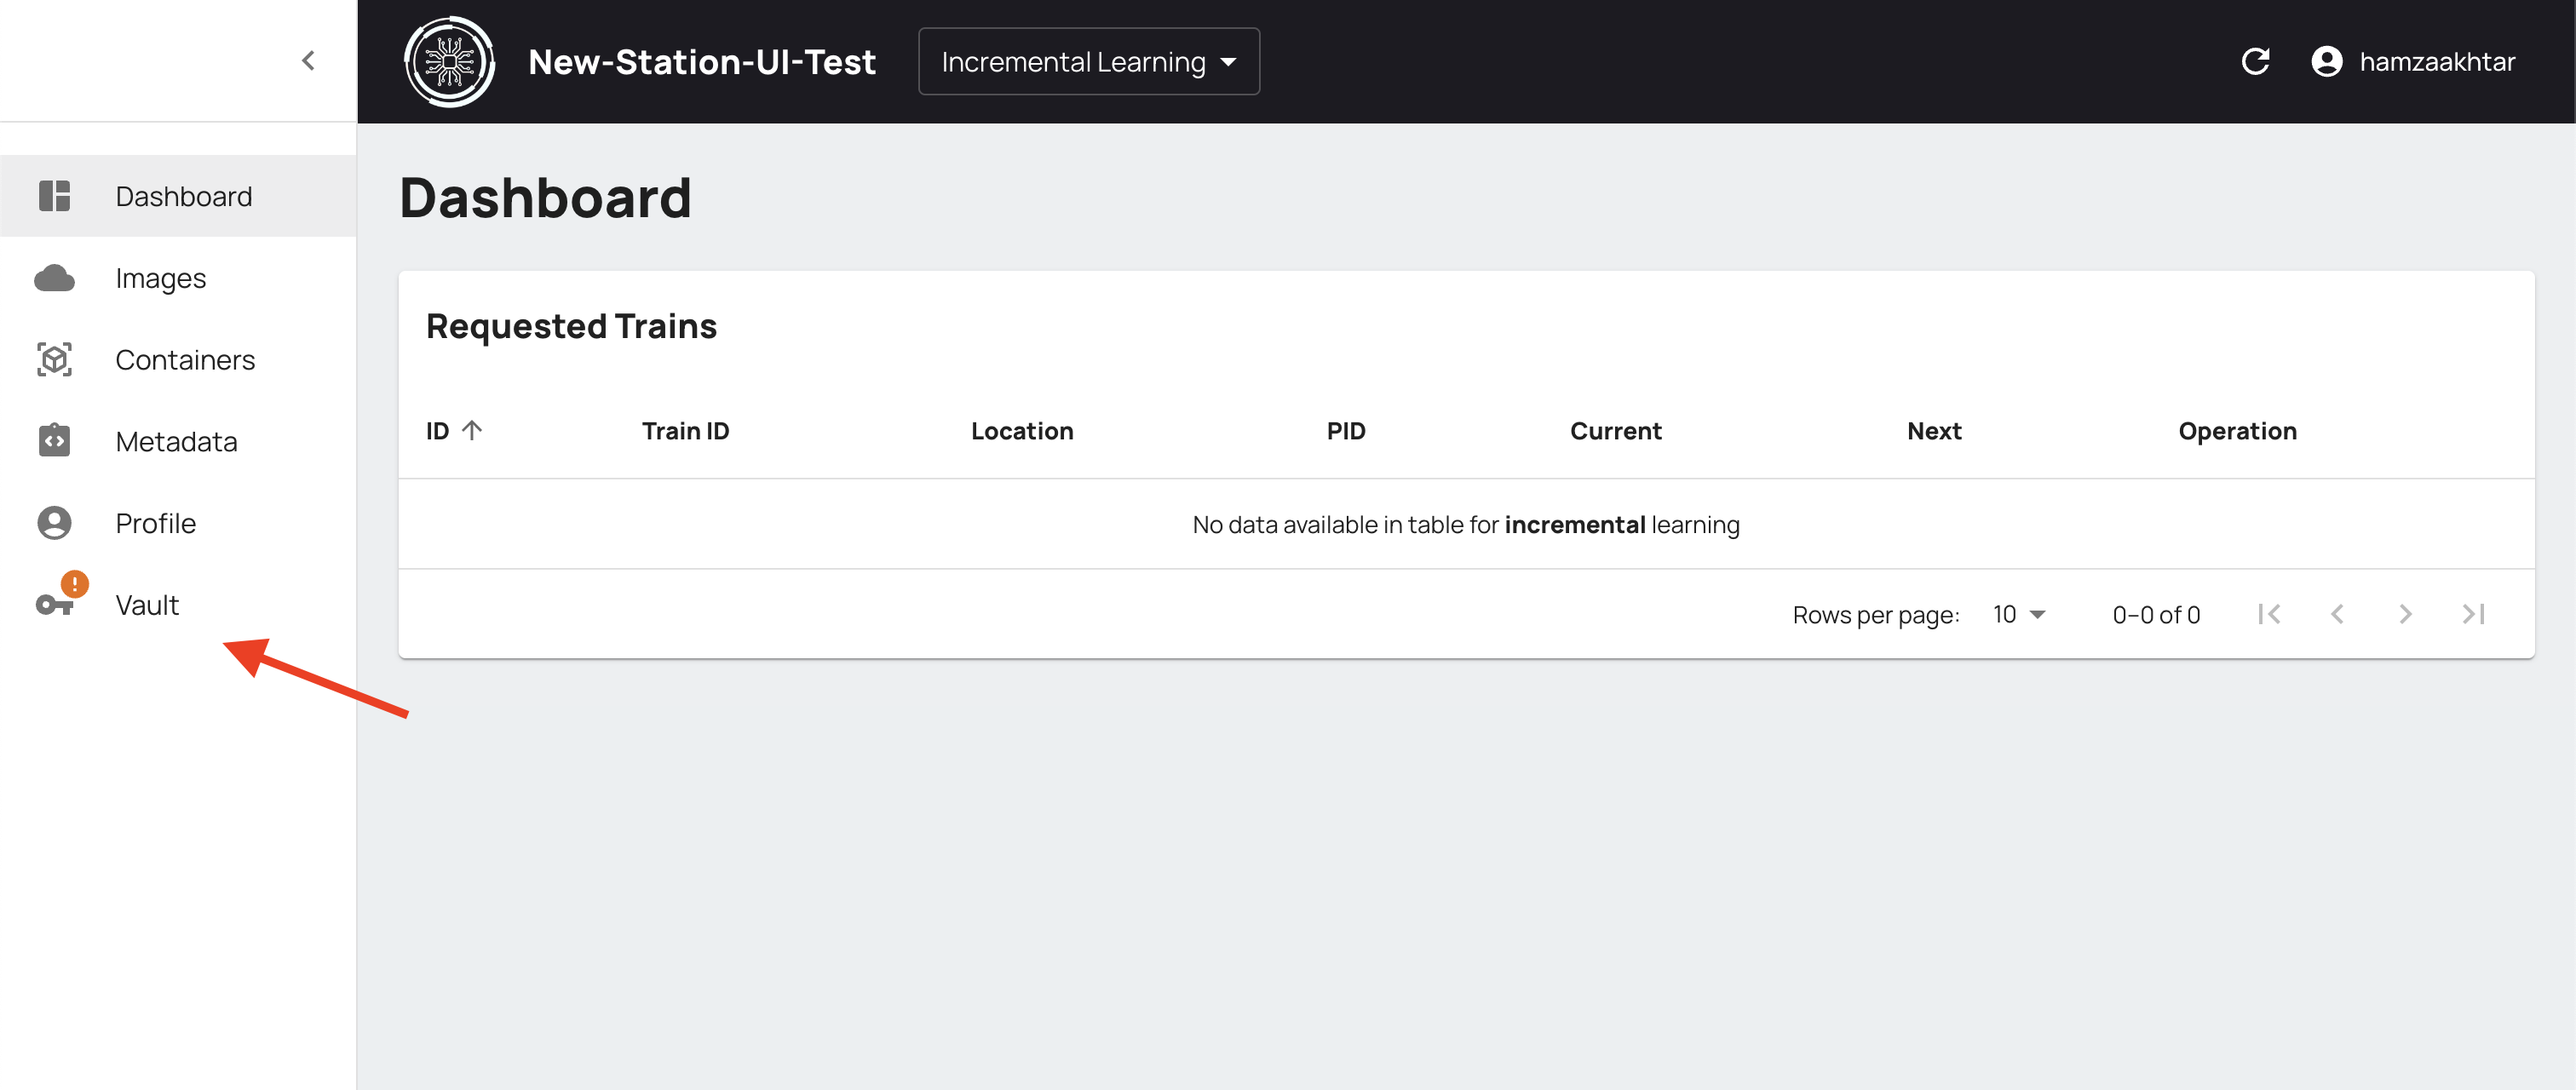
Click on the Vault icon in the drawer on the left.
¶ Initialization
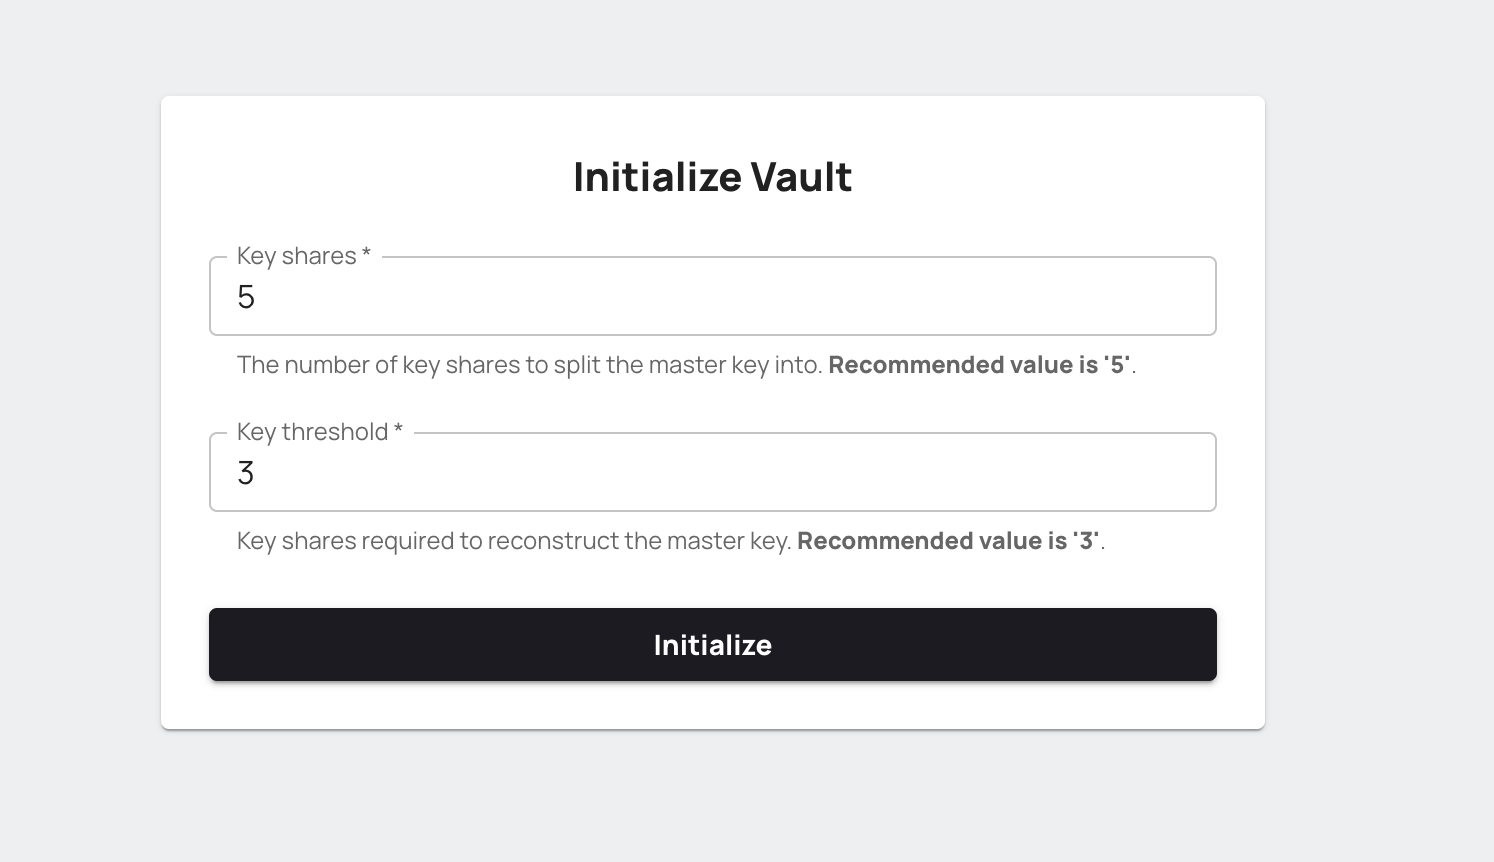
At the first step, you need to initialize your Vault. During initialization, Vault generates a master key and disassemble that into the number of Key shares such that a subset of those key shares can regenerate the master key. The Key threshold number shows how many key shares are needed to reconstruct the master key.
For example, as you can see in the following image, the master key is disassembled into 5 parts, and 3 of 5 key shares are needed to reconstruct the master key (these are recommended default values, you can change them). Click the Initialize button.
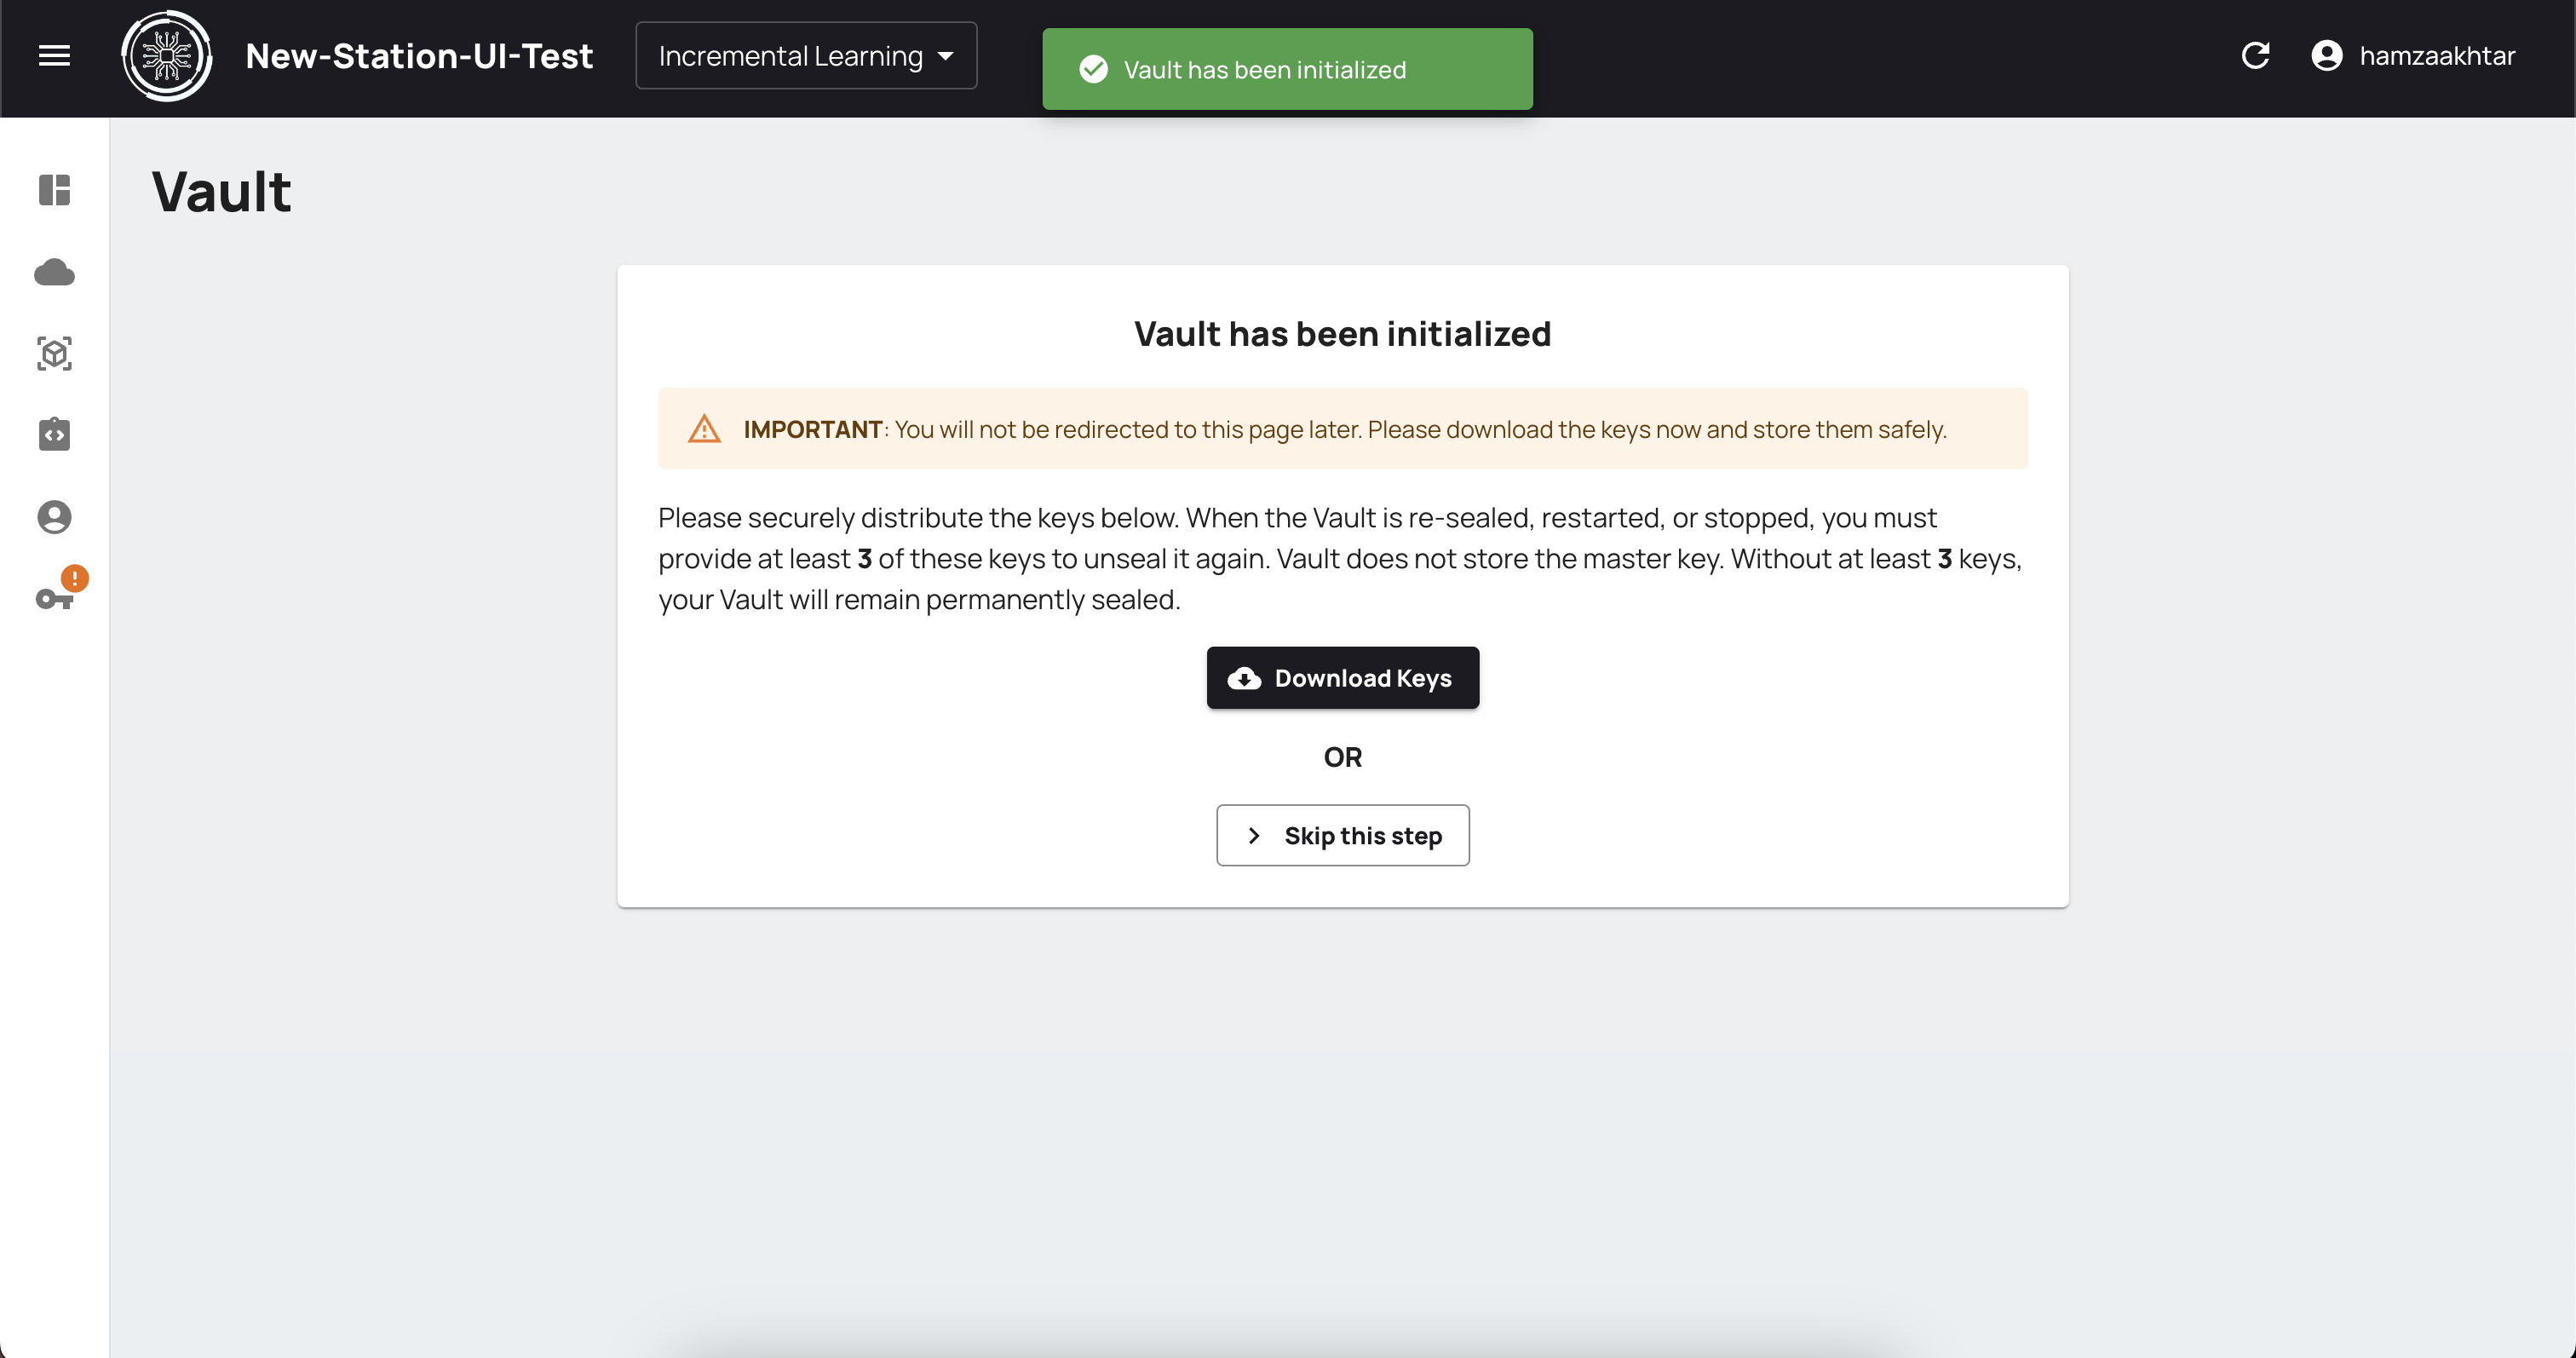
You will be redirected to a download page to download the keys file needed for further process. Click on Download Keys and make sure you download the file.
Note that this file contains confidential keys and should be stored in a safe place.
It is important you download the keys for the first time otherwise the vault will remain locked. If you already have the keys downloaded, you can click on Skip this step.
The screenshot below shows a sample file. Your file should have a similar structure (the number of keys may differ).
It might be usefull to extract the keys from the file, store them in a safe place e.g. a password manager and eraze the cleartext key file from the system, e.g., using Srm.

¶ Unsealing
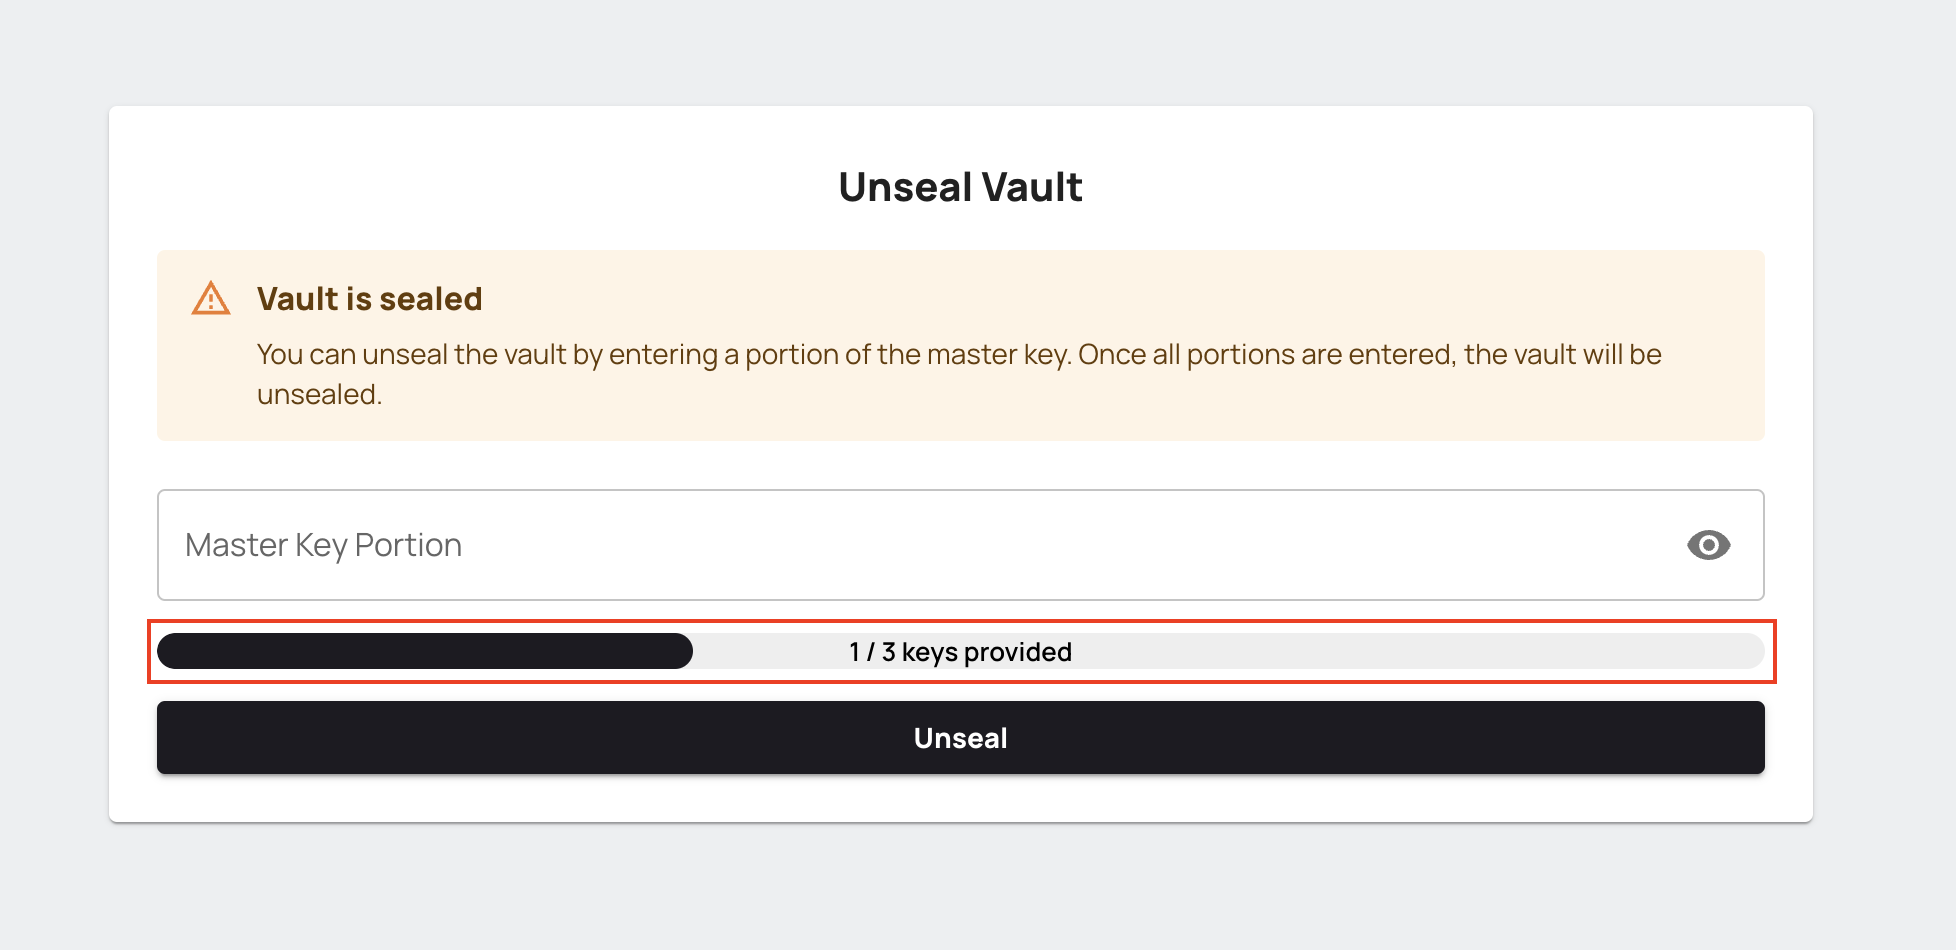
In this step, you need to unseal Vault with the downloaded keys from the previous step. Based on your initialization setting, you enter a number of keys (Key threshold) to unseal Vault. For default values, you should enter 3 of 5 keys. There is no order, and it does not matter which keys are selected to enter.
In this example, we enter 3 of 5 keys in the following textbox.

Do this step until the progress bar is completed.
¶ Login to Vault
Copy the value of root_token from the keys file and paste it into the text box and click Login.

If the previous steps are done successfully, the following screen will be displayed with Key-Value Engines. There is an indicator on the left which tells whether vault is sealed on unsealed.
Now Vault is ready, and the Station Software has access to it.

¶ Software Setup (Legacy)
If you have the new version of Station Software, please click here to proceed.
¶ Follow the Configuration Wizard steps
Open your browser and navigate to the stations installation wizard. If you access the website from the deployment machine you can use http://localhost:3030, otherwise use http://your-server-ip-or-domain:3030.
You should see a page like the one you see in the image below. Now you can start the Station Software configuration. Click the “Start Configuration” button.

¶ Upload and decrypt the env file
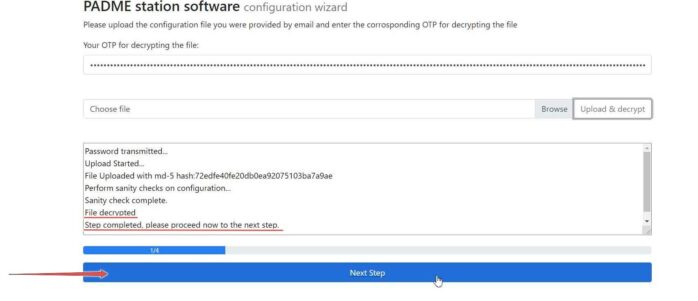
Insert the One Time Password from the previous step into the password field.
Click on Browse and select the env file you received from your email.

Click the Upload&Decrypt button.

If decryption is done successfully, the Next Step button is activated; click on it.
¶ Reset password
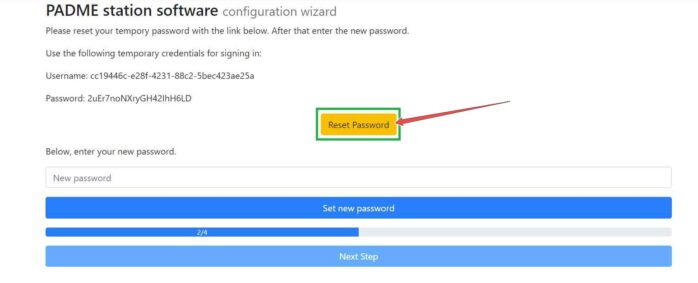
Now, you have to reset your temporary password.
Please, click the Reset Password button.
Please click the “Sign In” button.

Enter your username and password from Step 1.
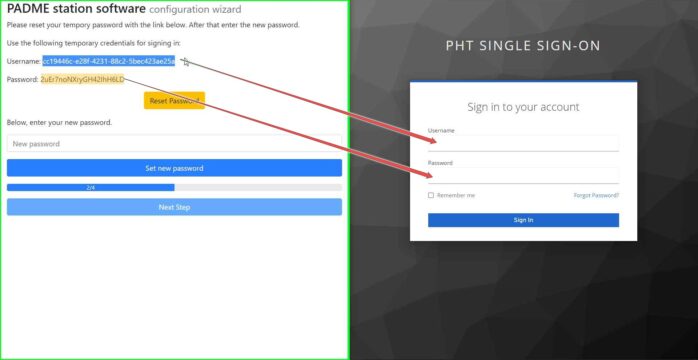
Now, you are asked to set a new password. Please, note it somewhere.

A verification email will be sent to you; check your inbox and open the Verify email.
Click on Link to email address verification

And click on Click here to proceed.

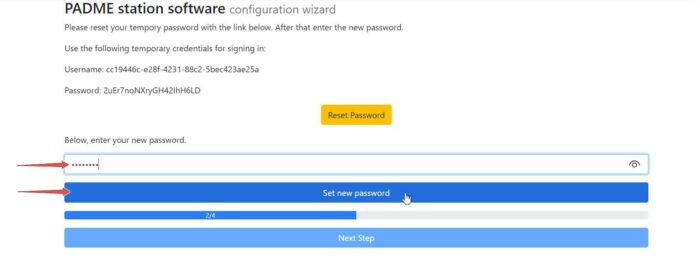
Now, go back to the Station Software wizard page and type your password, which you have just entered in our IAM entity. Click the “Set new password” button. If your account is verified, the “Next Step” button is activated; click on it.
¶ Generate a key-pair
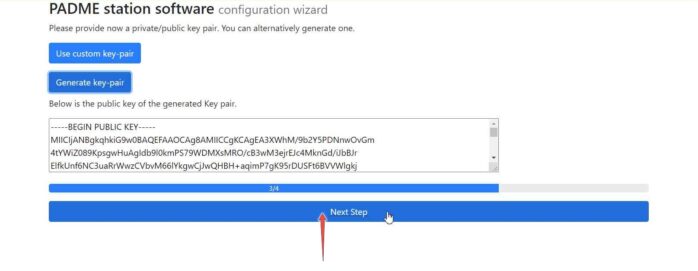
In this step, you need to generate an RSA key-pair. We recommend using our key engine by clicking on Generate key-pair. However, you can also use your own key generator. If you want to use a custom key-pair, choose Use custom key-pair option and provide your valid public and private keys (your private key will be stored locally and never leaves the Station Software). Otherwise, you can simply choose Generate key-pair.

The public key of the generated key pair is displayed, and you can go to the next step.
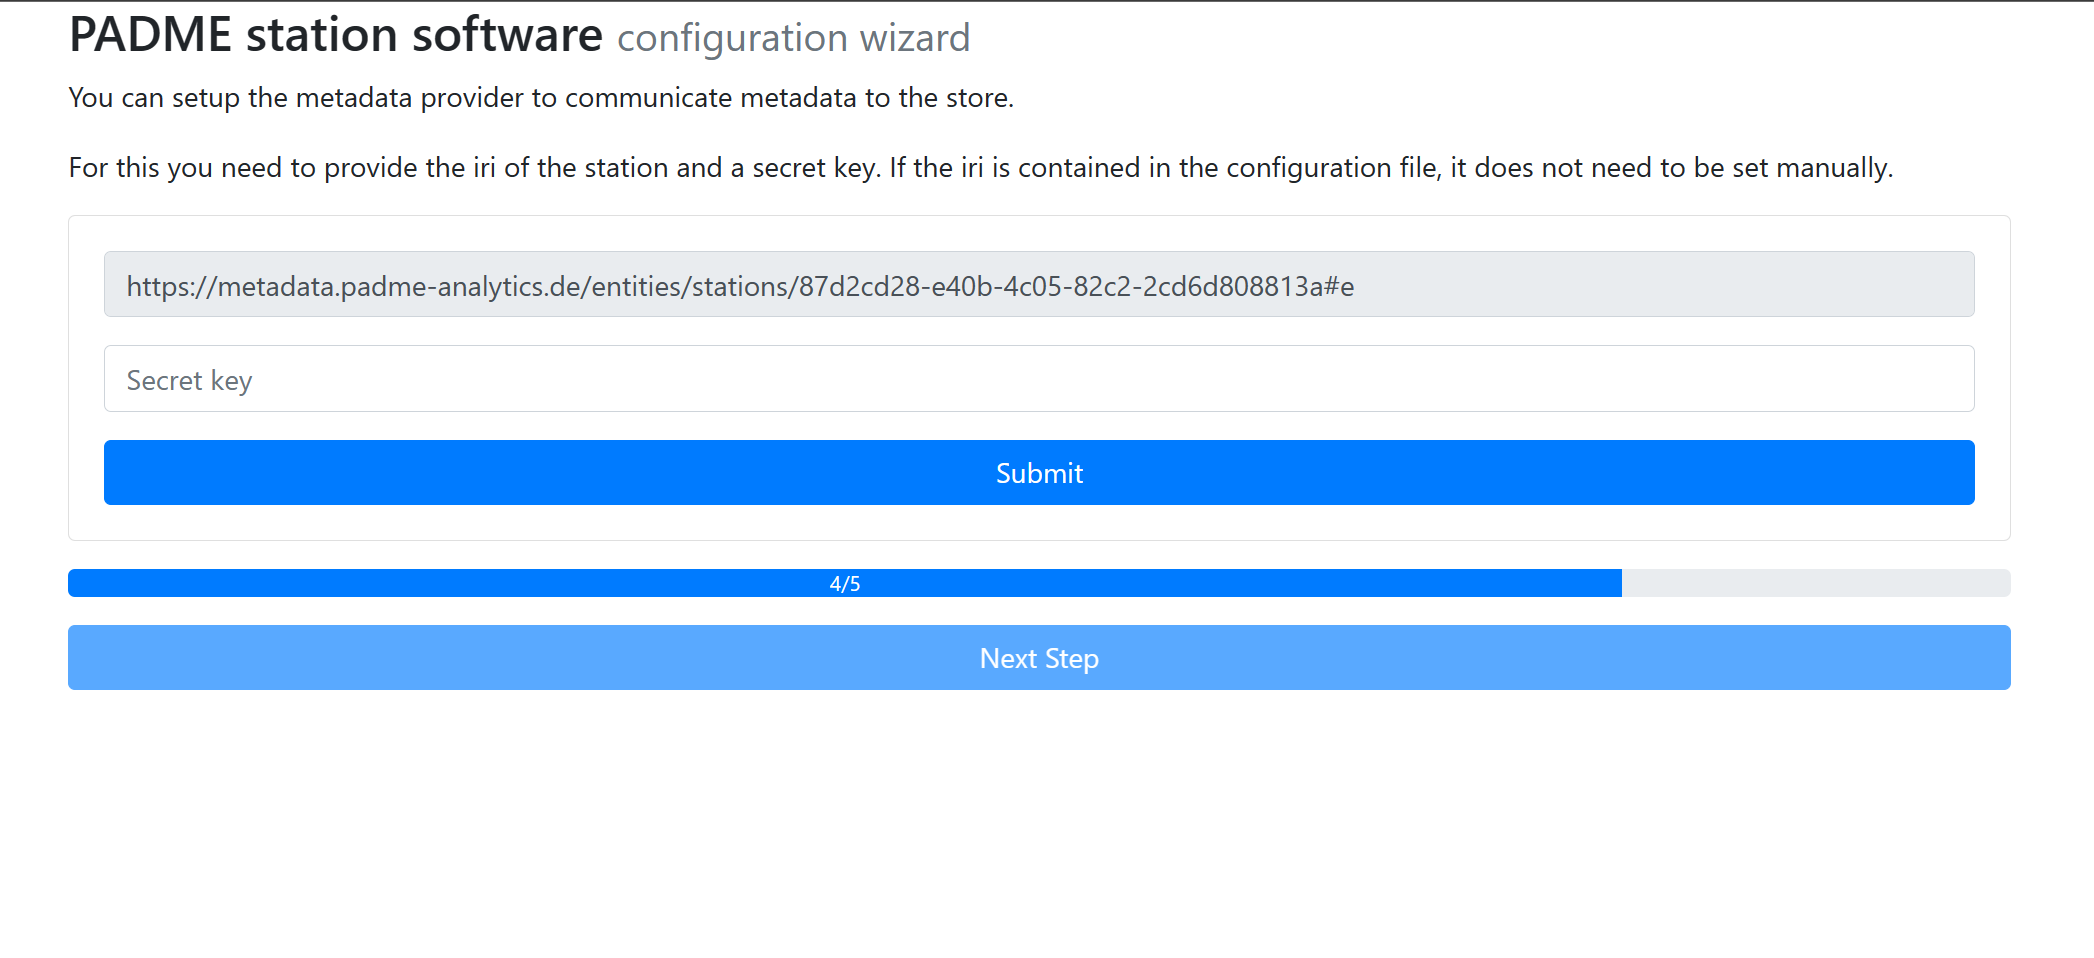
In this step, you can configure the Metadata provider to communicate metadata to the store. In the station IRI field, you can enter an IRI, identifying your station globally. If the prior uploaded configuration file contains such an IRI for the station, this field will be filled out for you. In the “Secret Key” field, you have to enter a random password. This will be used as a one time password to connect the metadata provider at the station with the central metadata store. After you submit this info, the Next Step button is enabled. Additionally, a text field is displayed, where you can enter in each row an IRI of an event which should be added to the filter list. Via the checkbox, you can define whether the list should be treated as an allow list, meaning that only entries in the filter list are communicated. Otherwise, the list will be used as a blocklist, allowing all events but those in the list.
The wizard steps are done. Click on the Complete Setup button. You will be forwarded to the login page of the Station Software.

Please click the Register button to create an account. Then you can log in to the Station Software with these login credentials.

¶ Vault Setup (Legacy)
¶ CSS not working in Station Software
If you do not see the Dashboard as shown in the pictures below (or in an ugly format), this means the styling is not applied. This can be due to the fact that your organization has firewall rules enabled which are preventing the application to fetch CSS (bootstrap) files over the internet.
This (legacy) version of Station Software uses CDN (Content Delivery Network) to serve CSS/JS files used for styling the application and for other utility javascript functions. For this to work, following links need to be whitelisted from your organizations firewall rules.
// Font CSS
https://use.fontawesome.com/releases/v5.6.3/css/all.css

// Bootstrap CSS
https://stackpath.bootstrapcdn.com/bootstrap/4.4.1/css/bootstrap.min.css

// diff2Html CSS
https://cdnjs.cloudflare.com/ajax/libs/highlight.js/9.13.1/styles/github.min.css
https://cdn.jsdelivr.net/npm/diff2html/bundles/css/diff2html.min.css

// diff2Html JS
https://cdn.jsdelivr.net/npm/diff2html/bundles/js/diff2html-ui.min.js

// JQuery JS
https://code.jquery.com/jquery-3.4.1.min.js

// Popper JS
https://cdn.jsdelivr.net/npm/popper.js@1.16.0/dist/umd/popper.min.js

// Bootstrap JS
https://stackpath.bootstrapcdn.com/bootstrap/4.4.1/js/bootstrap.min.js
Once the links are whitelisted, you can refresh the webpage and styling should now be applied.
After successfully logging in to the Station Software, you need to set up Vault. In this documentation, we will show you how to set up Vault.
At the top navigation bar of the Station Software, click on Vault.

¶ Initialization
At the first step, you need to initialize your Vault. During initialization, Vault generates a master key and disassemble that into the number of Key shares such that a subset of those key shares can regenerate the master key. The Key threshold number shows how many key shares are needed to reconstruct the master key.
For example, as you can see in the following image, the master key is disassembled into 5 parts, and 3 of 5 key shares are needed to reconstruct the master key (these are recommended default values, you can change them). Click the Initialize button.

You will be redirected to a download page to download the keys file needed for further process. Click on Download keys and make sure you download the file.
Note that this file contains confidential keys and should be stored in a safe place.

The screenshot below shows a sample file. Your file should have a similar structure (the number of keys may differ).
It might be usefull to extract the keys from the file, store them in a safe place e.g. a password manager and eraze the cleartext key file from the system, e.g., using Srm.

Now, you can continue to the next step, click on the Continue to Unseal button.

¶ Unsealing
In this step, you need to unseal Vault with the downloaded keys from the previous step. Based on your initialization setting, you enter a number of keys (Key threshold) to unseal Vault. For default values, you should enter 3 of 5 keys. There is no order, and it does not matter which keys are selected to enter.

Do this step until the progress bar is completed.

¶ Sign in to Vault
Copy the value of root_token from the keys file and paste it into the text box and click “Sign In”.

If the previous steps are done successfully, the following screen will be displayed. Now Vault is ready, and the Station Software has access to it.

¶ Upgrade to Latest Station Software
Follow the below steps to upgrade from your existing old station software to the new one:
- Download the latest files for the station from here. You will want to download the stationdeploymentfiles.zip.
- Take a copy of your existing stationdeploymentfiles folder (The folder containing the existing docker-compose and other files, in case you want to revert to old version.)
- Extract the new zip file and replace the existing folder contents with the new ones
- If your station has GPU enabled or if you have mounted any volumes by editing the compose file directly, open the new docker-compose.yml and update only the dind service portion from your old docker-compose.yml file
- After that, you can do a
docker compose up -din the folder from your terminal and the new station should be up and running. - Go to https://localhost:8443 in your browser and trust the certificate. This is where you can access the Keycloak admin console, not needed for upgrade, just for your info. (We are using a development certificate hence why this step is needed. If you have proper certificates, there is documentation here on how you can enable HTTPS).
- Go the http://localhost:3030 and you should be redirected to a keycloak login page. You can create a new account by using the register option.
- Once the new user is registered, you should be able to login to station using the new credentials and access the station with its new UI!.
¶ Running Multiple Stations on the Same Machine
There might be scenarios where you want to run multiple stations on the same machine. A common use-case is if you want to run two stations with one connected to the RWTH CS and the other connected to the FIT CS.
Here, we assume you already have a station running connected to the RWTH CS and now wants to run a new station connected to FIT CS. Follow the below steps:
- The requirements are the same except you will need two new free ports since ports
3030and8443will be in use by the existing station. Let us assume you will allocate ports3031and8444for the new station. - During Station Onboarding, choose
requester.pht.fit.fraunhofer.deas the onboarding service. - Follow the same steps as documented in this page to continue the station installation.
- Before doing
docker compose up -dstep, create a.envfile (if not already created to configure mounts) and add below environment variables:
STATION_PORT=3031
KEYCLOAK_PORT=8444
PROJECT_NAME=NEW_PROJECT_NAME_

# The Keycloak URLs also need to be updated
KEYCLOAK_HOSTNAME_URL=https://localhost:8444
KEYCLOAK_ADMIN_URL=https://localhost:8444
KEYCLOAK_REDIRECT_URI=http://localhost:3031
- Now, once you do
docker compoe up -dthe station should be running on port3031and keycloak on8444. Like with the other station, you should visit https://localhost:8444 and trust the certificate before visiting http://localhost:3031. - Continue with the onboarding as usual.