¶ How to deploy PADME
This document is a step-by-step guide that describes the deployment of the central components in the PADME ecosystem. See this document for instructions on how to setup a edge-client aka Station-Software. After following this guide, you will have a indepentend instance of PADME that you can operate on your own.
¶ Concept
The PADME architecture contains multiple services that interact with each other. Some of those services are considered required, meaning that those are part of a minimal viable deployment. Others are optional, meaning they provide additional features but are not strictly required to run the ecosystem. This section introduces a workflow for the deployment of the PADME ecosystem. This workflow takes dependencies between services into account and will contain required and optional services.
In general, all services in the ecosystem are Dockerized. Therefore, they can be deployed as containers. For the deployment we require that you have one machine available on which the services can be deployed. You can find the exact requirements for this machine in the hardware requirements section. While it is possible to deploy the infrastructure to multiple (physical or virtual) machines, this deployment is more complex and not covered in this guide. If you have a need for a multi-host deployment please reach out to us via the contact details on our website for guidance.
The following diagram shows an overview of the services to be deployed. Required services are color coded in green while optional services are shown in grey. You can also see the order in which the services need to be deployed. Moreover, the parallel gateways indicate services which can be deployed in any order.
For each service in the diagram, we provide a open source repository with instructions and a section in this document with further details, including a link to the mentioned repository. Moreover, for each service we provide a docker compose file that includes direct service dependencies (e.g. a PostgreSQL database for keycloak).
All open source repositories can be found here
Resulting from the provided docker compose files there are two possible ways to deploy our infrastructure:
- Through Gitlab CI/CD piplines (recommended)
- Manual deployment with the docker-compose files
While the first option involves more effort in the initial setup, this option it makes it easier down the line to keep your instance up-to-date with new developments and security patches. Therefore, this guide covers the first option and will only mention the general idea for the manual deployment.
In the next section we will provide the prerequisits for the deployment. This includes hardware requirements, the initial setup, and instructions depending on the choosen deployment method. Afterward we will guide through the deployment of the required services. Lastly, we will also provide instructions for optional service deployments.
¶ Prerequisites
¶ Hardware requirements
The machine that is the target for the PADME deployment can be a physical or virtual machine. In all cases it should meet the following requirements:
- Operating system: supported by Docker (Windows, Linux, Mac). We recommend the latest LTS version of ubuntu server
- Connectiviy: Internet connection with minumum 100 Mbits up- & download (1Gbit recommended)
- RAM: Minimum 16 GB, we recommend 32GB
- CPU: Higher server-grade CPU or High-End consumer-grade CPU. Minimum of 4 physical cores
- HDD/SDD: At least 100GB available space. We recommend 1TB (this depends on the number of optional services and use cases that should be executed)
¶ Preparing a machine for deployment
Once you have a machine available that meets our hardware requirements and the target operating system is installed, please perform the following steps to prepare the machine for the deployment:
¶ 1. Install the Docker Engine or Docker Desktop
See the instructions on the Docker website.
If you install Docker Desktop on Windows, it is generally recommended to use the WSL based installation instead of using HyperV due to the resulting performance improvements
After the installation, ensure that everything is working properly by running the hello-world Docker image like so:
docker run --rm hello-world
If our setup works correctly, you will see a message that your installation appears to be working. Lastly, check your docker compose installation (which is automatically installed with Docker) by executing the following command:
docker compose version
You should see the compose version printed to the console.
After this setup, please execute the setup for the Gitlab based auto deployment or read the instructions for a manual deployment in the following.
¶ 2. Configure a domain name for your machine
To provide the PADME services to the outer world, your target machine needs to be available through a domain. This can be any domain of your choosing (we use padme-analytics.de). Once you have choosen and ordered your domain, you need to adjust the domains’ DNS settings in such a way that
- The domain points to your target machine
- All subdomains also point to your target machine
The second point is needed because our infrastructure is configured in a way, that different services are provided through subdomains. For example, the Central Service will be reachable via “requester.$YOUR_DOMAIN” and Keycloak via “auth.$YOUR_DOMAIN”. This setup is possible through a NGINX-based reverse proxy. Moreover, this proxy will automatically generate and renew SSL certificates for your domain through Let’s encrypt.
For details see the Reverse Proxy deployment under deploying required services.
¶ Setting up auto deployment through GitLab CI/CD (recommended)
¶ Concept
The recommended way of deploying PADME is through GitLab CI/CD pipelines. This setup provides several benefits:
- The whole deployment is through code and therefore reproducable
- Deploy-time secrets can be managed by Gitlab via CI/CD variables, allowing us to provide the deployment files in an adjustable manner
- Less manual steps involved. This increases the efficiency for updates
Overall, this deployment through gitlab adheres to the following workflow:
As you can see, GitLab uses so called runners for its CI/CD job. In the first step, those runners are used to build the docker image for the service that should be deployed. Those images are stored in GitLabs own container image registry. In a second step, we replace placeholders in the services’ compose file (like database passwords) with the desired values. Those values are provided via Gitlab CI/CD variables. Lastly, we copy the resulting compose file to the target machine via ssh and perform a docker compose up to start the services.
This workflow is already encoded in the CI/CD configurations provided in our repositories. Moreover, we have kept the whole setup adjustable, such that it can be configured for any target machine.
In order to replicate the deployment in your environment, you will mirror the existing repositories to a Gitlab instance of your choosing. You will then configure those repository mirrors through CI/CD variables such that the deployment it done to your machine. For this to work, we need to perform a one-time setup, which is described in the following.
¶ Setup
In order for the Gitlabb CI/CD workflow to work, please execute the following steps:
¶ 1. If not already present, install and setup a SSH server on your machine (like OpenSSH)
If you have selected ubuntu server as your operating system, you can follow this guide by canonical. Please make sure to install the server components, not the openssh-client.
¶ 2. Create a group in a Gitlab instance of your choosing
See the Gitlab instructions here.
If you want to receive contious updates from our repositories, without manual efforts, a GitLab Premium instance is needed (see How to mirror a Gitlab project). Otherwise the free tier is sufficient.
¶ 3. Setup Gitlab Runners
Gitlab requires runners to execute CI/CD jobs. Those runners contiously fetch CI/CD jobs from Gitlab and execute them.
Runners can be installed directly on a machine or setup via Docker containers. We recommend the container-based setup. For the PADME deployment at least one runner is required, but we recommend setting up 5 runners to enable parallel job execution and reduce deployment times.
Your runners can be installed on the target machine for the PADME components or any other machine available to you. However, for our setup to work it is required that the machine hosting the runners can access the target machine via ssh. If your gitlab instance already providers runners to you, please check that this requirement is fulfilled.
Please follow these instructions from Gitlab to setup your runner(s). Register the runners in the group you created in step 2 via a registration token.
During the registration of the runner, select docker as the executer. For the default docker image you can use docker:23-git
¶ 4. Setup a system user
For all our deployment tasks we will access the target machine via ssh (see workflow above). This access requires a system user, which we will setup in the following. This user does not require elevated rights (su/sudo) and should only be used for PADME releated deployments. Please execute the following steps to create the user:
The following instructions should work on ubuntu/debian based linux systems. If your operating system is Windows or Mac please perform equivalent settings yourself.
4.1 Create a new user called deployment. Select a suitable passord in the upcoming prompt
sudo adduser deployment
4.2 Add new user to docker group
sudo usermod -aG docker deployment
4.3 Create ssh key pair for the user that will be used for the ssh-based access (The key should have no password; The key location can be choosen freely; You can adjust any other parameters as needed)
ssh-keygen
In the following we assume that the keys are stored in the default location (/home/deployment/.ssh/id_rsa and id_rsa.pub respectively)
4.4 Configure the new keys for ssh access
Create a copy of the public key (/home/deployment/.ssh/id_rsa.pub) to a file in the same folder named authorized_keys. This enables the ssh login with the new key pair:
~/home/deployment/ssh: cp id_rsa.pub authorized_keys
Steps 4.5 and 4.6 are optional by recommended for additional security
4.5 Disable ssh-based password logins for the new user. For this, add the following lines to the ssh-configuration file in /etc/ssh/sshd_config:
Match User deployment
    PasswordAuthentication no
Match all
4.6 Restart the SSH service to activate the new policy.
Caution: Do not close your current SSH connection till after you have verified you can still login after the service restart! Your current session is kept open even when the service is restarted. So if the login failes after the restart, you can use your existing session to fix and problems that might arise with the config adjustments
sudo service sshd restart
¶ 5. Configure the deployment image
During the deployment via CI/CD pipelines, we require some utilities (e.g. ssh client and helper scripts). To streamline the deployment of all repositories, we encapsulate those utilties in a docker image. This image is used for all deployment jobs and therefore needs to be setup in your environment as well. Please execute the following steps:
5.1 Mirror the deployment repository to your GitLab instance. See how to mirror a Gitlab project.
5.2 Follow the instructions in the projects’ Readme to configure the image for your environment
5.3. Wait for the CI/CD job to succeed
Every subsequently mirrored repository needs to be given access to the newly setup deployment image. See how to provide accesss to the deployment image for instructions how to do so. Otherwise your CI/CD job will fail. See CI/CD pipelines failed to pull deployment image.
¶ 6. Configure the group level CI/CD variables
As mentioned previously, the PADME deployment can be configured to your environment via Gitlab CI/CD variables. Most of those variables are specified on a project level and need to be setup when deploying the corresponding service. However, some variables are use throught all services. To have a single source of truth for those variables, they are configured on the Gitlab group level. Please specify the following CI/CD variables in your GitLab group (from Step 2) before proceeding:
All our deployment scripts are setup in such a way that they check whether all needed variables are defined. When a new variable is introduced through an update or you forget to define one, the corresponding CI/CD job will fail, stating which values are missing.
| Variable Name | Description | Example value |
|---|---|---|
| SERVICE_DOMAIN | The domain under which your services will operate. This is used by the reverse proxy (see Preparing a machine for deployment | padme-analytics.de |
| PROD_SERVICE_DOMAIN | Should be set to $SERVICE_DOMAIN (the same value as service domain). This variable exists due to technical reasons on our side | $SERVICE_DOMAIN |
| MAIL_FROM_ADDRESS | The mail address that should be used to send emails from our services (e.g. Station onboarding mails). This mail address does not really need to exist | no-reply@padme-analytics.de |
| MAIL_REPLY_TO_ADDRESS | The mail address to which users should send replies if that want to respond to automated emails (e.g. Station onboarding mail). This should be a real email address that is actively monitored | pht@dbis.rwth-aachen.de |
| METADATA_STORE_REGISTRY_KEY | This is the secret that is used by the services to send metadata items to the metadata store. It should be a randomized string with at least 15 characters. | sIV2AD0JC5im8n2ZSh7PBHFkY |
Lastly, we recommend storing the private key of the deployment user from step 4 in a group-level variable with a name of your choosing. For example, one could use MACHINE_NAME_PRIVATE_KEY. Later, you will need to configure this key for every deployed service. Therfore, having it stored once in a central location allows you to reused it for all needed instances.
Congratulations, you have now successfully prepared your GitLab instance and target machine for the deployment. 🎉🎉
Please proceed with the setup of the required services.
¶ General idea for manual deployments
If you do not want to deploy the services via GitLab CI/CD pipelines but prefer a manual deployment instead, you can adhere to the following ideas.
In our our open source repositories you will find a files called docker-compose.template.yml. This file contains the docker compose template that is used during the CI/CD based deployment. In this template, we replace all variables in the form of ${NAME} with values taken from environment variables. Those environment variables are managed and provided by GitLab. However, one could also copy the compose file and replace those values using our script, without needing Gitlab CI/CD pipelines. Here is the general idea:
-
Copy the
docker-compose.template.ymlfile to a local folder -
Copy our environment variable substitution script to the same folder
-
Create a file called “env” that contains the values for all the environment variables that need to be defined for this service (see instructions for each service below). Moreover, this file needs to contain all group-level variables (See 6. in previous section). The file should have the following format:
VARIABLE_NAME=VARIABLE_VALUE
VARIABLE_NAME2=VARIABLE_VALUE2
...
- Create your compose file from the variables like so
env $(cat env) ./substitute_envs.sh docker-compose.template.yml docker-compose.yml
- Start the services with compose
docker compose up -d
However, for this setup to work your first need to build all the required docker images from the source code yourself. This can e.g. be done by cloning the source. The build instructions can be taken from the Gitlab CI/CD instructions.
Caution: We could like to emphasize that this is not the recommended setup. It can happen at any time that we introduce additional steps during the image build or service deployment that are needed to get our software running. Those steps will need to be replicated by you by hand. Moreover, with this setup, keeping your instance up to date is very cumbersome.
¶ Deploying required services
The following will give instructions on how to deploy the required services. The deployments are provided in one possible deployment order. For all possibilities please see the workflow diagram in the Concept section.
¶ Reverse Proxy
To provide our services to the outer world, we use a NGINX based reverse proxy. This proxy is build on top of the NGINX proxy project on GitHub. The goal is to automatically create NGINX configurations for services using the Docker API and environment variable configurations. Additionally, this setup creates and managed Let’s encrypt certificats for all services. To setup the reverse proxy, do the following:
The NGINX Proxy project on Github provides further information about the ideas of the proxy and how it works
-
Mirror the proxy repository. See how to mirror a GitLab project.
-
Follow the instructions in the repositories’ Readme for the environment variable setup and the deployment
Done, you have successfully deployed the reverse proxy 🎉
¶ Vault
We use HashiCorp Vault as a secret storage and Encryption as a Service (EaaS) provider in our ecosystem. To setup vault, do the following
-
Mirror the vault repository. See how to mirror a GitLab project.
-
Follow the instructions in the repositories’ Readme for the environment variable setup and the subsequent configuration
Done, you have successfully deployed vault 🎉
¶ Keycloak
We use Keycloak as our Identitiy and Acceess Management (IAM) solution. To setup keycloak, do the following:
-
Mirror the keycloak repository. See how to mirror a GitLab project.
-
Follow the instructions in the repositories’ Readme for the environment variable setup and the subsequent configuration. Make sure you to create the needed realms and the administrator account.
You should now be able to navigate to https://auth.${SERVICE_DOMAIN} to view your keycloak instance.
Now you have successfully deployed Keycloak 🎉
With the keycloak deployment we will only perform the minimal needed configuration. Every service that uses and interacts with keycloak needs its own corresponding configuration. Therefore, we will describe the Keycloak setup for each service at the respective section describing the service deployment.
¶ Docker in Docker (dind)
The PADME ecosystem requires a docker in docker container such that it can run the use cases with docker while being deployed with docker itself. Due to some technical limitations, we use a dind image version which contains some additions compared to the upstream image provided by Docker itself. You can read the Readme in the corresponding dind repository if you want to have to have further details on those additions and the reasonsing behind the changes. To deploy dind, perform the following steps:
-
Mirror the dind repository. See how to mirror a GitLab project.
-
Wait for the CI/CD pipeline to finish. Unlike the other projects, this project does not require any additional environment variable configurations. However, you will need to give the consuming projects access to the dind image, similar to the deployment image we configured previously. This guide will mention this again with the needed instructions for those projects.
¶ Harbor
Harbor is the container registry used in the PADME ecosystem. While there are many registries available (such as the official one by Docker), Habor offers additional features that are used in our ecosystem. For example, it provides integration with OIDC providers, such as Keycloak, Webhooks for event-based processing, and support for Cosign, an container image signing solution. To deploy harbor, perform the following steps:
-
Mirror the harbor repository. See how to mirror a GitLab project.
-
Follow the instructions in the repositories’ Readme for the environment variable setup and the subsequent configuration. Make sure to read the information about custom configuration and to perform any subsequent setup steps (like configuring Keycloak).
Congratulations, you have now successfully deployed Harbor🎉
¶ Centralservice
Centralservice (CS) is the central component of the PADME ecosystem. It orchestrates the execution of trains (like which trains are going to which station and in what order etc.) and also gives you information about the available trains, stations and previous and current jobs. All of this information can be viewed via the CS Web App. The access to CS is managed by the same Keycloak service deployed in the previous step. To deploy CS, perform the following steps:
- Mirror the padme-central-service repository.
- Follow the instructions in the repository README for the environment variable setup and subsequent configurations. Make sure to read the information about custom configuration and to perform any subsequent setup steps (like configuring Keycloak).
You should now be able to navigate to https://requester.${SERVICE_DOMAIN} to access your CS web app.
Congratulations, you have now successfully deployed Central Service🎉
¶ Deploying optional service
The following will give instructions on how to deploy the optional services. While those services are not strictly required to operate a instance of the PADME ecosystem they offer additional features.
¶ Playground
The playground offers the possibility to simulate a PADME analysis run in a Juypter-Notebook like environment. For this, it creates synthetic data sources that replicate existing, real-world instances. It then allows you to iterativly develop and test your algorithms to ensure they are functional from a technical perspective. Read the Readme file in the playgrounds’ repository for further information, instructions on the useage, screenshots and a demo video. To deploy the playground, perform the following steps:
-
Mirror the playground repository. See how to mirror a GitLab project.
-
Setup the previously mirrored dind repository to allow access to the playground. See how to provide accesss to the deployment image, which describes all the needed steps in for the deployment repository. Perform the same steps but for the dind repository.
-
Follow the instructions in the repositories’ Readme for the environment variable setup and the subsequent configuration. Make sure you perform the needed keycloak setup. The Readme also provides instructions how to fill the Playground with data.
You should now be able to navigate to https://playground.${YOUR_DOMAIN} to view your playground instance.
Congratulation, you have successfully deployed the PADME playground 🎉
¶ Metadata components
The PADME metadata infrastructure is responsible for providing semantic information about the different components of the PADME ecosystem. The information is represented with the PHT metadata schema. At the moment, the infrastructure only traces information about the execution of trains. To setup the PADME metadata components, do the following:
-
Mirror the metadata repository. See how to mirror a GitLab project.
-
Follow the instructions in the repositories’ Readme for the environment variable setup. Execute the CI/CD pipeline and wait for it to succeed.
You should now be able to navigate to https://metadata.${YOUR_DOMAIN}. However, this component is mainly used through its api, which is why this will only show a blank page.
Congratulation, you have successfully deployed the metadata components 🎉
¶ Train Depot
The Train Depot is a custom Gitlab instance that is integrated with the PADME Keycloak, Train Creator and Train Storehouse (see below). It stores the analysis codes (aka Trains) in two gitlab repositories, namely padme-train-depot and padme-federated-train-depot. The repositories are configured to build the code and push it to the harbor registry whenever any new changes are pushed to the main branch. To setup the Train Depot, do the following:
-
Mirror the train-depot repository. See how to mirror a GitLab project.
-
Follow the instructions in the repositories’ README for the environment variable setup. Execute the CI/CD pipeline and wait for it to succeed.
You should now be able to navigate to https://depot.${YOUR_DOMAIN}. You can login with either the root credentials (which you would have got during the first deployment) or with a Keycloak account. Note that depending on the configuration of the Gitlab instance, your keycloak account may need to be approved by an admin before you can login.
Congratulation, you have successfully deployed the train depot 🎉
¶ Train Creator
The Train Creator app helps users to upload their analysis or training code and help convert it to a train which can then be published to the Harbor Repository. The train will then be visible in Requester and can be sent to stations. To setup the PADME Train Creator, do the following:
-
Mirror the train-creation-wizard repository. See how to mirror a GitLab project.
-
Follow the instructions in the repositories’ README for the environment variable setup. Execute the CI/CD pipeline and wait for it to succeed.
You should now be able to navigate to https://creator.${YOUR_DOMAIN}. Before you can use the train creator to push images, you may need to setup a personal access token in the Train Depot at https://depot.${YOUR_DOMAIN} with required access rights. The creator app will display the instructions on how to do it, once you login.
Congratulation, you have successfully deployed the train creator app 🎉
¶ Train Storehouse
The Train Storehouse is an app store platform to display all published train images in the official train depot for the PHT infrastructure. It helps users to provide feedback and review existing trains and also approve it and publish it to the Harbor Repository. The train will then be visible in Requester and can be sent to stations. To setup the PADME Train Storehouse Platform, do the following:
-
Mirror the padme-storehouse-platform repository. See how to mirror a GitLab project.
-
Follow the instructions in the repositories’ README for the environment variable setup. Execute the CI/CD pipeline and wait for it to succeed.
You should now be able to navigate to https://storehouse.${YOUR_DOMAIN}. Before you can use the train storehouse platform to submit reviews and approve trains, you may need to setup a personal access token in the Train Depot at https://depot.${YOUR_DOMAIN} with required access rights. The storehouse app will display the instructions on how to do it, once you login.
Congratulation, you have successfully deployed the train storehouse app 🎉
¶ Miscellaneous
¶ How to mirror a GitLab project
There are two approaches to setting up a mirror of our open source repositories. Firstly, GitLab offers a so-called Pull mirror which automatically fetches changes from our upstream repository to yours. However, pull-mirroring requires a Gitlab Premium License. If you do not have such a license, you can also perform the mirror by hand. No matter which approach you choose, please execute the following setps first:
- Create a new project in your group with the same name as the repository that should be mirrored
Navigate to your Gitlab group and select “New Project” in the top right corner. In the next page, choose “Create Blank Project”. Untick the “Initialize repository with a README” checkbox and enter the project name. If the new project should be called deployment the settings should look like this:
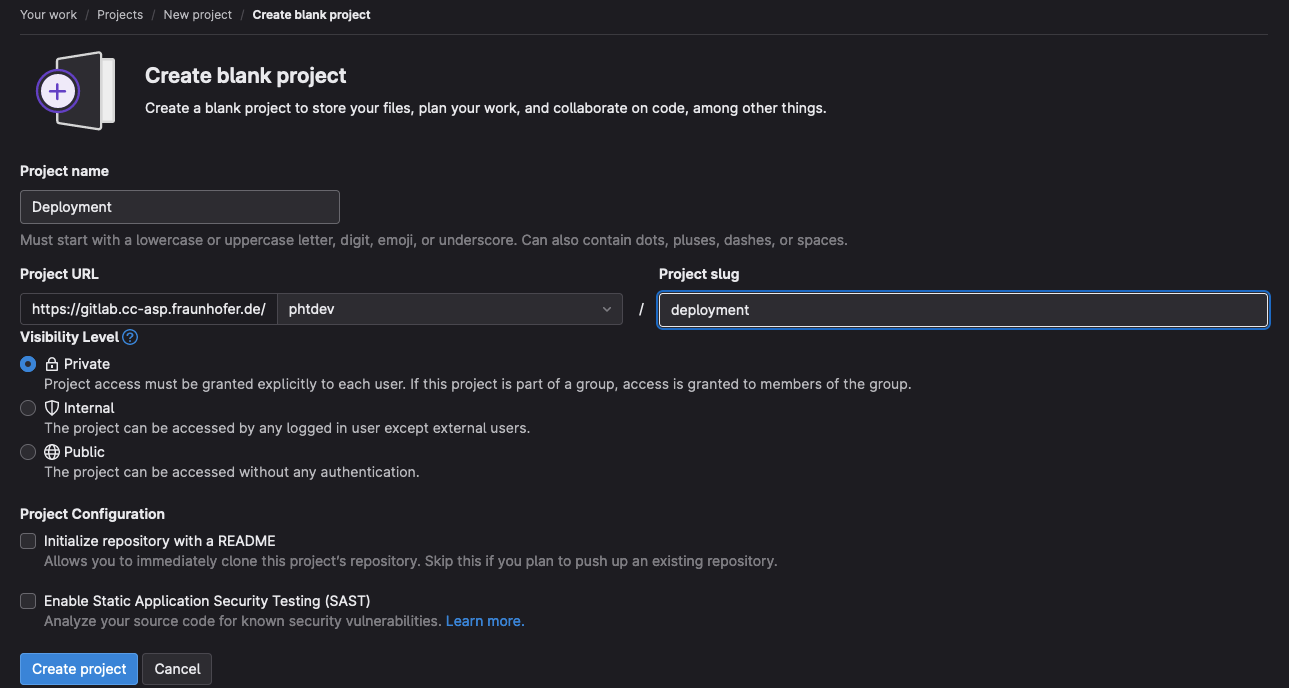
Confirm your choice by clicking on “Create project”
- Allow access to the deployment image for the new repository.
See how to provide accesss to the deployment image
Now proceed either with the automatic or manual mirror.
¶ Automatic mirror through Gitlab pull mirroring
-
Open the project you created in the first step.
-
Navigate to Settings -> Repository. Scroll to “Mirroring repositories” and click “Expand”.
-
In a seperate tab, open the project that should be mirrored. Click the “Clone” button and copy the “Clone with HTTPS” url.
-
Enter it into the mirror configuration page (it is important to have the ‘.git’ at the end, otherwise cloning will not work).
-
In the mirror configuration, select ‘Pull’ as the mirror direction. You do not need to specify a password since our repositories are openly accessible.
-
Check the “Mirror only protected branches” box, this will only mirror the release branches of our projects.
-
Lastly, if you want to automatically deploy any upstream updates, check “Trigger pipelines for mirror updates”. If you do not chose this option, you need to manually trigger the CI/CD pipeline to deploy updates.
Overall, this should look like the following:

- Confirm by pressing “Mirror repository”
¶ Manual mirror
It is also possible to mirror the projects manualy. The drawback of this approach is that manual steps are required whenever you want to update the software to the latest release. For a manual mirror, perform the following:
- Clone the target project to your local machine using either HTTPS or SSH
- Navigate to the new project from step 1, which is the target for the mirror. Copy the target URL from the “Clone” button
- Locally, in the cloned repository execute the following
git remote add mirror <URL from step 2>
Now whenever you want to update your repository with the latest changes from our repository, execute the following
git pull origin main
git push mirror main
¶ How to provide accesss to the deployment image
To use our deployment image in other projects or your group, your need to give access to those projects by executing the following setups. For those steps we assume your Gitlab Group is named phtdev and the target project to give access to is called test
- Navigate the the deployment image repository. Open Settings -> CI/CD. Then scroll to “Token Access”
- Click on “Expand”
- In the section “Allow access to this project with a CI_JOB_TOKEN” paste the following project path (replace your group and project names accordingly)
phtdev/test
- Click on “Add Project”
Now the access should be configured
¶ Common Errors
¶ CI/CD: Failed to pull image “…/deployment/image:main”
If you see the following error message in your CI/CD job:
failed to pull image "registry.YOUR_GITLAB_ADDRESS/YOUR_GROUP_NAME/deployment/image:main" with specified policies
This means the corresponding repository does not have the needed access to the deployment image. See How to provide accesss to the deployment image on how to fix this.